Difference between revisions of "VPN Lifeguard"
(Created page with "<div class="wrapper"> <div class="wrapleft"> <div class="left"> <span class="plainlinks">[http://wiki.btguard.com/images/vpnlifeguard_1.png http://wiki.btguard.com/imag...") |
|||
| (11 intermediate revisions by the same user not shown) | |||
| Line 2: | Line 2: | ||
<div class="wrapleft"> | <div class="wrapleft"> | ||
<div class="left"> | <div class="left"> | ||
| − | <span class="plainlinks">[ | + | <span class="plainlinks">[https://wiki.btguard.com/images/vpnlifeguard_1.png https://wiki.btguard.com/images/vpnlifeguard_1.png]</span> |
</div> | </div> | ||
</div> | </div> | ||
<div class="right"> | <div class="right"> | ||
<p> | <p> | ||
| − | + | == Setup Instructions == | |
| + | This software '''only''' works with the '''PPTP''' protocol. <br/> | ||
<br/> | <br/> | ||
| − | + | [https://vpnlifeguard.blogspot.com/p/english.html VPN Lifeguard] will monitor the status of your VPN connection and will automatically try to reconnect you to the VPN if you're disconnected. <br/> | |
| − | + | <br/> | |
| − | </ | + | This program will also allow you to select up to 6 programs that will automatically be shutdown when disconnected and reopened when reconnected.<br/> |
| − | + | <br/> | |
| − | + | 1. Download the [https://sourceforge.net/projects/vpnlifeguard/ VPN Lifeguard] zip file. <br/> | |
| − | + | <br/> | |
| − | < | + | 2. Open the file '''VPNLifeguard.zip''' and extract the '''VPNLifeguard folder''' and it's content to the location you wish to install it. <br/> |
| − | + | <br/> | |
| − | + | 3. Open the folder you just extracted and '''right click''' on the '''VPNLifeguard''' icon and hit '''Properties'''. | |
| − | + | ||
| − | + | ||
| − | + | ||
| − | + | ||
| − | + | ||
| − | + | ||
<br/> | <br/> | ||
</p> | </p> | ||
| Line 34: | Line 29: | ||
<div class="wrapleft"> | <div class="wrapleft"> | ||
<div class="left"> | <div class="left"> | ||
| − | <span class="plainlinks">[ | + | <span class="plainlinks">[https://wiki.btguard.com/images/vpnlifeguard_2.png https://wiki.btguard.com/images/vpnlifeguard_2.png]</span> |
</div> | </div> | ||
</div> | </div> | ||
<div class="right"> | <div class="right"> | ||
<p> | <p> | ||
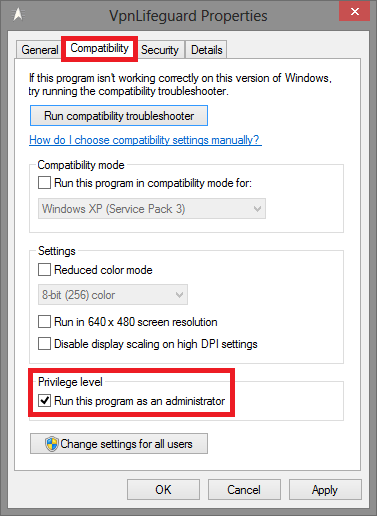
| − | + | 4. Click on the '''Compatibility''' tab and checkmark '''Run this program as an administrator''' and hit '''OK'''. | |
<br/> | <br/> | ||
</p> | </p> | ||
| Line 50: | Line 45: | ||
<div class="wrapleft"> | <div class="wrapleft"> | ||
<div class="left"> | <div class="left"> | ||
| − | <span class="plainlinks">[ | + | <span class="plainlinks">[https://wiki.btguard.com/images/vpnlifeguard_3.png https://wiki.btguard.com/images/vpnlifeguard_3.png]</span> |
</div> | </div> | ||
</div> | </div> | ||
<div class="right"> | <div class="right"> | ||
<p> | <p> | ||
| − | + | 5. Connect to the VPN using the PPTP protocol.<br/> | |
| + | <br/> | ||
| + | ''Make sure you are connected to the VPN before the next step!''<br/> | ||
| + | <br/> | ||
| + | 6. Open '''VPNLifeguard''' and click on '''Config.'''. | ||
<br/> | <br/> | ||
</p> | </p> | ||
| Line 66: | Line 65: | ||
<div class="wrapleft"> | <div class="wrapleft"> | ||
<div class="left"> | <div class="left"> | ||
| − | <span class="plainlinks">[ | + | <span class="plainlinks">[https://wiki.btguard.com/images/vpnlifeguard_4.png https://wiki.btguard.com/images/vpnlifeguard_4.png]</span> |
</div> | </div> | ||
</div> | </div> | ||
<div class="right"> | <div class="right"> | ||
<p> | <p> | ||
| − | + | 7. Select the '''Number''' of softwares you'd like to be managed by VPN Lifeguard. (in this case I chose two, for utorrent and qbittorrent).<br/> <br/> | |
| + | 8. Hit '''Browse...''' and locate the .exe file of the first program you choose and repeat for the next one. <br/> | ||
<br/> | <br/> | ||
| + | ''Make sure you are still connected to the VPN before the next step!''<br/> | ||
| + | <br/> | ||
| + | 9. Click on '''List IP''' and both '''Local IP of VPN''' and '''IP of the box''' should be filled correctly depending on your network. <br/> | ||
| + | If you're having problems connecting, try to check '''In case of trouble''' and click on '''List IP''' again.<br/> | ||
| + | <br/> | ||
| + | All other settings are optional. <br/> | ||
| + | <br/> | ||
| + | 10. Click on '''Close'''. <br/> | ||
</p> | </p> | ||
</div> | </div> | ||
| Line 82: | Line 90: | ||
<div class="wrapleft"> | <div class="wrapleft"> | ||
<div class="left"> | <div class="left"> | ||
| − | <span class="plainlinks">[ | + | <span class="plainlinks">[https://wiki.btguard.com/images/vpnlifeguard_5.png https://wiki.btguard.com/images/vpnlifeguard_5.png]</span> |
</div> | </div> | ||
</div> | </div> | ||
<div class="right"> | <div class="right"> | ||
<p> | <p> | ||
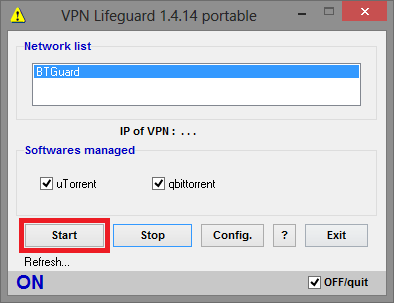
| − | + | 11. Click on '''Start'''. | |
<br/> | <br/> | ||
</p> | </p> | ||
| Line 98: | Line 106: | ||
<div class="wrapleft"> | <div class="wrapleft"> | ||
<div class="left"> | <div class="left"> | ||
| − | <span class="plainlinks">[ | + | <span class="plainlinks">[https://wiki.btguard.com/images/vpnlifeguard_6.png https://wiki.btguard.com/images/vpnlifeguard_6.png]</span> |
</div> | </div> | ||
</div> | </div> | ||
<div class="right"> | <div class="right"> | ||
<p> | <p> | ||
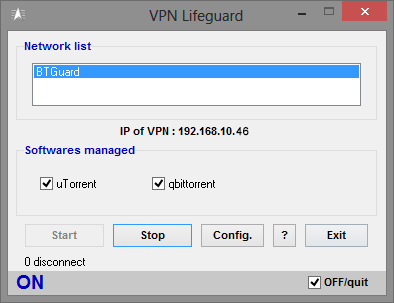
| − | + | 12. VPN Lifeguard is active and connected to the VPN when the top left icon changes from the warning sign to the VPNLifeguard icon.<br/> | |
<br/> | <br/> | ||
</p> | </p> | ||
</div> | </div> | ||
</div> | </div> | ||
Latest revision as of 01:08, 12 June 2013
Setup Instructions
This software only works with the PPTP protocol.
VPN Lifeguard will monitor the status of your VPN connection and will automatically try to reconnect you to the VPN if you're disconnected.
This program will also allow you to select up to 6 programs that will automatically be shutdown when disconnected and reopened when reconnected.
1. Download the VPN Lifeguard zip file.
2. Open the file VPNLifeguard.zip and extract the VPNLifeguard folder and it's content to the location you wish to install it.
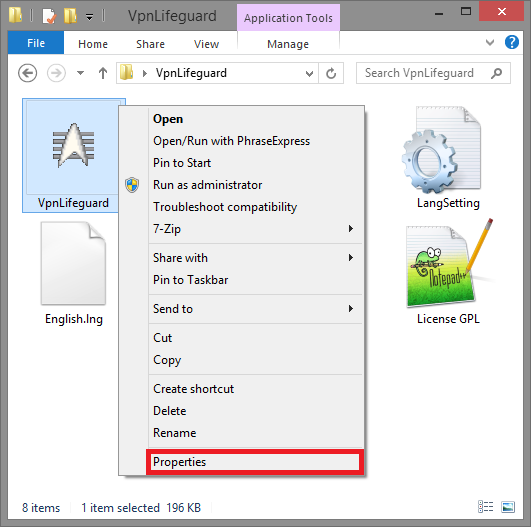
3. Open the folder you just extracted and right click on the VPNLifeguard icon and hit Properties.
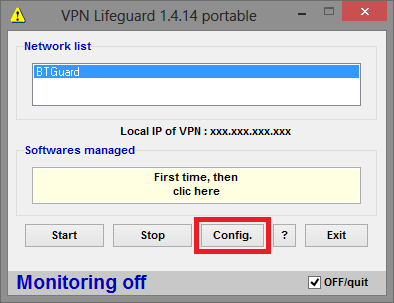
5. Connect to the VPN using the PPTP protocol.
Make sure you are connected to the VPN before the next step!
6. Open VPNLifeguard and click on Config..
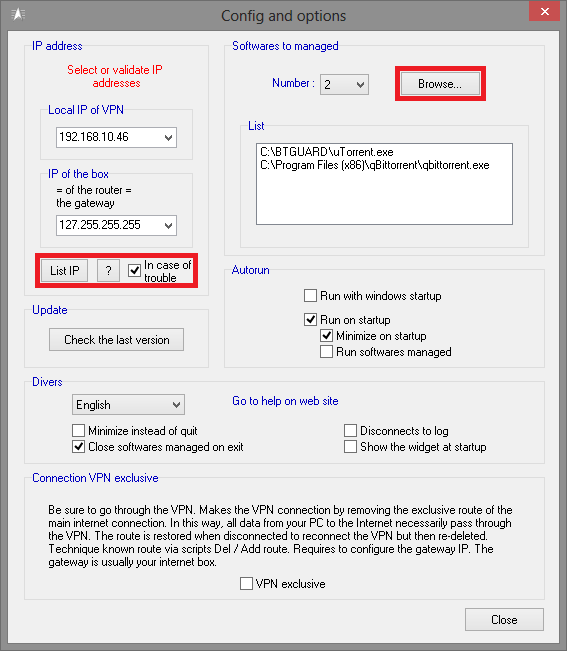
7. Select the Number of softwares you'd like to be managed by VPN Lifeguard. (in this case I chose two, for utorrent and qbittorrent).
8. Hit Browse... and locate the .exe file of the first program you choose and repeat for the next one.
Make sure you are still connected to the VPN before the next step!
9. Click on List IP and both Local IP of VPN and IP of the box should be filled correctly depending on your network.
If you're having problems connecting, try to check In case of trouble and click on List IP again.
All other settings are optional.
10. Click on Close.
