Difference between revisions of "PPTP iOS"
From BTGuard Wiki
| (6 intermediate revisions by the same user not shown) | |||
| Line 1: | Line 1: | ||
| − | <div | + | <div class="wrapper3"> |
| − | <div class=" | + | <div class="wrapleft3"> |
| − | + | <div class="left3"> | |
| − | </div> | + | <span class="plainlinks">[https://wiki.btguard.com/images/6/6c/Vpn_pptp_ios_1.PNG https://wiki.btguard.com/images/6/6c/Vpn_pptp_ios_1.PNG]</span> |
| − | + | </div> | |
| − | <div class=" | + | </div> |
| − | <p | + | <div class="right3"> |
| − | + | <p> | |
== Setup Instructions == | == Setup Instructions == | ||
| − | |||
| − | |||
| − | |||
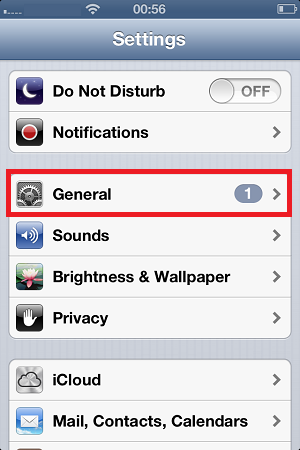
1. Go to '''Settings''' and select '''General'''<br/> | 1. Go to '''Settings''' and select '''General'''<br/> | ||
</p> | </p> | ||
| Line 16: | Line 13: | ||
</div> | </div> | ||
| − | + | <div class="wrapper3"> | |
| − | + | <div class="wrapleft3"> | |
| − | <div | + | <div class="left3"> |
| − | <div class=" | + | <span class="plainlinks">[https://wiki.btguard.com/images/e/e7/Vpn_pptp_ios_2.PNG https://wiki.btguard.com/images/e/e7/Vpn_pptp_ios_2.PNG]</span> |
| − | + | </div> | |
| − | </div> | + | </div> |
| − | + | <div class="right3"> | |
| − | <div class=" | + | <p> |
| − | <p | + | |
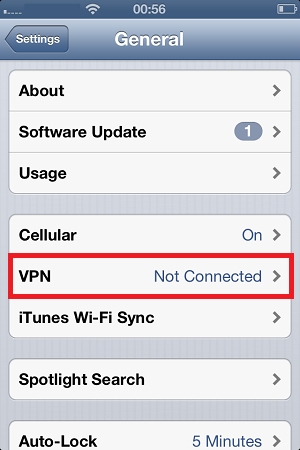
2. Tap on '''VPN'''<br/> | 2. Tap on '''VPN'''<br/> | ||
</p> | </p> | ||
| Line 30: | Line 26: | ||
</div> | </div> | ||
| − | + | <div class="wrapper3"> | |
| − | + | <div class="wrapleft3"> | |
| − | <div | + | <div class="left3"> |
| − | <div class=" | + | <span class="plainlinks">[https://wiki.btguard.com/images/a/a4/Vpn_pptp_ios_3.PNG https://wiki.btguard.com/images/a/a4/Vpn_pptp_ios_3.PNG]</span> |
| − | + | </div> | |
| − | </div> | + | </div> |
| − | + | <div class="right3"> | |
| − | <div class=" | + | <p> |
| − | <p | + | |
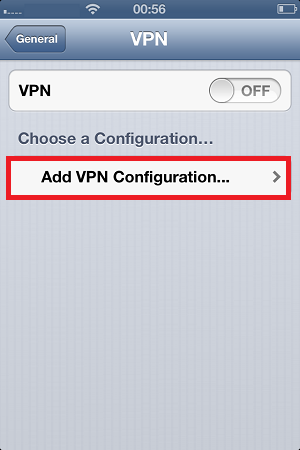
3. Tap on '''Add VPN Configuration'''<br/> | 3. Tap on '''Add VPN Configuration'''<br/> | ||
</p> | </p> | ||
| Line 44: | Line 39: | ||
</div> | </div> | ||
| − | + | <div class="wrapper3"> | |
| − | + | <div class="wrapleft3"> | |
| − | <div | + | <div class="left3"> |
| − | <div class=" | + | <span class="plainlinks">[https://wiki.btguard.com/images/4/44/Vpn_pptp_ios_4.PNG https://wiki.btguard.com/images/4/44/Vpn_pptp_ios_4.PNG]</span> |
| − | + | </div> | |
| − | </div> | + | </div> |
| − | + | <div class="right3"> | |
| − | <div class=" | + | <p> |
| − | <p | + | |
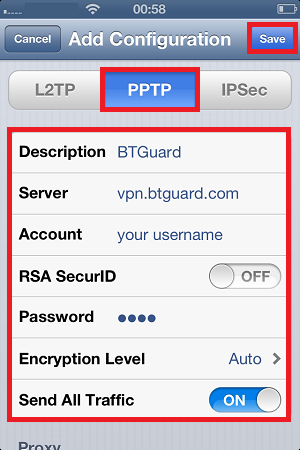
4. Select '''PPTP'''<br/> | 4. Select '''PPTP'''<br/> | ||
5. In the box below PPTP, enter the following information:<br/> | 5. In the box below PPTP, enter the following information:<br/> | ||
| Line 63: | Line 57: | ||
Encryption Level: '''Auto'''<br/> | Encryption Level: '''Auto'''<br/> | ||
Send All Traffic: '''ON'''<br/> | Send All Traffic: '''ON'''<br/> | ||
| + | ''Both username and password are case sensitive. Make sure not to add/forget Capital Letters.'' <br/> | ||
6. Hit Save<br/> | 6. Hit Save<br/> | ||
<br/> | <br/> | ||
| Line 71: | Line 66: | ||
| + | <div class="wrapper3"><br/> | ||
| + | ---- | ||
| + | <br/></div> | ||
| − | |||
| − | |||
| − | |||
| − | |||
| − | |||
| − | |||
| + | <div class="wrapper3"> | ||
| + | <div class="wrapleft3"> | ||
| + | <div class="left3"> | ||
| + | <span class="plainlinks">[https://wiki.btguard.com/images/8/84/Vpn_pptp_ios_5.PNG https://wiki.btguard.com/images/8/84/Vpn_pptp_ios_5.PNG]</span> | ||
| + | </div> | ||
| + | </div> | ||
| + | <div class="right3"> | ||
| + | <p> | ||
== How To Connect == | == How To Connect == | ||
| − | |||
| − | |||
| − | |||
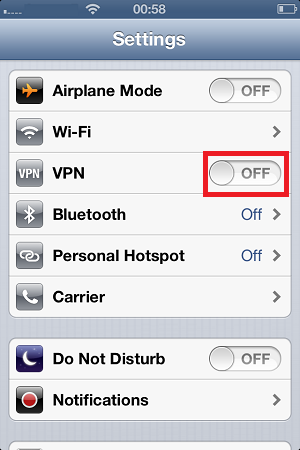
1. Go to '''Settings''' and hit on the '''OFF''' button next to '''VPN'''<br/> | 1. Go to '''Settings''' and hit on the '''OFF''' button next to '''VPN'''<br/> | ||
</p> | </p> | ||
| Line 89: | Line 86: | ||
</div> | </div> | ||
| − | + | <div class="wrapper3"> | |
| − | + | <div class="wrapleft3"> | |
| − | <div | + | <div class="left3"> |
| − | <div class=" | + | <span class="plainlinks">[https://wiki.btguard.com/images/7/76/Vpn_pptp_ios_6.PNG https://wiki.btguard.com/images/7/76/Vpn_pptp_ios_6.PNG]</span> |
| − | + | </div> | |
| − | </div> | + | </div> |
| − | + | <div class="right3"> | |
| − | <div class=" | + | <p> |
| − | <p | + | |
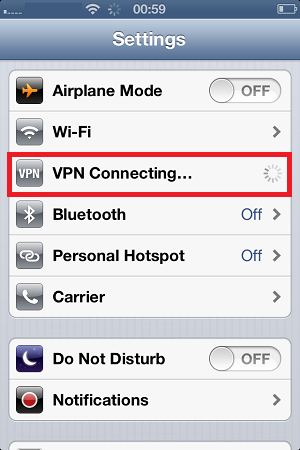
Please wait a few seconds for the VPN to connect.<br/> | Please wait a few seconds for the VPN to connect.<br/> | ||
</p> | </p> | ||
| Line 103: | Line 99: | ||
</div> | </div> | ||
| − | + | <div class="wrapper3"> | |
| − | <div | + | <div class="wrapleft3"> |
| − | <div class=" | + | <div class="left3"> |
| − | + | <span class="plainlinks">[https://wiki.btguard.com/images/2/2a/Vpn_pptp_ios_7.PNG https://wiki.btguard.com/images/2/2a/Vpn_pptp_ios_7.PNG]</span> | |
| − | </div> | + | </div> |
| − | + | </div> | |
| − | <div class=" | + | <div class="right3"> |
| − | <p | + | <p> |
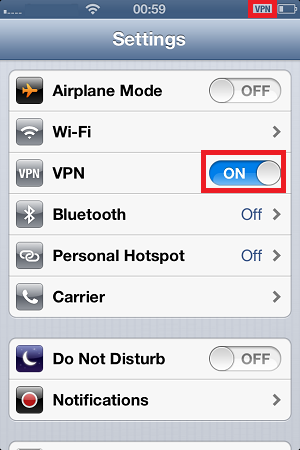
You are now connected!<br/> | You are now connected!<br/> | ||
| − | |||
</p> | </p> | ||
</div> | </div> | ||
</div> | </div> | ||
Latest revision as of 01:17, 12 June 2013
4. Select PPTP
5. In the box below PPTP, enter the following information:
Description: BTGuard
Server: vpn.btguard.com
Optional: To manually select your server location, please use ca.vpn.btguard.com for Canada or eu.vpn.btguard.com for Europe or sg.vpn.btguard.com for Singapore.
Account: Your username
RSA SecurID: OFF
Password: Your Password
Encryption Level: Auto
Send All Traffic: ON
Both username and password are case sensitive. Make sure not to add/forget Capital Letters.
6. Hit Save
Setup Complete!
