Difference between revisions of "OpenVPN Android"
| (15 intermediate revisions by the same user not shown) | |||
| Line 1: | Line 1: | ||
| − | <div class=" | + | __NOTOC__ |
| − | <div class=" | + | <div class="wrapper3"> |
| − | <div class=" | + | <div class="wrapleft3"> |
| − | <span class="plainlinks">[ | + | <div class="left3"> |
| + | <span class="plainlinks">[https://wiki.btguard.com/images/8/87/Openvpn_android_1.png https://wiki.btguard.com/images/8/87/Openvpn_android_1.png]</span> | ||
</div> | </div> | ||
</div> | </div> | ||
| − | <div class=" | + | <div class="right3"> |
<p> | <p> | ||
| − | == Setup Instructions == | + | == Setup Instructions Method 1== |
| − | + | [[OpenVPN_Android#Setup Instructions Method 2|Setup Instructions Method 2]]<br/> | |
| + | <br/> | ||
1. Download and install [https://play.google.com/store/apps/details?id=de.blinkt.openvpn OpenVPN for Android] by Arne Schwabe.<br/> | 1. Download and install [https://play.google.com/store/apps/details?id=de.blinkt.openvpn OpenVPN for Android] by Arne Schwabe.<br/> | ||
| − | 2. Open a browser on your Android device and [https://btguard.com/ | + | 2. Open a browser on your Android device and [https://wiki.btguard.com/uploads/openvpnconnect-config.zip Download the Configuration Files] and unzip the files. <br/> |
| − | ''[https://play.google.com/store/apps/details?id=com. | + | ''[https://play.google.com/store/apps/details?id=com.google.android.apps.nbu.files Files by Google] is a free file manager if you don't have a tool to unzip.'' |
<br/> | <br/> | ||
3. Open OpenVPN for Android and tap on the bottom right icon to import. | 3. Open OpenVPN for Android and tap on the bottom right icon to import. | ||
| Line 21: | Line 23: | ||
| − | <div class=" | + | <div class="wrapper3"> |
| − | <div class=" | + | <div class="wrapleft3"> |
| − | <div class=" | + | <div class="left3"> |
| − | <span class="plainlinks">[ | + | <span class="plainlinks">[https://wiki.btguard.com/images/b/b0/Openvpn_android_2.png https://wiki.btguard.com/images/b/b0/Openvpn_android_2.png]</span> |
</div> | </div> | ||
</div> | </div> | ||
| − | <div class=" | + | <div class="right3"> |
| − | <p> | + | <p style="margin-top:25px"> |
4. Browse to the folder where the configuration files are located. Tap on the server you wish to connect to and hit '''Select'''. | 4. Browse to the folder where the configuration files are located. Tap on the server you wish to connect to and hit '''Select'''. | ||
<br/> | <br/> | ||
| Line 36: | Line 38: | ||
| − | <div class=" | + | <div class="wrapper3"> |
| − | <div class=" | + | <div class="wrapleft3"> |
| − | <div class=" | + | <div class="left3"> |
| − | <span class="plainlinks">[ | + | <span class="plainlinks">[https://wiki.btguard.com/images/3/31/Openvpn_android_3.png https://wiki.btguard.com/images/3/31/Openvpn_android_3.png]</span> |
</div> | </div> | ||
</div> | </div> | ||
| − | <div class=" | + | <div class="right3"> |
<p> | <p> | ||
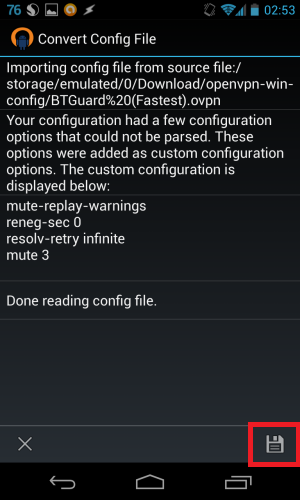
5. Tap on the '''Save icon''' in the bottom right corner. | 5. Tap on the '''Save icon''' in the bottom right corner. | ||
| Line 51: | Line 53: | ||
| − | <div class=" | + | <div class="wrapper3"> |
| − | <div class=" | + | <div class="wrapleft3"> |
| − | <div class=" | + | <div class="left3"> |
| − | <span class="plainlinks">[ | + | <span class="plainlinks">[https://wiki.btguard.com/images/8/89/Openvpn_android_4.png https://wiki.btguard.com/images/8/89/Openvpn_android_4.png]</span> |
</div> | </div> | ||
</div> | </div> | ||
| − | <div class=" | + | <div class="right3"> |
<p> | <p> | ||
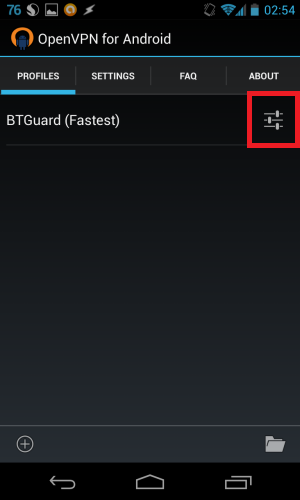
6. Tap on the '''Settings icon'''. | 6. Tap on the '''Settings icon'''. | ||
| Line 66: | Line 68: | ||
| − | <div class=" | + | <div class="wrapper3"> |
| − | <div class=" | + | <div class="wrapleft3"> |
| − | <div class=" | + | <div class="left3"> |
| − | <span class="plainlinks">[ | + | <span class="plainlinks">[https://wiki.btguard.com/images/d/d3/Openvpn_android_5.png https://wiki.btguard.com/images/d/d3/Openvpn_android_5.png]</span> |
</div> | </div> | ||
</div> | </div> | ||
| − | <div class=" | + | <div class="right3"> |
<p> | <p> | ||
7. Hit '''Basic''' | 7. Hit '''Basic''' | ||
| Line 81: | Line 83: | ||
| − | <div class=" | + | <div class="wrapper3"> |
| − | <div class=" | + | <div class="wrapleft3"> |
| − | <div class=" | + | <div class="left3"> |
| − | <span class="plainlinks">[ | + | <span class="plainlinks">[https://wiki.btguard.com/images/0/0e/Openvpn_android_6.png https://wiki.btguard.com/images/0/0e/Openvpn_android_6.png]</span> |
</div> | </div> | ||
</div> | </div> | ||
| − | <div class=" | + | <div class="right3"> |
<p> | <p> | ||
| − | 8. Fill in your | + | 8. Fill in your '''Username''' and '''Password'''.<br/> |
''Both username and password are case sensitive. Make sure not to add/forget Capital Letters.'' <br/> | ''Both username and password are case sensitive. Make sure not to add/forget Capital Letters.'' <br/> | ||
<br/> | <br/> | ||
| Line 97: | Line 99: | ||
| − | <div class=" | + | <div class="wrapper3"> |
| − | <div class=" | + | <div class="wrapleft3"> |
| − | <div class=" | + | <div class="left3"> |
| − | <span class="plainlinks">[ | + | <span class="plainlinks">[https://wiki.btguard.com/images/3/34/Openvpn_android_7.png https://wiki.btguard.com/images/3/34/Openvpn_android_7.png]</span> |
</div> | </div> | ||
</div> | </div> | ||
| − | <div class=" | + | <div class="right3"> |
<p> | <p> | ||
| − | 9. | + | 9. Tap on '''Select...''' next to CA certificate, then browse to the folder where the configuration files are located. Tap on '''btguard.ca.crt''' and hit '''Select'''.<br/> |
10. Hit the back button until you're back at '''the main page'''. <br/> | 10. Hit the back button until you're back at '''the main page'''. <br/> | ||
<br/> | <br/> | ||
| Line 116: | Line 118: | ||
| − | <div | + | <div class="wrapper3"><br/> |
| + | ---- | ||
| + | <br/></div> | ||
| + | |||
| + | |||
| + | <div class="wrapper3"> | ||
| + | <div class="wrapleft3"> | ||
| + | <div class="left3"> | ||
| + | <span class="plainlinks">[https://wiki.btguard.com/images/8/8f/Openvpn_android_8.png https://wiki.btguard.com/images/8/8f/Openvpn_android_8.png]</span> | ||
| + | </div> | ||
| + | </div> | ||
| + | <div class="right3"> | ||
| + | <p> | ||
| + | |||
| + | == How To Connect == | ||
| + | |||
| + | 1. Open OpenVPN for Android and tap on the server you wish to connect to. | ||
<br/> | <br/> | ||
| + | </p> | ||
| + | </div> | ||
| + | </div> | ||
| + | |||
| + | |||
| + | <div class="wrapper3"> | ||
| + | <div class="wrapleft3"> | ||
| + | <div class="left3"> | ||
| + | <span class="plainlinks">[https://wiki.btguard.com/images/e/e6/Openvpn_android_9.png https://wiki.btguard.com/images/e/e6/Openvpn_android_9.png]</span> | ||
| + | </div> | ||
| + | </div> | ||
| + | <div class="right3"> | ||
| + | <p> | ||
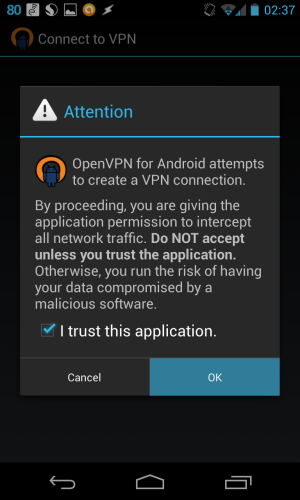
| + | 2. Check '''I trust this application.''' and hit '''OK''' | ||
| + | <br/> | ||
| + | </p> | ||
| + | </div> | ||
| + | </div> | ||
| + | |||
| + | |||
| + | <div class="wrapper3"> | ||
| + | <div class="wrapleft3"> | ||
| + | <div class="left3"> | ||
| + | <span class="plainlinks">[https://wiki.btguard.com/images/4/49/Openvpn_android_10.png https://wiki.btguard.com/images/4/49/Openvpn_android_10.png]</span> | ||
| + | </div> | ||
| + | </div> | ||
| + | <div class="right3"> | ||
| + | <p> | ||
| + | You are now connected! | ||
| + | <br/> | ||
| + | </p> | ||
| + | </div> | ||
| + | </div> | ||
| + | |||
| + | |||
| + | <div class="wrapper"><br/> | ||
---- | ---- | ||
| + | <br/></div> | ||
| + | |||
| + | |||
| + | <div class="wrapper3"> | ||
| + | <div class="wrapleft3"> | ||
| + | <div class="left3"> | ||
| + | <span class="plainlinks">[https://wiki.btguard.com/images/openvpn_android2_1.png https://wiki.btguard.com/images/openvpn_android2_1.png]</span> | ||
| + | </div> | ||
| + | </div> | ||
| + | <div class="right3"> | ||
| + | <p> | ||
| + | |||
| + | == Setup Instructions Method 2== | ||
| + | [[OpenVPN_Android#Setup Instructions Method 1|Setup Instructions Method 1]]<br/> | ||
<br/> | <br/> | ||
| + | 1. Download and install [https://play.google.com/store/apps/details?id=net.openvpn.openvpn OpenVPN Connect].<br/> | ||
| + | 2. Open a browser on your Android device and [https://wiki.btguard.com/uploads/openvpnconnect-config.zip Download the Configuration Files] ''(They are different then in Method 1)'' and unzip the files. <br/> | ||
| + | ''[https://play.google.com/store/apps/details?id=com.google.android.apps.nbu.files Files by Google] is a free file manager if you don't have a tool to unzip.'' | ||
| + | |||
| + | <br/> | ||
| + | 3. Open OpenVPN Connect and tap on the top right icon to import. | ||
| + | <br/> | ||
| + | </p> | ||
| + | </div> | ||
</div> | </div> | ||
| − | <div class=" | + | <div class="wrapper3"> |
| − | <div class=" | + | <div class="wrapleft3"> |
| − | <div class=" | + | <div class="left3"> |
| − | <span class="plainlinks">[ | + | <span class="plainlinks">[https://wiki.btguard.com/images/openvpn_android2_2.png https://wiki.btguard.com/images/openvpn_android2_2.png]</span> |
</div> | </div> | ||
</div> | </div> | ||
| − | <div class=" | + | <div class="right3"> |
| + | <p style="margin-top:25px"> | ||
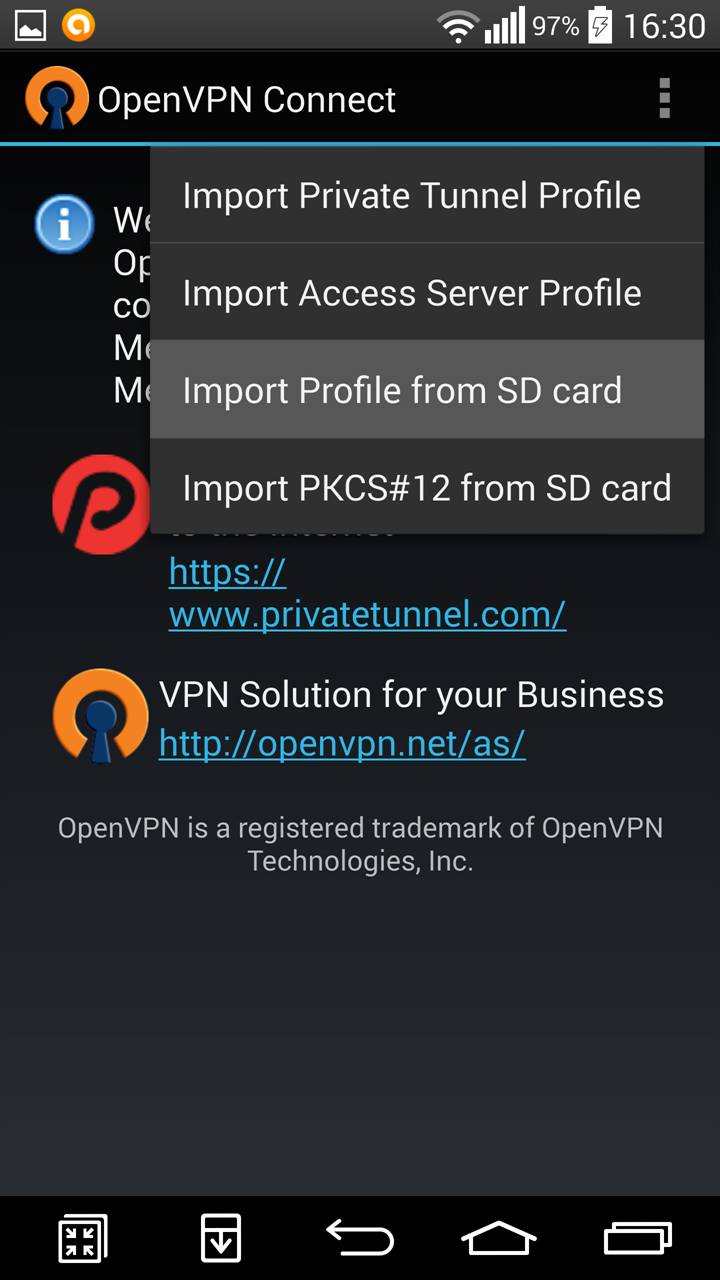
| + | 4. Tap on '''Import Profile from SD card'''<br/> | ||
| + | <br/> | ||
| + | </p> | ||
| + | </div> | ||
| + | </div> | ||
| + | |||
| + | |||
| + | <div class="wrapper3"> | ||
| + | <div class="wrapleft3"> | ||
| + | <div class="left3"> | ||
| + | <span class="plainlinks">[https://wiki.btguard.com/images/openvpn_android2_3.png https://wiki.btguard.com/images/openvpn_android2_3.png]</span> | ||
| + | </div> | ||
| + | </div> | ||
| + | <div class="right3"> | ||
<p> | <p> | ||
| + | 5. Browse to the folder where the configuration files are located. Tap on the server you wish to connect to and hit '''Select'''. | ||
| + | <br/> | ||
| + | </p> | ||
| + | </div> | ||
| + | </div> | ||
| + | |||
| + | <div class="wrapper3"> | ||
| + | <div class="wrapleft3"> | ||
| + | <div class="left3"> | ||
| + | <span class="plainlinks">[https://wiki.btguard.com/images/openvpn_android2_4.png https://wiki.btguard.com/images/openvpn_android2_4.png]</span> | ||
| + | </div> | ||
| + | </div> | ||
| + | <div class="right3"> | ||
| + | <p> | ||
| + | 6. Fill in your '''Username''' and '''Password'''.<br/> | ||
| + | ''Both username and password are case sensitive. Make sure not to add/forget Capital Letters.'' <br/> | ||
| + | <br/> | ||
| + | <br/> | ||
| + | Setup Complete! | ||
| + | </p> | ||
| + | </div> | ||
| + | </div> | ||
| + | |||
| + | |||
| + | <div class="wrapper3"><br/> | ||
| + | ---- | ||
| + | <br/></div> | ||
| + | |||
| + | |||
| + | <div class="wrapper3"> | ||
| + | <div class="wrapleft3"> | ||
| + | <div class="left3"> | ||
| + | <span class="plainlinks">[https://wiki.btguard.com/images/openvpn_android2_4.png https://wiki.btguard.com/images/openvpn_android2_4.png]</span> | ||
| + | </div> | ||
| + | </div> | ||
| + | <div class="right3"> | ||
| + | <p> | ||
== How To Connect == | == How To Connect == | ||
| + | |||
| + | 1. Open OpenVPN Connect and tap on Connect. | ||
<br/> | <br/> | ||
| + | |||
</p> | </p> | ||
</div> | </div> | ||
| Line 141: | Line 273: | ||
| − | <div class=" | + | <div class="wrapper3"> |
| − | <div class=" | + | <div class="wrapleft3"> |
| − | <div class=" | + | <div class="left3"> |
| − | <span class="plainlinks">[ | + | <span class="plainlinks">[https://wiki.btguard.com/images/openvpn_android2_5.png https://wiki.btguard.com/images/openvpn_android2_5.png]</span> |
</div> | </div> | ||
</div> | </div> | ||
| − | <div class=" | + | <div class="right3"> |
<p> | <p> | ||
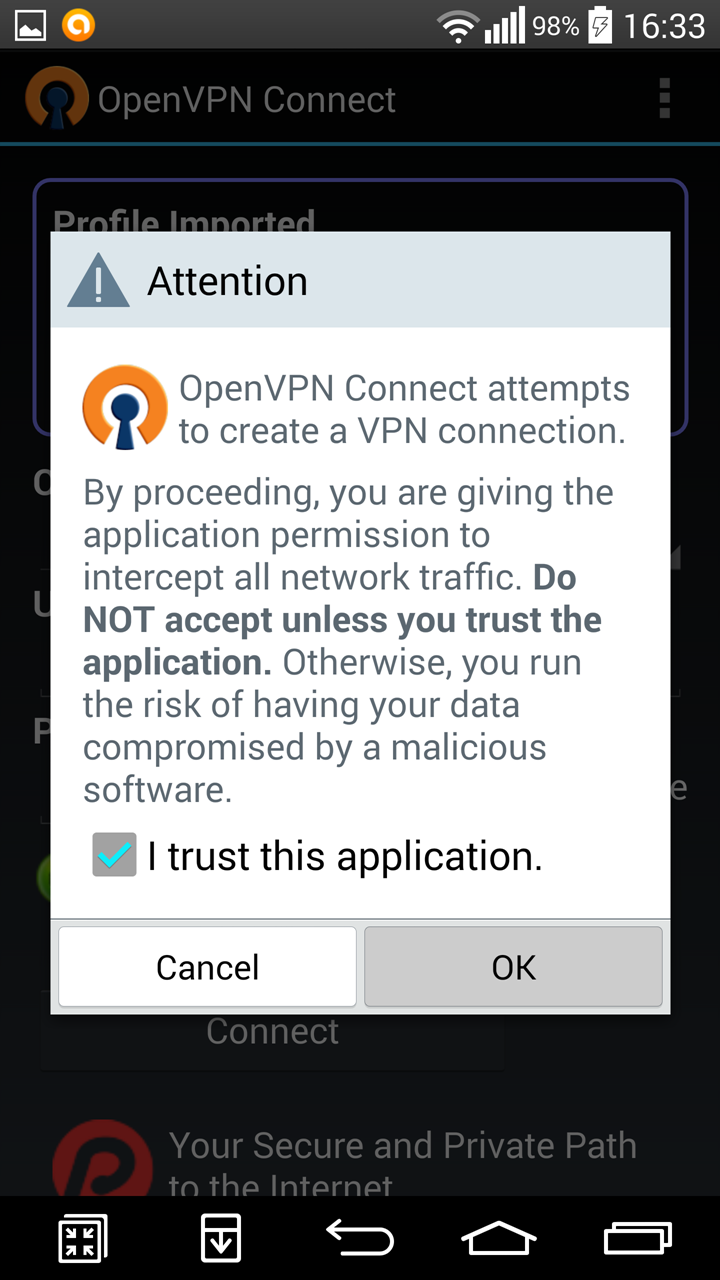
| − | + | 2. Check '''I trust this application.''' and hit '''OK''' | |
<br/> | <br/> | ||
| + | |||
</p> | </p> | ||
</div> | </div> | ||
| Line 156: | Line 289: | ||
| − | <div class=" | + | <div class="wrapper3"> |
| − | <div class=" | + | <div class="wrapleft3"> |
| − | <div class=" | + | <div class="left3"> |
| − | <span class="plainlinks">[ | + | <span class="plainlinks">[https://wiki.btguard.com/images/openvpn_android2_6.png https://wiki.btguard.com/images/openvpn_android2_6.png]</span> |
</div> | </div> | ||
</div> | </div> | ||
| − | <div class=" | + | <div class="right3"> |
<p> | <p> | ||
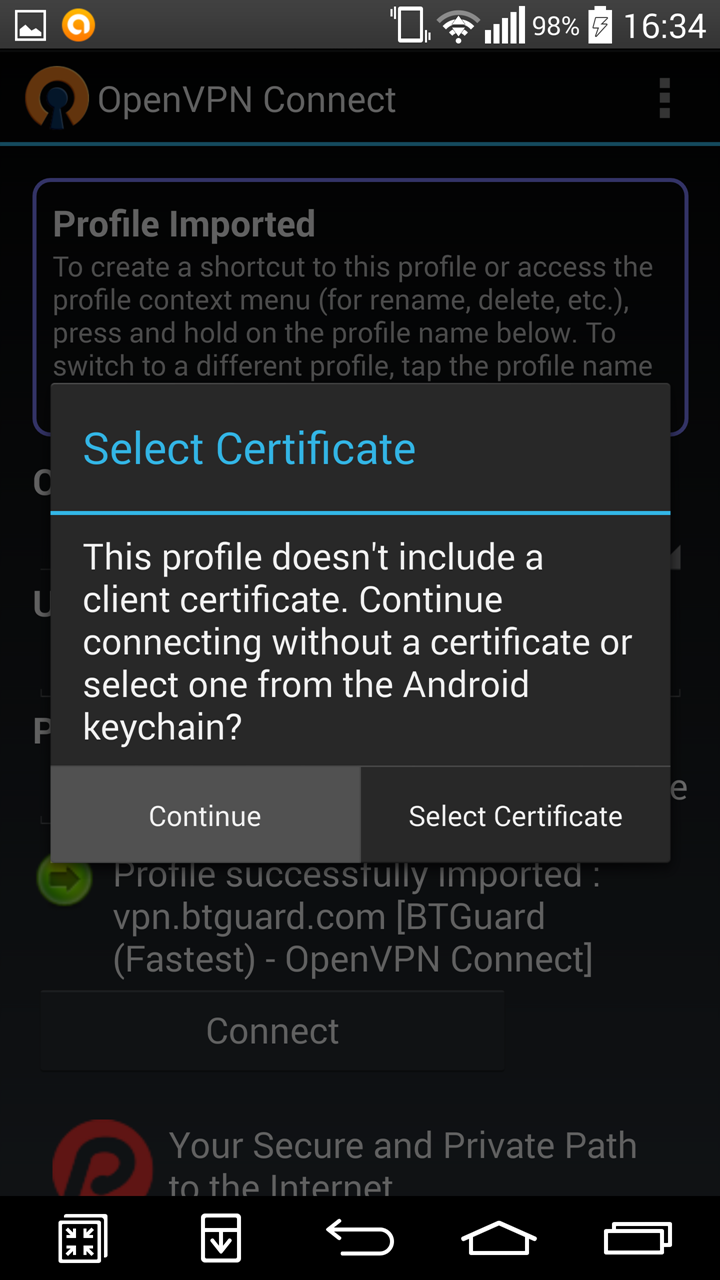
| + | 3. Tap on '''Continue''' | ||
| + | <br/> | ||
| + | </p> | ||
| + | </div> | ||
| + | </div> | ||
| + | |||
| + | <div class="wrapper3"> | ||
| + | <div class="wrapleft3"> | ||
| + | <div class="left3"> | ||
| + | <span class="plainlinks">[https://wiki.btguard.com/images/openvpn_android2_7.png https://wiki.btguard.com/images/openvpn_android2_7.png]</span> | ||
| + | </div> | ||
| + | </div> | ||
| + | <div class="right3"> | ||
| + | <p> | ||
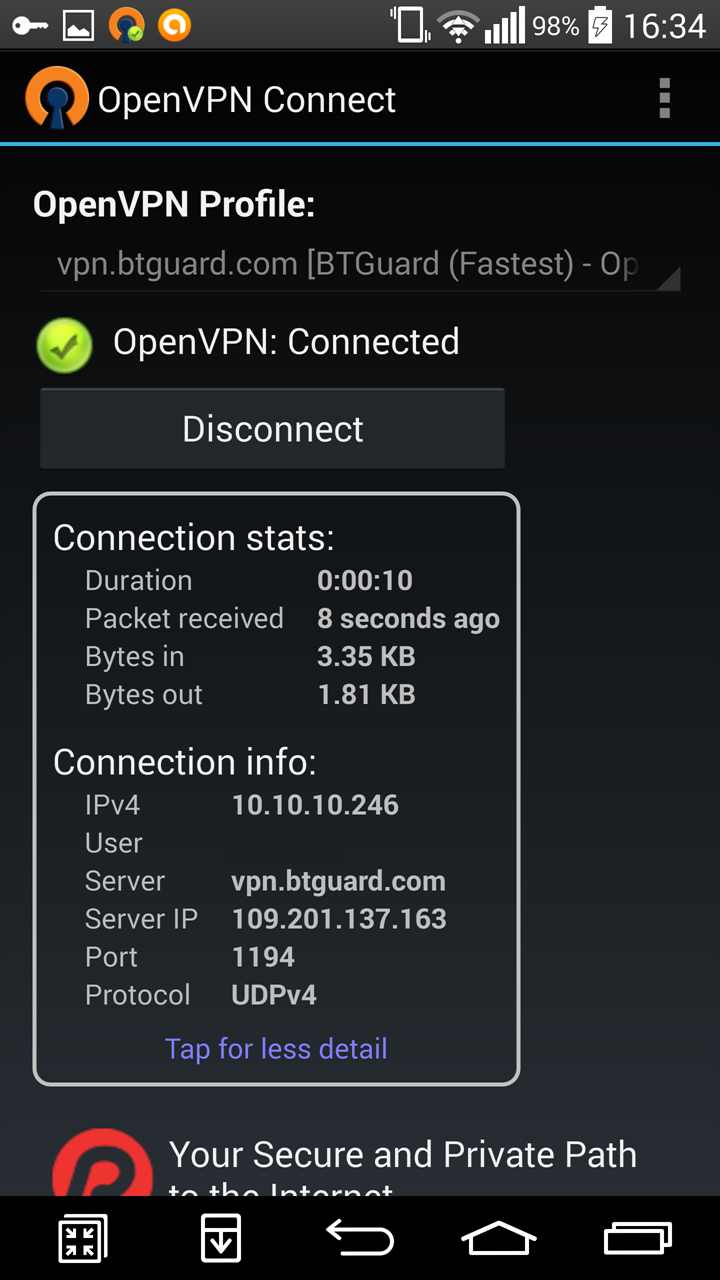
| + | You are now Connected!<br/> | ||
<br/> | <br/> | ||
</p> | </p> | ||
</div> | </div> | ||
</div> | </div> | ||
Latest revision as of 15:41, 3 November 2021
Setup Instructions Method 1
Setup Instructions Method 2
1. Download and install OpenVPN for Android by Arne Schwabe.
2. Open a browser on your Android device and Download the Configuration Files and unzip the files.
Files by Google is a free file manager if you don't have a tool to unzip.
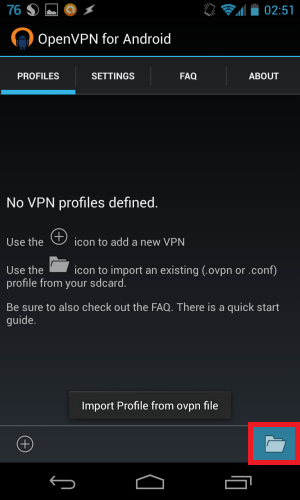
3. Open OpenVPN for Android and tap on the bottom right icon to import.
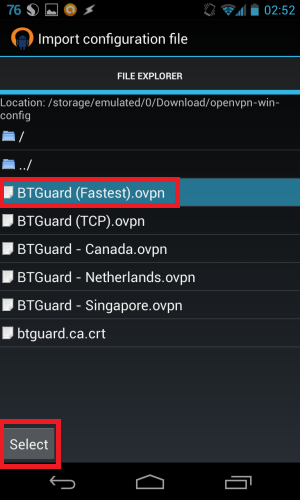
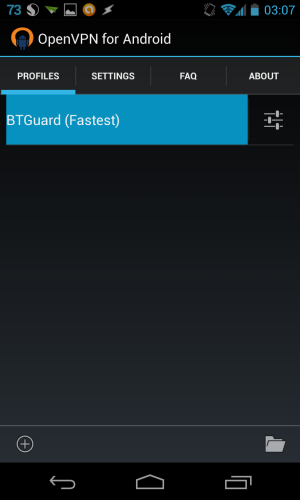
4. Browse to the folder where the configuration files are located. Tap on the server you wish to connect to and hit Select.
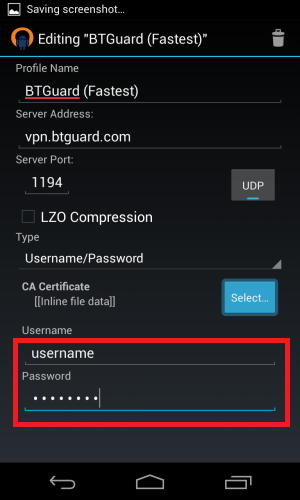
8. Fill in your Username and Password.
Both username and password are case sensitive. Make sure not to add/forget Capital Letters.
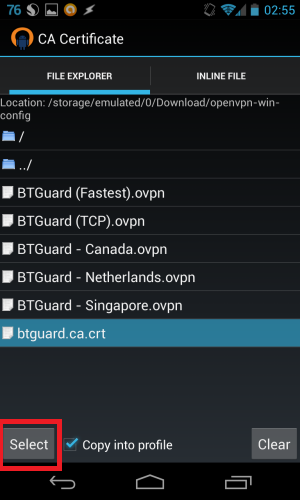
9. Tap on Select... next to CA certificate, then browse to the folder where the configuration files are located. Tap on btguard.ca.crt and hit Select.
10. Hit the back button until you're back at the main page.
Setup Complete!
Setup Instructions Method 2
Setup Instructions Method 1
1. Download and install OpenVPN Connect.
2. Open a browser on your Android device and Download the Configuration Files (They are different then in Method 1) and unzip the files.
Files by Google is a free file manager if you don't have a tool to unzip.
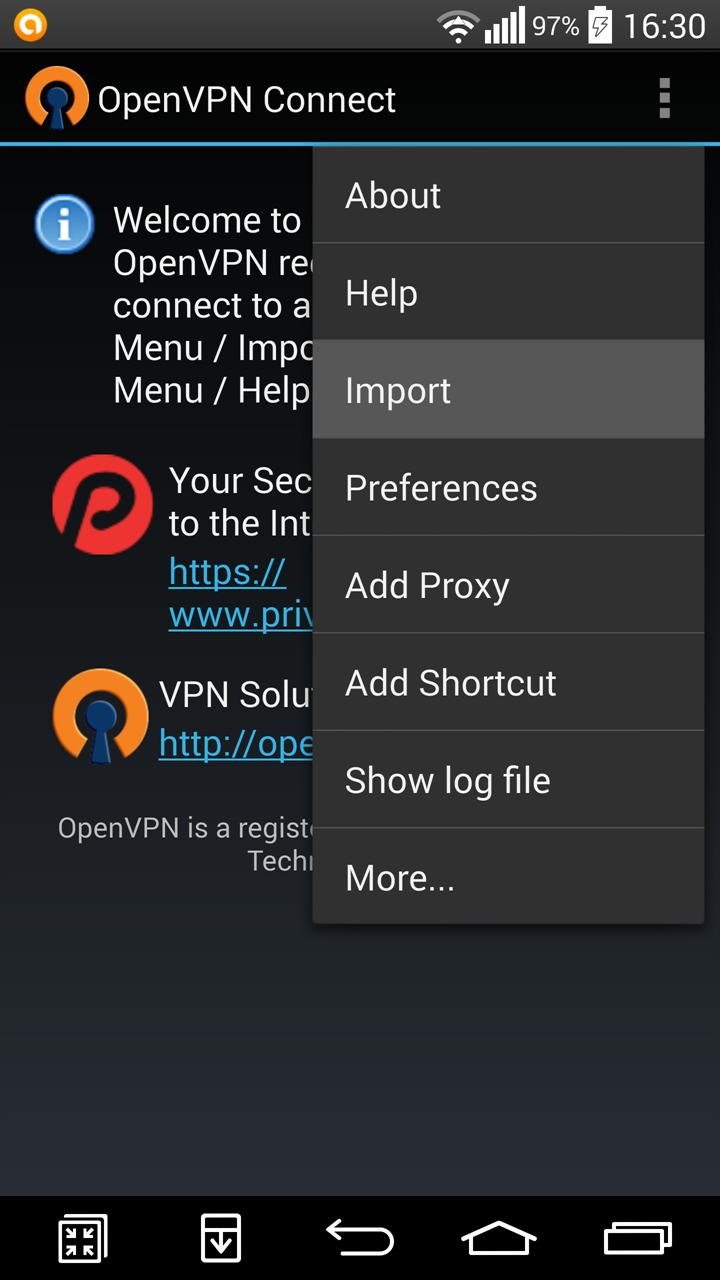
3. Open OpenVPN Connect and tap on the top right icon to import.
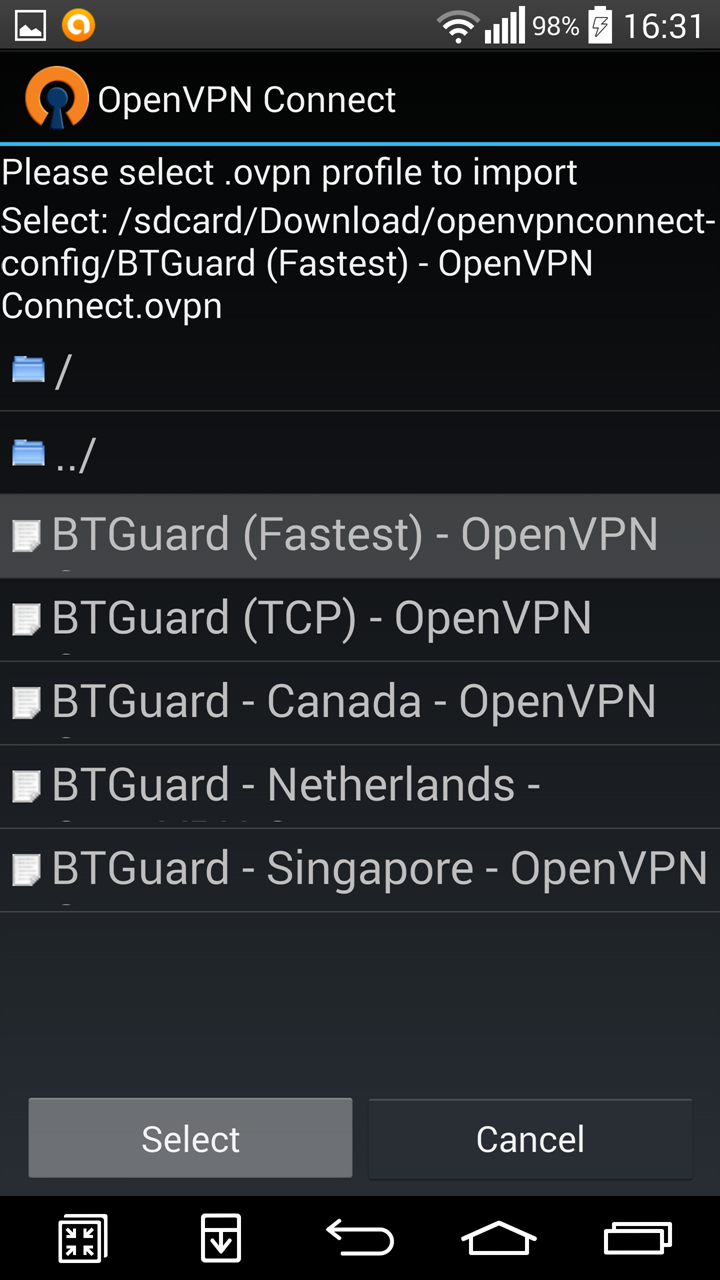
5. Browse to the folder where the configuration files are located. Tap on the server you wish to connect to and hit Select.
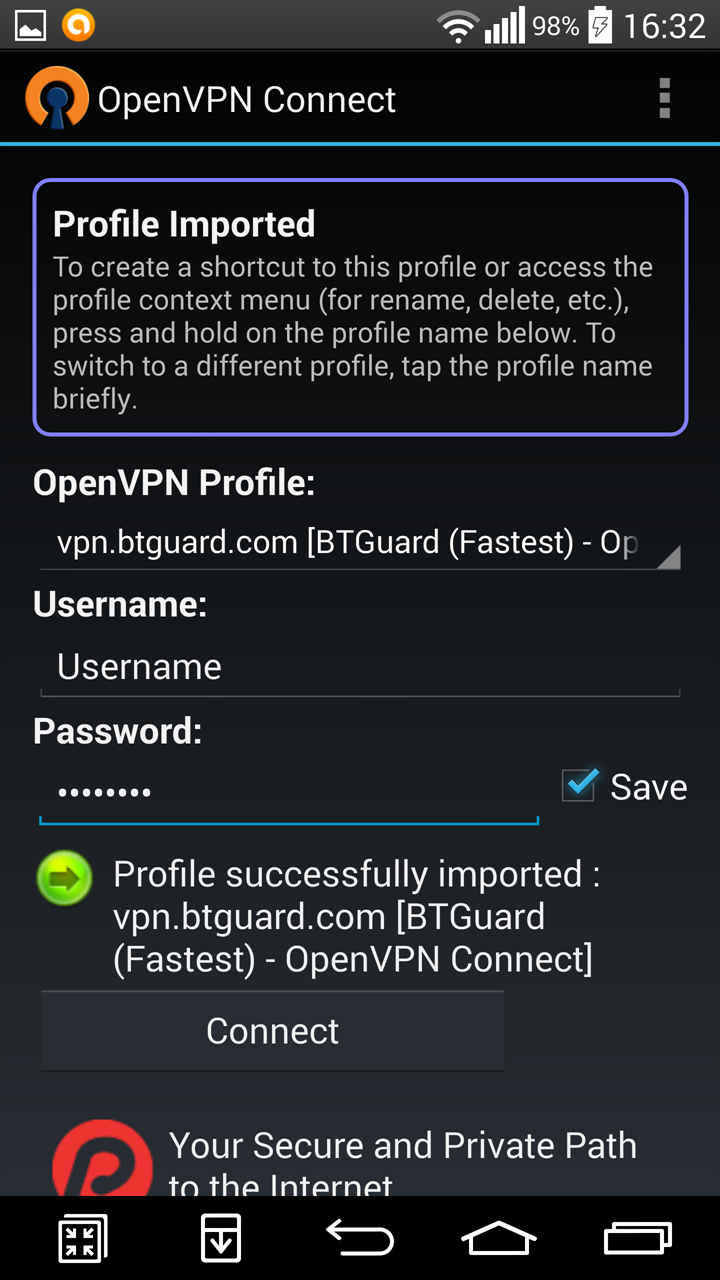
6. Fill in your Username and Password.
Both username and password are case sensitive. Make sure not to add/forget Capital Letters.
Setup Complete!
