Difference between revisions of "OpenVPN ubuntu"
| (14 intermediate revisions by the same user not shown) | |||
| Line 2: | Line 2: | ||
<div class="wrapleft"> | <div class="wrapleft"> | ||
<div class="left"> | <div class="left"> | ||
| − | <span class="plainlinks">[ | + | <span class="plainlinks">[https://wiki.btguard.com/images/openvpn_ubuntu_1.png https://wiki.btguard.com/images/openvpn_ubuntu_1.png]</span> |
</div> | </div> | ||
</div> | </div> | ||
| Line 19: | Line 19: | ||
<div class="wrapleft"> | <div class="wrapleft"> | ||
<div class="left"> | <div class="left"> | ||
| − | <span class="plainlinks">[ | + | <span class="plainlinks">[https://wiki.btguard.com/images/openvpn_ubuntu_2.png https://wiki.btguard.com/images/openvpn_ubuntu_2.png]</span> |
</div> | </div> | ||
</div> | </div> | ||
| Line 35: | Line 35: | ||
<div class="wrapleft"> | <div class="wrapleft"> | ||
<div class="left"> | <div class="left"> | ||
| − | <span class="plainlinks">[ | + | <span class="plainlinks">[https://wiki.btguard.com/images/openvpn_ubuntu_3.png https://wiki.btguard.com/images/openvpn_ubuntu_3.png]</span> |
</div> | </div> | ||
</div> | </div> | ||
| Line 51: | Line 51: | ||
<div class="wrapleft"> | <div class="wrapleft"> | ||
<div class="left"> | <div class="left"> | ||
| − | <span class="plainlinks">[ | + | <span class="plainlinks">[https://wiki.btguard.com/images/openvpn_ubuntu_4.png https://wiki.btguard.com/images/openvpn_ubuntu_4.png]</span> |
</div> | </div> | ||
</div> | </div> | ||
| Line 67: | Line 67: | ||
<div class="wrapleft"> | <div class="wrapleft"> | ||
<div class="left"> | <div class="left"> | ||
| − | <span class="plainlinks">[ | + | <span class="plainlinks">[https://wiki.btguard.com/images/openvpn_ubuntu_5.png https://wiki.btguard.com/images/openvpn_ubuntu_5.png]</span> |
</div> | </div> | ||
</div> | </div> | ||
<div class="right"> | <div class="right"> | ||
<p> | <p> | ||
| − | 5. Click on the '''Network icon''' in the top right corner and go to '''VPN Connections > Configure VPN...'''. | + | 5. Download the BTGuard CA certificate [https://btguard.com/btguard.ca.crt btguard.ca.crt]<br/> |
| + | <br/> | ||
| + | 6. Click on the '''Network icon''' in the top right corner and go to '''VPN Connections > Configure VPN...'''. | ||
<br/> | <br/> | ||
<br/> | <br/> | ||
| Line 84: | Line 86: | ||
<div class="wrapleft"> | <div class="wrapleft"> | ||
<div class="left"> | <div class="left"> | ||
| − | <span class="plainlinks">[ | + | <span class="plainlinks">[https://wiki.btguard.com/images/openvpn_ubuntu_6.png https://wiki.btguard.com/images/openvpn_ubuntu_6.png]</span> |
</div> | </div> | ||
</div> | </div> | ||
<div class="right"> | <div class="right"> | ||
<p> | <p> | ||
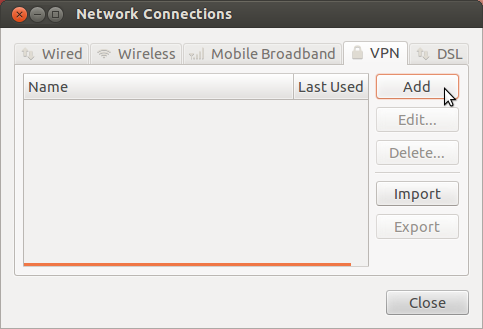
| − | + | 7. Click on '''Add'''. | |
<br/> | <br/> | ||
</p> | </p> | ||
| Line 100: | Line 102: | ||
<div class="wrapleft"> | <div class="wrapleft"> | ||
<div class="left"> | <div class="left"> | ||
| − | <span class="plainlinks">[ | + | <span class="plainlinks">[https://wiki.btguard.com/images/openvpn_ubuntu_7.png https://wiki.btguard.com/images/openvpn_ubuntu_7.png]</span> |
</div> | </div> | ||
</div> | </div> | ||
<div class="right"> | <div class="right"> | ||
<p> | <p> | ||
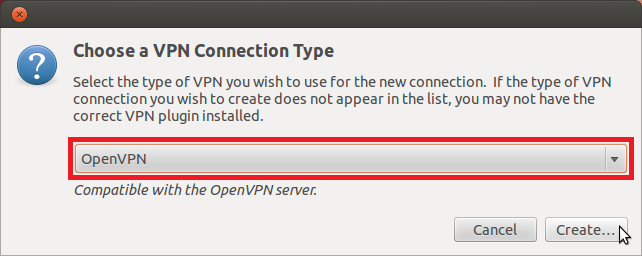
| − | + | 8. Select '''OpenVPN''' and hit '''Create'''. | |
<br/> | <br/> | ||
</p> | </p> | ||
| Line 116: | Line 118: | ||
<div class="wrapleft"> | <div class="wrapleft"> | ||
<div class="left"> | <div class="left"> | ||
| − | <span class="plainlinks">[ | + | <span class="plainlinks">[https://wiki.btguard.com/images/openvpn_ubuntu_8.png https://wiki.btguard.com/images/openvpn_ubuntu_8.png]</span> |
</div> | </div> | ||
</div> | </div> | ||
<div class="right"> | <div class="right"> | ||
<p> | <p> | ||
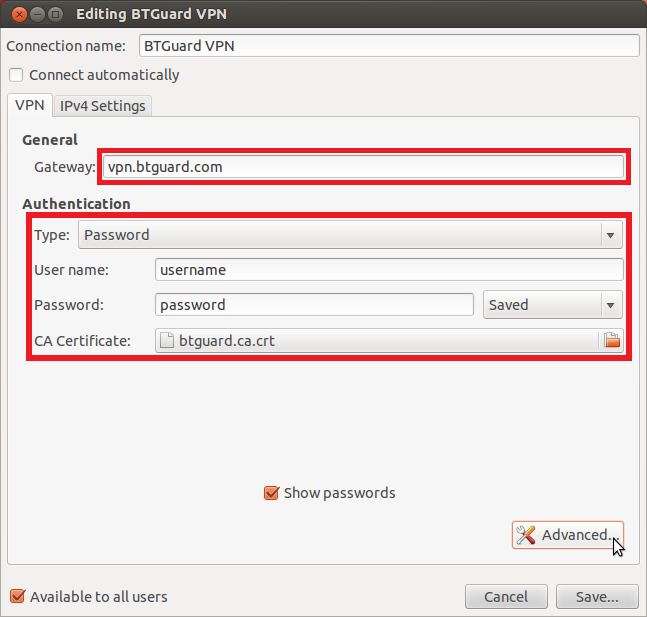
| − | + | 9. Enter the following information:<br/> | |
Gateway: '''vpn.btguard.com'''<br/> | Gateway: '''vpn.btguard.com'''<br/> | ||
''Optional: To manually select your server location, please use '''ca.vpn.btguard.com''' for Canada or '''eu.vpn.btguard.com''' for Europe or sg.vpn.btguard.com for Singapore.''<br/> | ''Optional: To manually select your server location, please use '''ca.vpn.btguard.com''' for Canada or '''eu.vpn.btguard.com''' for Europe or sg.vpn.btguard.com for Singapore.''<br/> | ||
Username: <br/> | Username: <br/> | ||
Password: Enter your password.<br/> | Password: Enter your password.<br/> | ||
| + | ''Both username and password are case sensitive. Make sure not to add/forget Capital Letters.'' <br/> | ||
<br/> | <br/> | ||
| − | + | 10. Click on the '''icon''' next to '''CA Certificate''' and locate the file [https://btguard.com/btguard.ca.crt btguard.ca.crt] downloaded previously.<br/> | |
| − | + | <br/> | |
| + | 11. Click on the '''Advanced...''' button. | ||
| + | <br/> | ||
| + | </p> | ||
| + | </div> | ||
| + | </div> | ||
| + | |||
| + | |||
| + | |||
| + | <div class="wrapper"> | ||
| + | <div class="wrapleft"> | ||
| + | <div class="left"> | ||
| + | <span class="plainlinks">[https://wiki.btguard.com/images/openvpn_ubuntu_9.png https://wiki.btguard.com/images/openvpn_ubuntu_9.png]</span> | ||
| + | <br/><br/><br/><br/><br/><br/> | ||
| + | </div> | ||
| + | </div> | ||
| + | <div class="right"> | ||
| + | <p> | ||
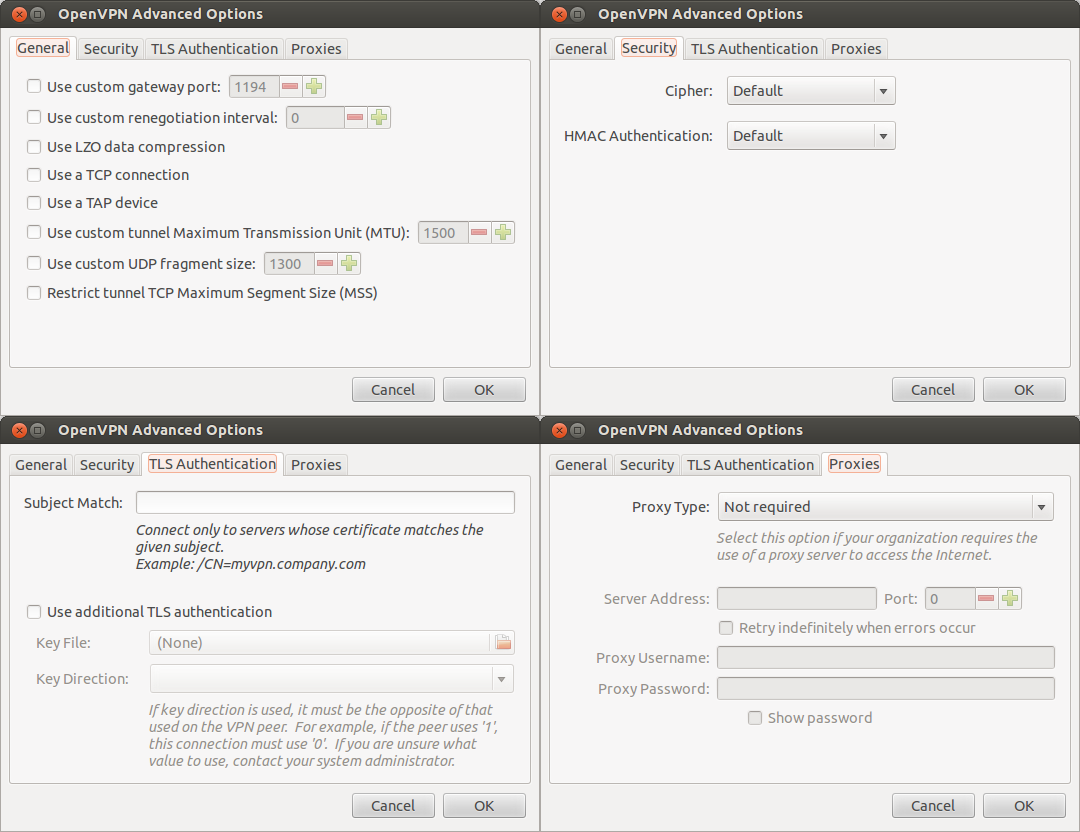
| + | 12. Make sure the default settings are as shown on the left except change the encryption settings to:<br/> | ||
| + | cipher AES-256-CBC<br/> | ||
| + | auth SHA512.<br/> | ||
| + | |||
| + | <br/> | ||
| + | ''If you're having trouble connecting or with performance/stability you can try checking "'''Use a TCP Connection'''". ''<br/> | ||
| + | <br/> | ||
| + | 13. Hit OK and Save.<br/> | ||
| + | <br/> | ||
| + | Setup Complete! | ||
| + | <br/> | ||
| + | </p> | ||
| + | </div> | ||
| + | </div> | ||
| + | |||
| + | |||
| + | <div class="wrapper"><br/> | ||
| + | ---- | ||
| + | <br/></div> | ||
| + | |||
| + | |||
| + | |||
| + | <div class="wrapper"> | ||
| + | <div class="wrapleft"> | ||
| + | <div class="left"> | ||
| + | <span class="plainlinks">[https://wiki.btguard.com/images/openvpn_ubuntu_10.png https://wiki.btguard.com/images/openvpn_ubuntu_10.png]</span> | ||
| + | </div> | ||
| + | </div> | ||
| + | <div class="right"> | ||
| + | <p> | ||
| + | == How To Connect == | ||
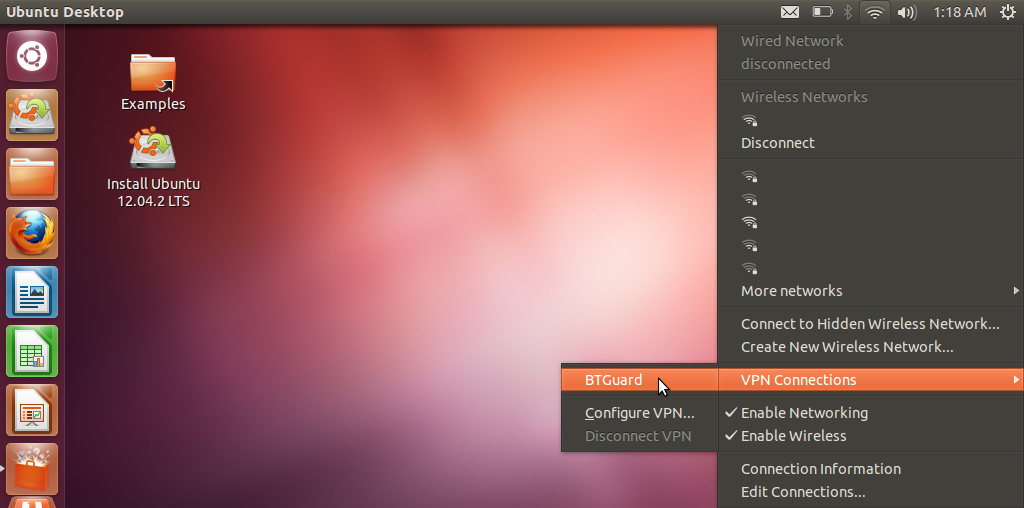
| + | 1. Click on the '''Network icon''' in the top right corner and go to '''VPN Connections > BTGuard...'''. | ||
<br/> | <br/> | ||
</p> | </p> | ||
</div> | </div> | ||
</div> | </div> | ||
Latest revision as of 11:11, 11 August 2020
5. Download the BTGuard CA certificate btguard.ca.crt
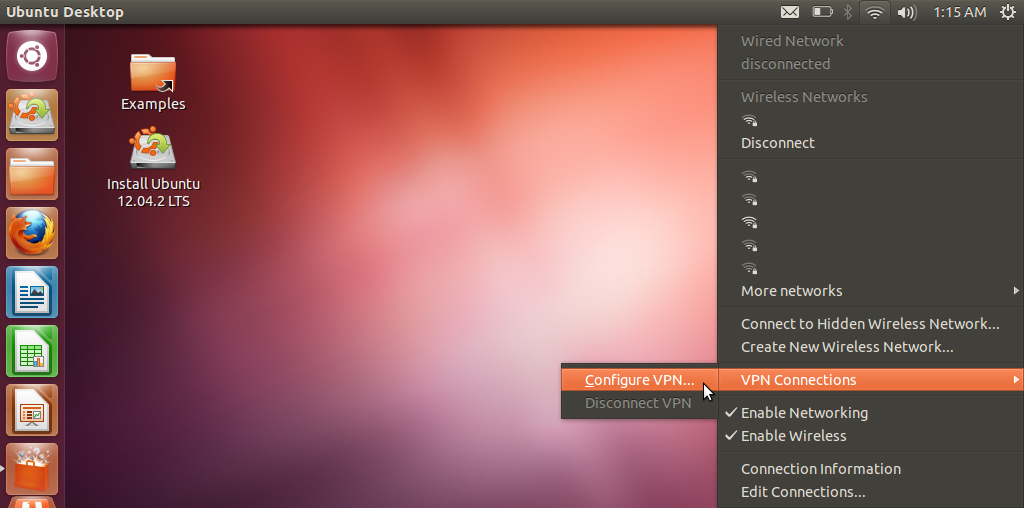
6. Click on the Network icon in the top right corner and go to VPN Connections > Configure VPN....
9. Enter the following information:
Gateway: vpn.btguard.com
Optional: To manually select your server location, please use ca.vpn.btguard.com for Canada or eu.vpn.btguard.com for Europe or sg.vpn.btguard.com for Singapore.
Username:
Password: Enter your password.
Both username and password are case sensitive. Make sure not to add/forget Capital Letters.
10. Click on the icon next to CA Certificate and locate the file btguard.ca.crt downloaded previously.
11. Click on the Advanced... button.
12. Make sure the default settings are as shown on the left except change the encryption settings to:
cipher AES-256-CBC
auth SHA512.
If you're having trouble connecting or with performance/stability you can try checking "Use a TCP Connection".
13. Hit OK and Save.
Setup Complete!
