Difference between revisions of "OpenVPN ChromeBook"
| (4 intermediate revisions by the same user not shown) | |||
| Line 6: | Line 6: | ||
</div> | </div> | ||
<div class="right"> | <div class="right"> | ||
| − | <p | + | <p> |
== Setup Instructions == | == Setup Instructions == | ||
| − | 1. Download the [ | + | 1. Download the [https://www.btguard.com/btguard.ca.crt BTGuard certificate].<br/><br/> |
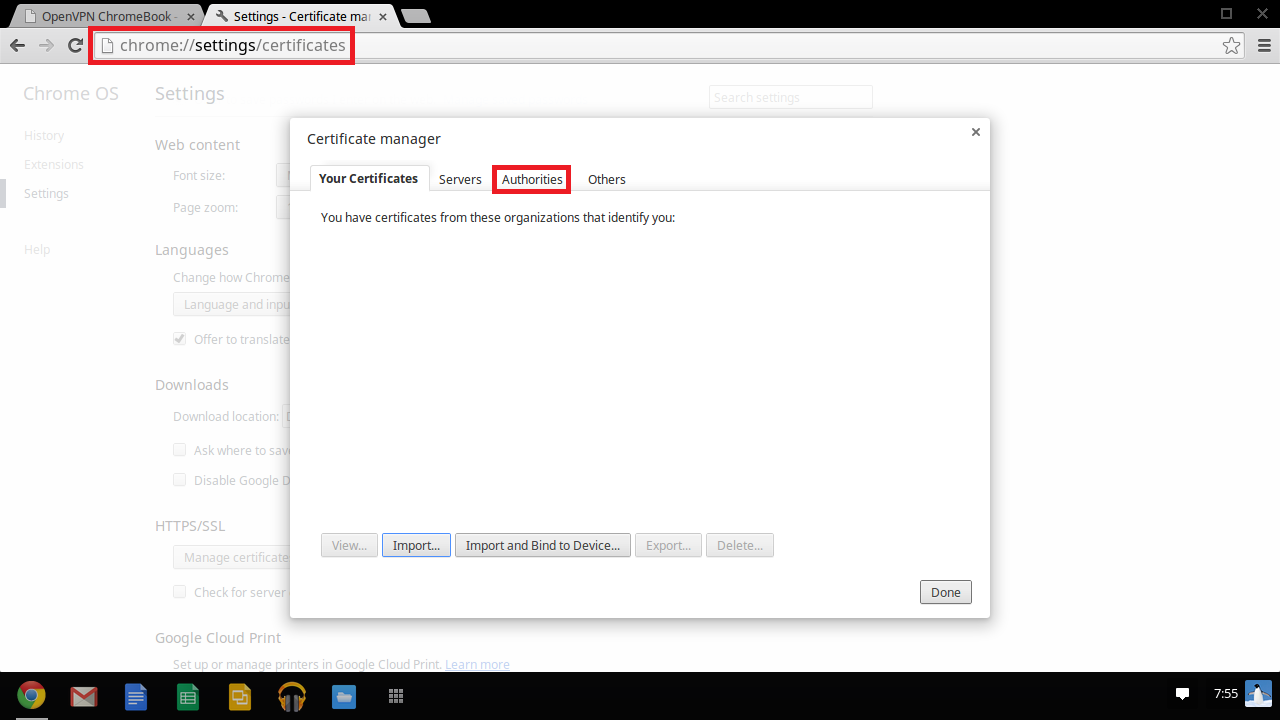
| − | 2. | + | 2. Open Chrome and go to: '''chrome://settings/certificates''' then to the '''Authorities''' tab.<br/> |
<br/> | <br/> | ||
</p> | </p> | ||
| Line 24: | Line 24: | ||
<div class="right"> | <div class="right"> | ||
<p><br/> | <p><br/> | ||
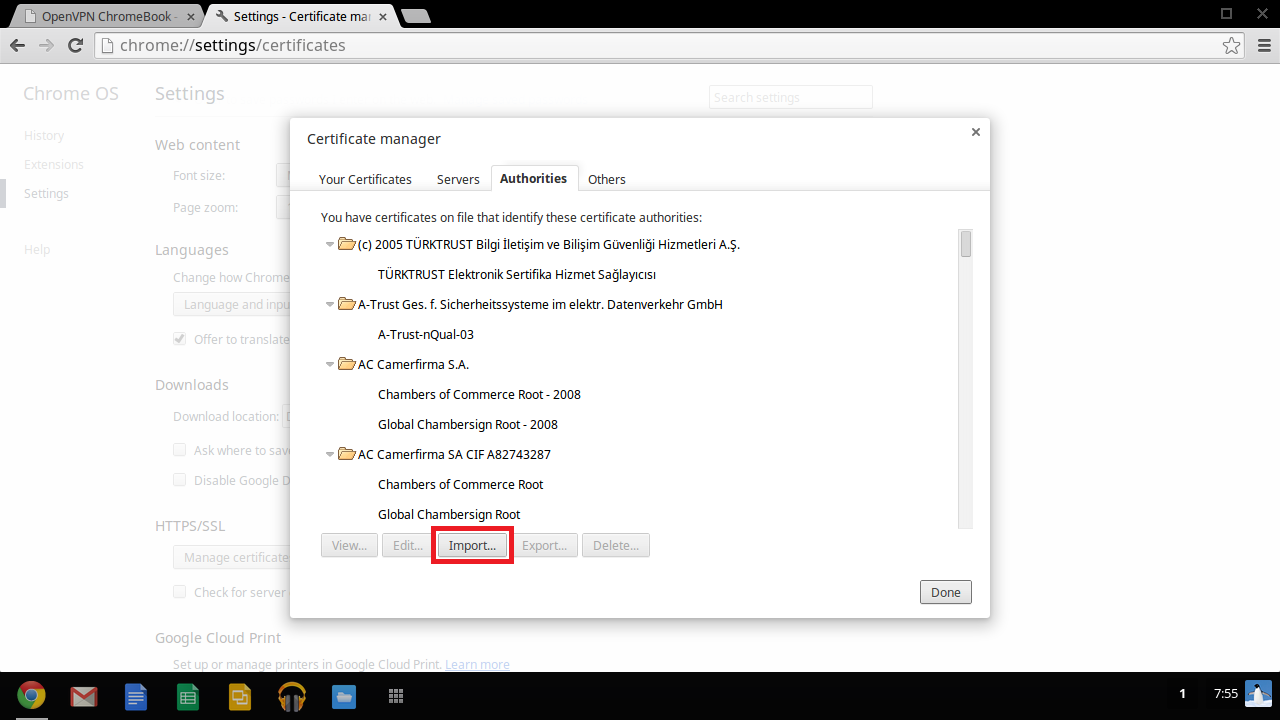
| − | + | 3. Click on '''Import...''' | |
<br/> | <br/> | ||
</p> | </p> | ||
| Line 39: | Line 39: | ||
<div class="right"> | <div class="right"> | ||
<p><br/> | <p><br/> | ||
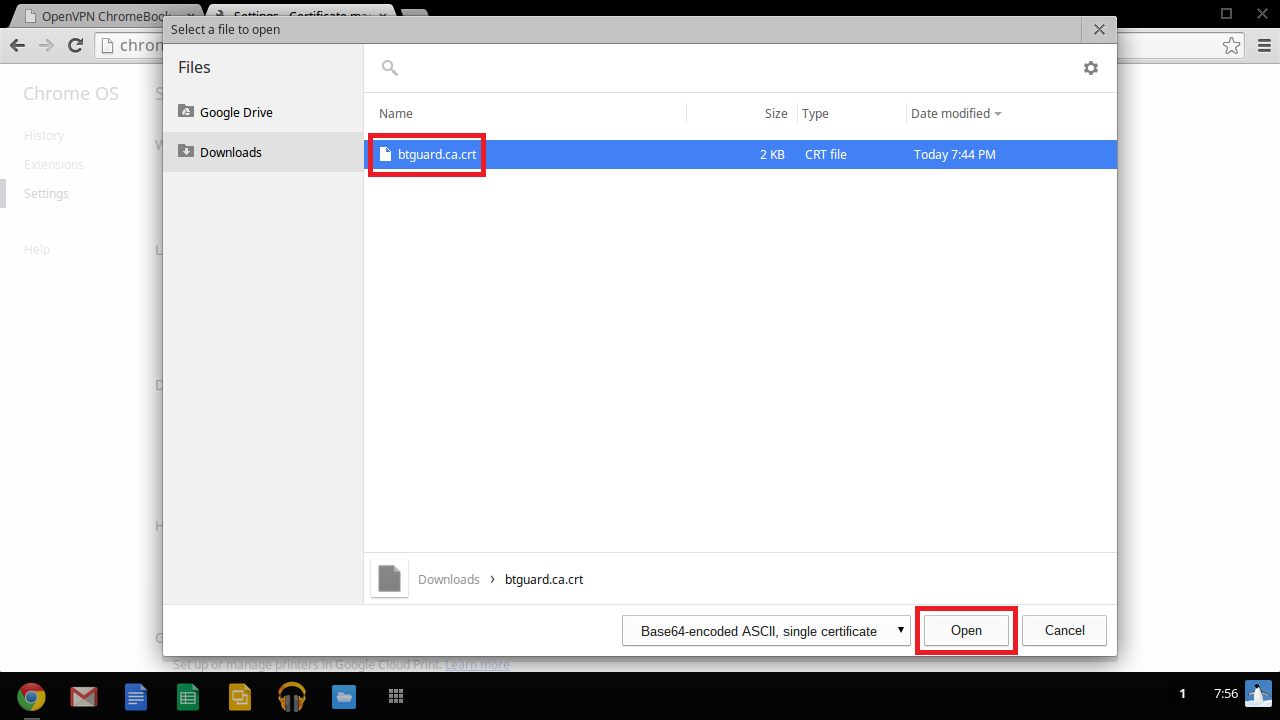
| − | + | 4. Locate and Select the '''btguard.ca.crt''' certificate file you just downloaded then hit '''Open'''. | |
<br/> | <br/> | ||
</p> | </p> | ||
| Line 54: | Line 54: | ||
<div class="right"> | <div class="right"> | ||
<p><br/> | <p><br/> | ||
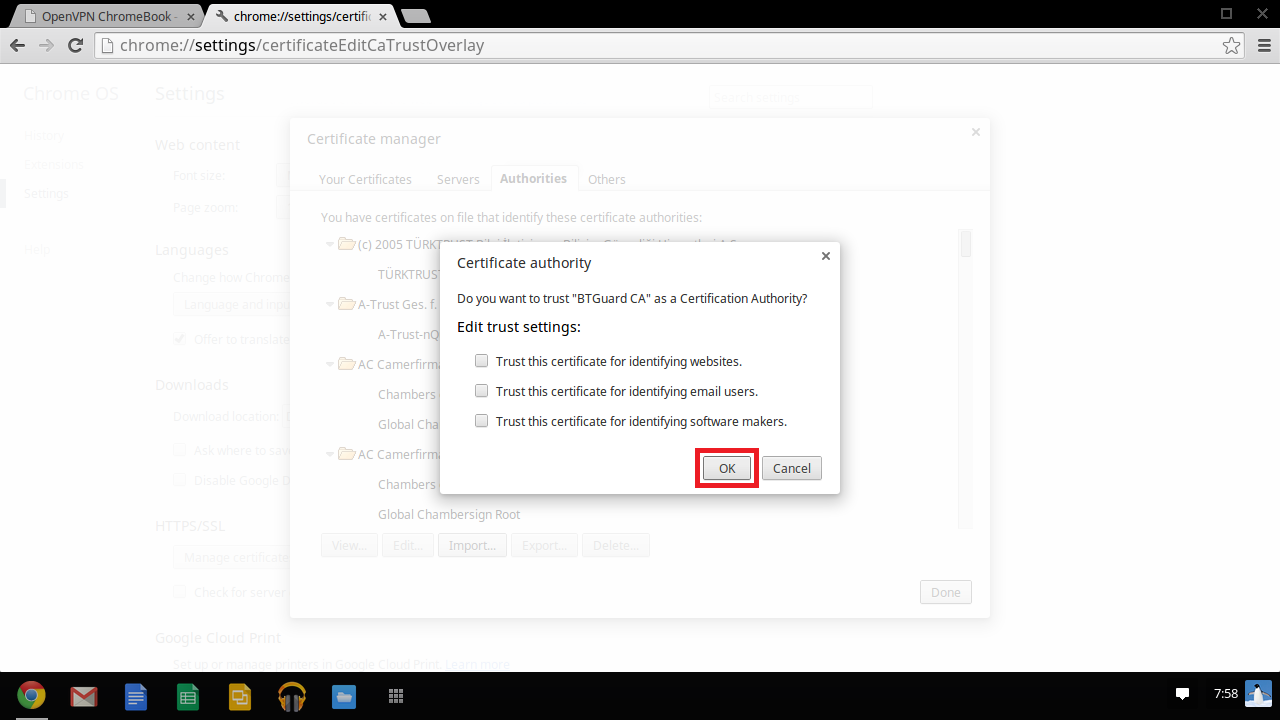
| − | + | 5. Hit '''OK'''.<br/><br/> | |
| + | 6. '''Restart your computer now or the certificate you need to add later won't show up''' | ||
<br/> | <br/> | ||
</p> | </p> | ||
| Line 69: | Line 70: | ||
<div class="right"> | <div class="right"> | ||
<p><br/> | <p><br/> | ||
| − | + | 7. After restarting your computer, Open Chrome and go to: '''chrome://settings/'''.<br/><br/> | |
| + | 8. Click on ''' Add connection''' then on '''Add private network...'''. <br/><br/> | ||
<br/> | <br/> | ||
</p> | </p> | ||
| Line 84: | Line 86: | ||
<div class="right"> | <div class="right"> | ||
<p><br/> | <p><br/> | ||
| − | + | 9. Fill in the following information:<br/><br/> | |
| + | Server hostname: '''vpn.btguard.com'''<br/> | ||
| + | ''Optional: To manually select your server location, please use '''ca.vpn.btguard.com''' for Canada or '''eu.vpn.btguard.com''' for Europe or sg.vpn.btguard.com for Singapore.''<br/><br/> | ||
| + | Service name: '''BTGuard'''<br/> | ||
| + | Provider type: '''OpenVPN'''<br/> | ||
| + | Server CA certificate: '''BTGuard CA [BTGuard CA]'''<br/> | ||
| + | <br/> | ||
| + | Enter your username & password then click '''Connect'''<br/> | ||
| + | ''Both username and password are case sensitive. Make sure not to add/forget Capital Letters.'' <br/> | ||
<br/> | <br/> | ||
| + | Setup Complete! | ||
</p> | </p> | ||
</div> | </div> | ||
</div> | </div> | ||
| + | |||
| + | |||
| + | |||
| + | <div class="wrapper"><br/> | ||
| + | ---- | ||
| + | <br/></div> | ||
| + | |||
| + | |||
| Line 98: | Line 117: | ||
</div> | </div> | ||
<div class="right"> | <div class="right"> | ||
| − | <p> | + | <p> |
| + | == How To Connect == | ||
| + | 1. Click on your '''user image''' in the bottom right corner then on '''VPN'''. | ||
<br/> | <br/> | ||
| Line 114: | Line 135: | ||
<div class="right"> | <div class="right"> | ||
<p><br/> | <p><br/> | ||
| − | + | 2. Select '''BTGuard'''. | |
<br/> | <br/> | ||
</p> | </p> | ||
| Line 129: | Line 150: | ||
<div class="right"> | <div class="right"> | ||
<p><br/> | <p><br/> | ||
| − | + | 3. Click on '''Connect'''. | |
| − | <br/> | + | <br/><br/> |
| + | You are now connected! | ||
</p> | </p> | ||
</div> | </div> | ||
</div> | </div> | ||
| − | |||
| − | |||
| − | |||
| − | |||
| − | |||
| − | |||
| − | |||
| − | |||
| − | |||
| − | |||
| − | |||
| − | |||
| − | |||
| − | |||
| − | |||
| − | |||
| − | |||
| − | |||
| − | |||
| − | |||
| − | |||
| − | |||
| − | |||
| − | |||
| − | |||
| − | |||
| − | |||
| − | |||
| − | |||
| − | |||
| − | |||
| − | |||
| − | |||
| − | |||
| − | |||
| − | |||
| − | |||
| − | |||
| − | |||
| − | |||
| − | |||
| − | |||
| − | |||
| − | |||
| − | |||
| − | |||
| − | |||
| − | |||
| − | |||
| − | |||
| − | |||
| − | |||
Latest revision as of 15:14, 4 April 2021
Setup Instructions
1. Download the BTGuard certificate.
2. Open Chrome and go to: chrome://settings/certificates then to the Authorities tab.
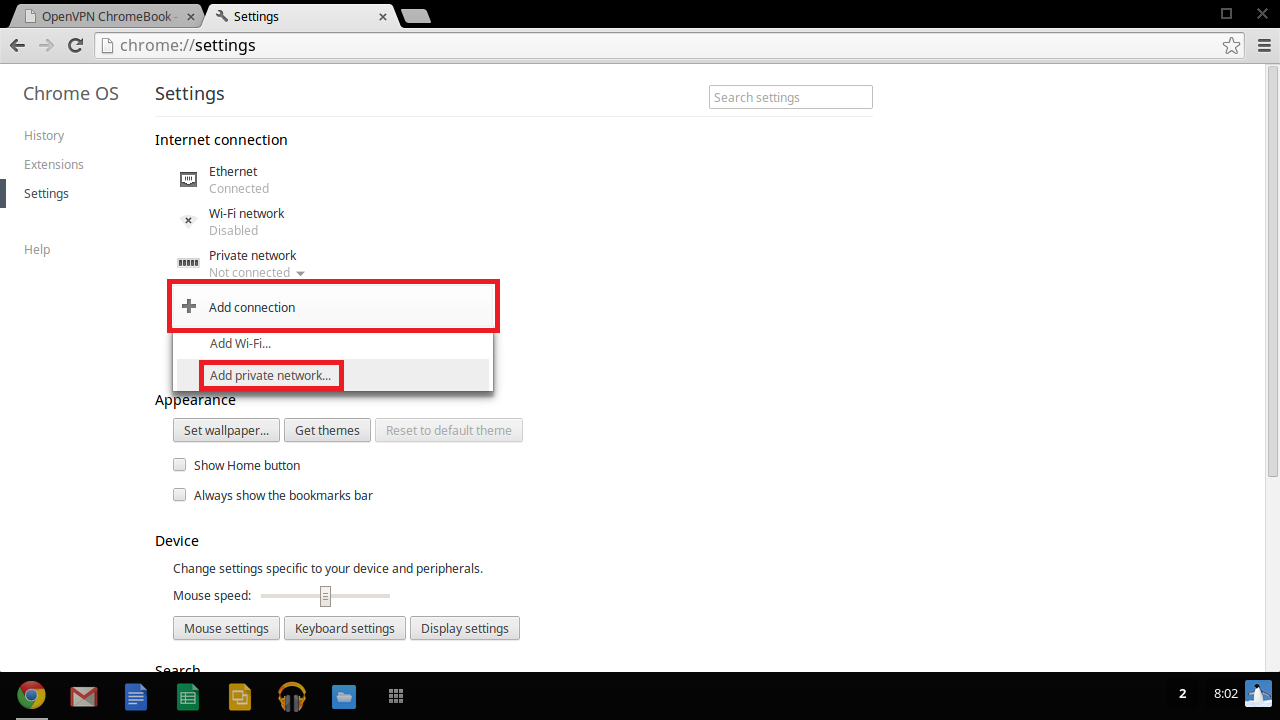
7. After restarting your computer, Open Chrome and go to: chrome://settings/.
8. Click on Add connection then on Add private network....
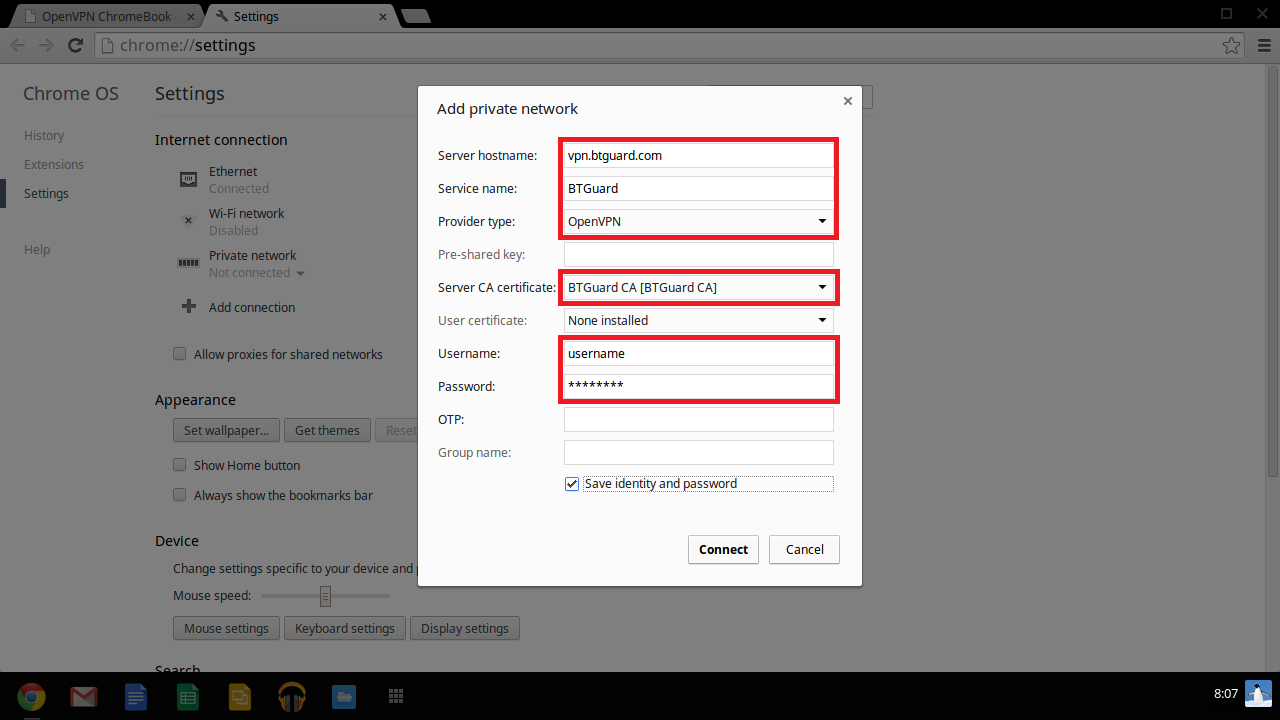
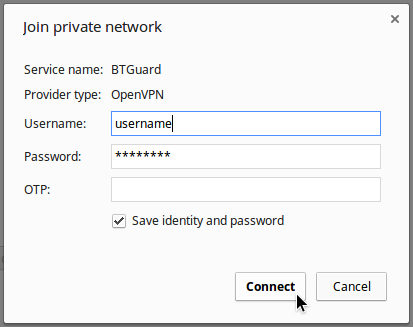
9. Fill in the following information:
Server hostname: vpn.btguard.com
Optional: To manually select your server location, please use ca.vpn.btguard.com for Canada or eu.vpn.btguard.com for Europe or sg.vpn.btguard.com for Singapore.
Service name: BTGuard
Provider type: OpenVPN
Server CA certificate: BTGuard CA [BTGuard CA]
Enter your username & password then click Connect
Both username and password are case sensitive. Make sure not to add/forget Capital Letters.
Setup Complete!
