Difference between revisions of "PPTP iOS"
| (6 intermediate revisions by the same user not shown) | |||
| Line 1: | Line 1: | ||
| − | <div | + | <div class="wrapper3"> |
| − | <div class=" | + | <div class="wrapleft3"> |
| − | + | <div class="left3"> | |
| − | </div> | + | <span class="plainlinks">[https://wiki.btguard.com/images/6/6c/Vpn_pptp_ios_1.PNG https://wiki.btguard.com/images/6/6c/Vpn_pptp_ios_1.PNG]</span> |
| − | + | </div> | |
| − | <div class=" | + | </div> |
| − | <p | + | <div class="right3"> |
| − | + | <p> | |
== Setup Instructions == | == Setup Instructions == | ||
| − | |||
| − | |||
| − | |||
1. Go to '''Settings''' and select '''General'''<br/> | 1. Go to '''Settings''' and select '''General'''<br/> | ||
</p> | </p> | ||
| Line 16: | Line 13: | ||
</div> | </div> | ||
| − | + | <div class="wrapper3"> | |
| − | + | <div class="wrapleft3"> | |
| − | <div | + | <div class="left3"> |
| − | <div class=" | + | <span class="plainlinks">[https://wiki.btguard.com/images/e/e7/Vpn_pptp_ios_2.PNG https://wiki.btguard.com/images/e/e7/Vpn_pptp_ios_2.PNG]</span> |
| − | + | </div> | |
| − | </div> | + | </div> |
| − | + | <div class="right3"> | |
| − | <div class=" | + | <p> |
| − | <p | + | |
2. Tap on '''VPN'''<br/> | 2. Tap on '''VPN'''<br/> | ||
</p> | </p> | ||
| Line 30: | Line 26: | ||
</div> | </div> | ||
| − | + | <div class="wrapper3"> | |
| − | + | <div class="wrapleft3"> | |
| − | <div | + | <div class="left3"> |
| − | <div class=" | + | <span class="plainlinks">[https://wiki.btguard.com/images/a/a4/Vpn_pptp_ios_3.PNG https://wiki.btguard.com/images/a/a4/Vpn_pptp_ios_3.PNG]</span> |
| − | + | </div> | |
| − | </div> | + | </div> |
| − | + | <div class="right3"> | |
| − | <div class=" | + | <p> |
| − | <p | + | |
3. Tap on '''Add VPN Configuration'''<br/> | 3. Tap on '''Add VPN Configuration'''<br/> | ||
</p> | </p> | ||
| Line 44: | Line 39: | ||
</div> | </div> | ||
| − | + | <div class="wrapper3"> | |
| − | + | <div class="wrapleft3"> | |
| − | <div | + | <div class="left3"> |
| − | <div class=" | + | <span class="plainlinks">[https://wiki.btguard.com/images/4/44/Vpn_pptp_ios_4.PNG https://wiki.btguard.com/images/4/44/Vpn_pptp_ios_4.PNG]</span> |
| − | + | </div> | |
| − | </div> | + | </div> |
| − | + | <div class="right3"> | |
| − | <div class=" | + | <p> |
| − | <p | + | |
4. Select '''PPTP'''<br/> | 4. Select '''PPTP'''<br/> | ||
5. In the box below PPTP, enter the following information:<br/> | 5. In the box below PPTP, enter the following information:<br/> | ||
| Line 63: | Line 57: | ||
Encryption Level: '''Auto'''<br/> | Encryption Level: '''Auto'''<br/> | ||
Send All Traffic: '''ON'''<br/> | Send All Traffic: '''ON'''<br/> | ||
| + | ''Both username and password are case sensitive. Make sure not to add/forget Capital Letters.'' <br/> | ||
6. Hit Save<br/> | 6. Hit Save<br/> | ||
<br/> | <br/> | ||
| Line 71: | Line 66: | ||
| + | <div class="wrapper3"><br/> | ||
| + | ---- | ||
| + | <br/></div> | ||
| − | |||
| − | |||
| − | |||
| − | |||
| − | |||
| − | |||
| + | <div class="wrapper3"> | ||
| + | <div class="wrapleft3"> | ||
| + | <div class="left3"> | ||
| + | <span class="plainlinks">[https://wiki.btguard.com/images/8/84/Vpn_pptp_ios_5.PNG https://wiki.btguard.com/images/8/84/Vpn_pptp_ios_5.PNG]</span> | ||
| + | </div> | ||
| + | </div> | ||
| + | <div class="right3"> | ||
| + | <p> | ||
== How To Connect == | == How To Connect == | ||
| − | |||
| − | |||
| − | |||
1. Go to '''Settings''' and hit on the '''OFF''' button next to '''VPN'''<br/> | 1. Go to '''Settings''' and hit on the '''OFF''' button next to '''VPN'''<br/> | ||
</p> | </p> | ||
| Line 89: | Line 86: | ||
</div> | </div> | ||
| − | + | <div class="wrapper3"> | |
| − | + | <div class="wrapleft3"> | |
| − | <div | + | <div class="left3"> |
| − | <div class=" | + | <span class="plainlinks">[https://wiki.btguard.com/images/7/76/Vpn_pptp_ios_6.PNG https://wiki.btguard.com/images/7/76/Vpn_pptp_ios_6.PNG]</span> |
| − | + | </div> | |
| − | </div> | + | </div> |
| − | + | <div class="right3"> | |
| − | <div class=" | + | <p> |
| − | <p | + | |
Please wait a few seconds for the VPN to connect.<br/> | Please wait a few seconds for the VPN to connect.<br/> | ||
</p> | </p> | ||
| Line 103: | Line 99: | ||
</div> | </div> | ||
| − | + | <div class="wrapper3"> | |
| − | <div | + | <div class="wrapleft3"> |
| − | <div class=" | + | <div class="left3"> |
| − | + | <span class="plainlinks">[https://wiki.btguard.com/images/2/2a/Vpn_pptp_ios_7.PNG https://wiki.btguard.com/images/2/2a/Vpn_pptp_ios_7.PNG]</span> | |
| − | </div> | + | </div> |
| − | + | </div> | |
| − | <div class=" | + | <div class="right3"> |
| − | <p | + | <p> |
You are now connected!<br/> | You are now connected!<br/> | ||
| − | |||
</p> | </p> | ||
</div> | </div> | ||
</div> | </div> | ||
Latest revision as of 01:17, 12 June 2013
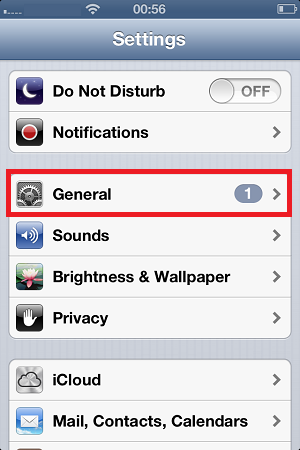
Setup Instructions
1. Go to Settings and select General
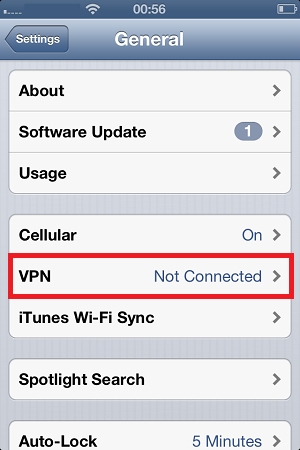
2. Tap on VPN
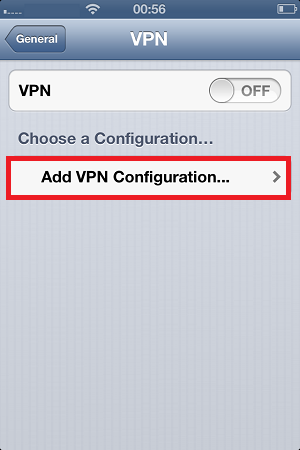
3. Tap on Add VPN Configuration
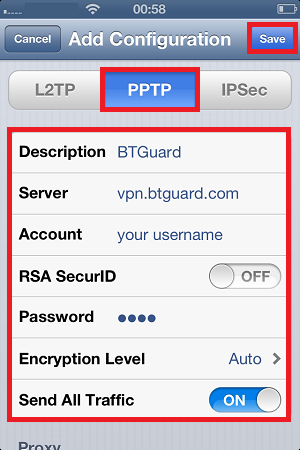
4. Select PPTP
5. In the box below PPTP, enter the following information:
Description: BTGuard
Server: vpn.btguard.com
Optional: To manually select your server location, please use ca.vpn.btguard.com for Canada or eu.vpn.btguard.com for Europe or sg.vpn.btguard.com for Singapore.
Account: Your username
RSA SecurID: OFF
Password: Your Password
Encryption Level: Auto
Send All Traffic: ON
Both username and password are case sensitive. Make sure not to add/forget Capital Letters.
6. Hit Save
Setup Complete!
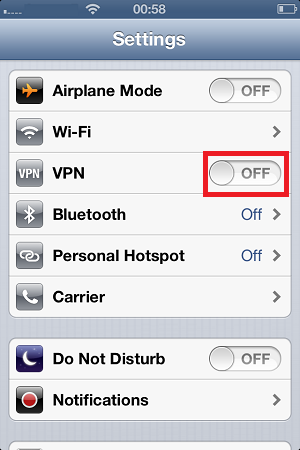
How To Connect
1. Go to Settings and hit on the OFF button next to VPN
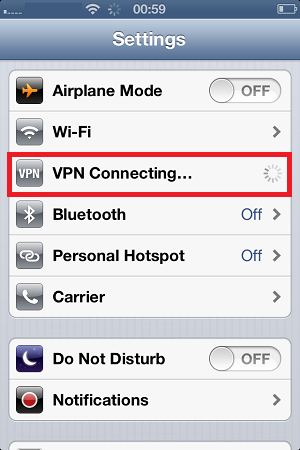
Please wait a few seconds for the VPN to connect.
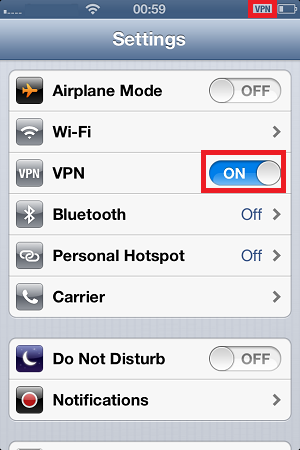
You are now connected!