Difference between revisions of "OpenVPN Windows Old"
| Line 2: | Line 2: | ||
<div class="wrapleft"> | <div class="wrapleft"> | ||
<div class="left"> | <div class="left"> | ||
| − | <span class="plainlinks">[https://wiki.btguard.com/images/openvpn_win_1.png https://wiki.btguard.com/images/ | + | <span class="plainlinks">[https://wiki.btguard.com/images/openvpn_win_1.png https://wiki.btguard.com/images/openvpn_win_1.png]</span> |
</div> | </div> | ||
</div> | </div> | ||
<div class="right"> | <div class="right"> | ||
<p> | <p> | ||
| − | == Setup Instructions for Windows Vista/7/8/10 | + | == Setup Instructions for Windows Vista/7/8/10 == |
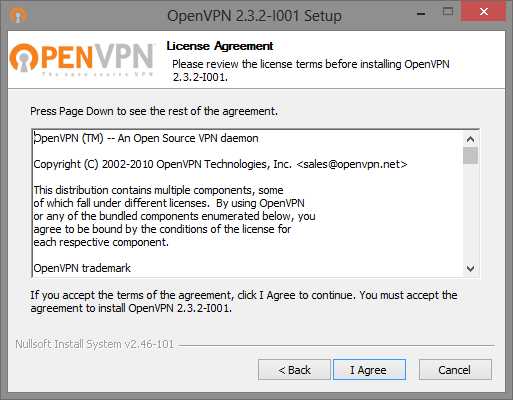
| − | 1. Download the OpenVPN Installation Program <br/> [https://swupdate.openvpn.org/community/releases/openvpn-install-2. | + | 1. Download the OpenVPN Installation Program <br/> [https://swupdate.openvpn.org/community/releases/openvpn-install-2.3.10-I603-i686.exe 32-bit] or [https://swupdate.openvpn.org/community/releases/openvpn-install-2.3.10-I603-x86_64.exe 64-bit].<br/> |
<br /> | <br /> | ||
[http://openvpn.net/index.php/open-source/downloads.html OpenVPN Official Download Page]<br /> | [http://openvpn.net/index.php/open-source/downloads.html OpenVPN Official Download Page]<br /> | ||
<br /> | <br /> | ||
| − | 2. Double-click '''openvpn-install-2. | + | 2. Double-click '''openvpn-install-2.3.10-I603-x86_64.exe to install.'''<br /> |
'''HIT NEXT, CONTINUE, AND CONFIRM ALL STAGES OF INSTALLATION'''<br /> | '''HIT NEXT, CONTINUE, AND CONFIRM ALL STAGES OF INSTALLATION'''<br /> | ||
<br/> | <br/> | ||
| Line 27: | Line 27: | ||
<div class="right"> | <div class="right"> | ||
<p> | <p> | ||
| − | 3. Download the [https://btguard.com/openvpn-win-config.exe OpenVPN BTGuard Configuration] executable file.([https:// | + | 3. Download the [https://btguard.com/openvpn-win-config.exe OpenVPN BTGuard Configuration] executable file.([https://btguard.com/openvpn-win-config.zip ZIP]).<br /><br/> |
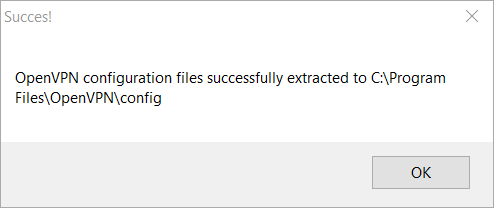
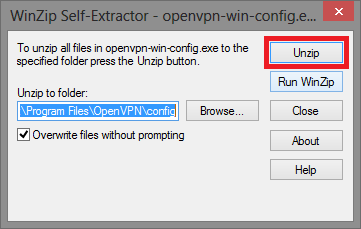
4. Open '''openvpn-win-config.exe''' and hit '''OK'''. | 4. Open '''openvpn-win-config.exe''' and hit '''OK'''. | ||
<br /> | <br /> | ||
| Line 52: | Line 52: | ||
<div class="wrapleft"> | <div class="wrapleft"> | ||
<div class="left"> | <div class="left"> | ||
| − | <span class="plainlinks">[https://wiki.btguard.com/images/ | + | <span class="plainlinks">[https://wiki.btguard.com/images/openvpn_win_4.png https://wiki.btguard.com/images/openvpn_win_4.png]</span> |
</div> | </div> | ||
</div> | </div> | ||
| Line 62: | Line 62: | ||
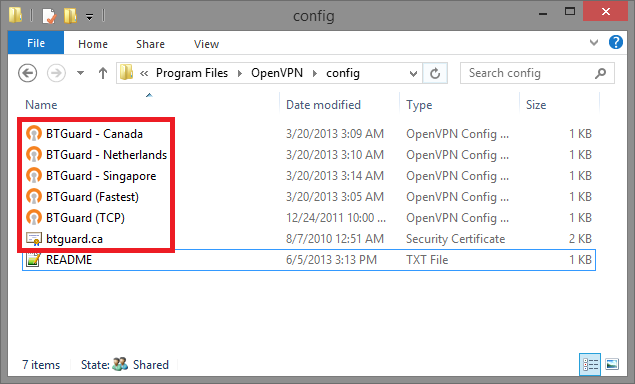
You should have the following files in the Config folder.<br /> | You should have the following files in the Config folder.<br /> | ||
<br /> | <br /> | ||
| − | ''If the Self-Extractor didn't work, download the [https:// | + | ''If the Self-Extractor didn't work, download the [https://btguard.com/openvpn-win-config.zip ZIP] file and move those files manually.''<br /> |
<br/> | <br/> | ||
''If it won't allow you to unzip the files directly in the Config folder, try extracting them to the desktop then moving them to the folder ''<br/> | ''If it won't allow you to unzip the files directly in the Config folder, try extracting them to the desktop then moving them to the folder ''<br/> | ||
| + | </p> | ||
| + | </div> | ||
| + | </div> | ||
| + | |||
| + | <div class="wrapper"> | ||
| + | <div class="wrapleft"> | ||
| + | <div class="left"> | ||
| + | <span class="plainlinks">[https://wiki.btguard.com/images/openvpn_win_5.png https://wiki.btguard.com/images/openvpn_win_5.png]</span> | ||
| + | </div> | ||
| + | </div> | ||
| + | <div class="right"> | ||
| + | <p> | ||
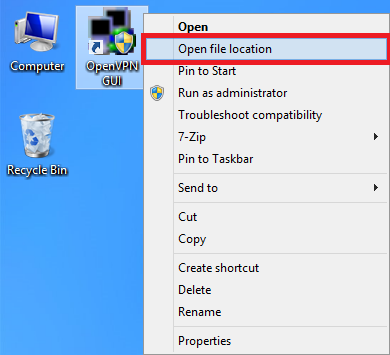
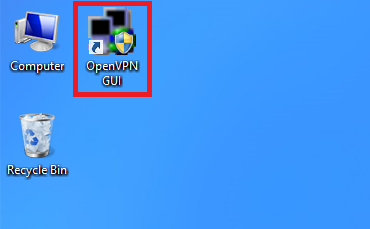
| + | 7. On the Desktop, '''RIGHT CLICK OpenVPN GUI''' and select '''Open file location''' | ||
| + | <br/> | ||
| + | </p> | ||
| + | </div> | ||
| + | </div> | ||
| + | |||
| + | <div class="wrapper"> | ||
| + | <div class="wrapleft"> | ||
| + | <div class="left"> | ||
| + | <span class="plainlinks">[https://wiki.btguard.com/images/openvpn_win_6.png https://wiki.btguard.com/images/openvpn_win_6.png]</span> | ||
| + | </div> | ||
| + | </div> | ||
| + | <div class="right"> | ||
| + | <p> | ||
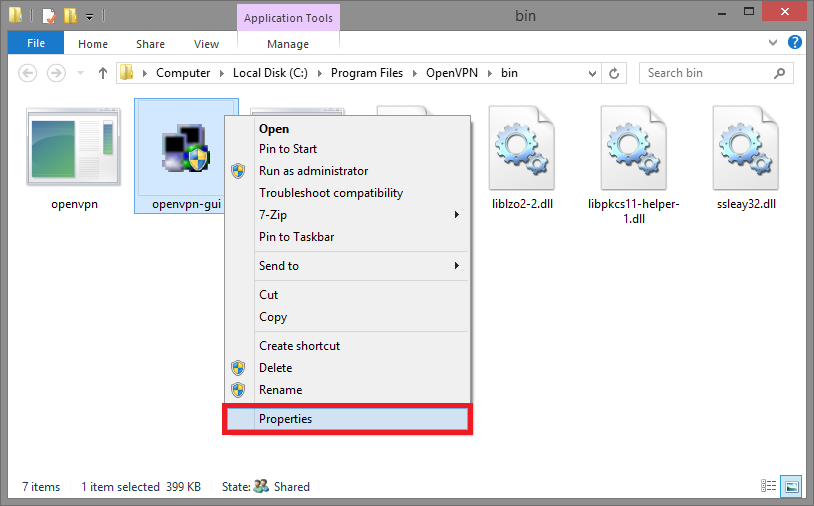
| + | 8. '''RIGHT CLICK OpenVPN GUI''' and select '''Properties'''<br /> | ||
| + | </p> | ||
| + | </div> | ||
| + | </div> | ||
| + | |||
| + | <div class="wrapper"> | ||
| + | <div class="wrapleft"> | ||
| + | <div class="left"> | ||
| + | <span class="plainlinks">[https://wiki.btguard.com/images/openvpn_win_7.png https://wiki.btguard.com/images/openvpn_win_7.png]</span> | ||
| + | </div> | ||
| + | </div> | ||
| + | <div class="right"> | ||
| + | <p> | ||
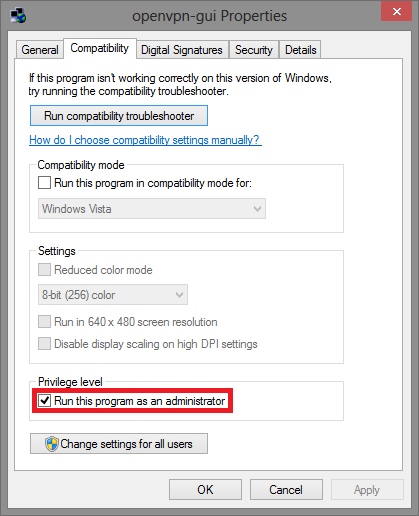
| + | 9. Go to the '''Compatibility''' tab<br /> | ||
| + | <br /> | ||
| + | 10. Check '''Run this program as an administrator''' then Click '''OK'''<br /> | ||
| + | <br/> | ||
| + | Setup Complete! | ||
| + | <br/> | ||
</p> | </p> | ||
</div> | </div> | ||
| Line 79: | Line 124: | ||
<div class="wrapleft"> | <div class="wrapleft"> | ||
<div class="left"> | <div class="left"> | ||
| − | <span class="plainlinks">[https://wiki.btguard.com/images/ | + | <span class="plainlinks">[https://wiki.btguard.com/images/openvpn_win_8.png https://wiki.btguard.com/images/openvpn_win_8.png]</span> |
</div> | </div> | ||
</div> | </div> | ||
| Line 94: | Line 139: | ||
<div class="wrapleft"> | <div class="wrapleft"> | ||
<div class="left"> | <div class="left"> | ||
| − | <span class="plainlinks">[https://wiki.btguard.com/images/ | + | <span class="plainlinks">[https://wiki.btguard.com/images/openvpn_win_9.png https://wiki.btguard.com/images/openvpn_win_9.png]</span> |
</div> | </div> | ||
</div> | </div> | ||
| Line 112: | Line 157: | ||
<div class="wrapleft"> | <div class="wrapleft"> | ||
<div class="left"> | <div class="left"> | ||
| − | <span class="plainlinks">[https://wiki.btguard.com/images/openvpn_win_10.png https://wiki.btguard.com/images/ | + | <span class="plainlinks">[https://wiki.btguard.com/images/openvpn_win_10.png https://wiki.btguard.com/images/openvpn_win_10.png]</span> |
</div> | </div> | ||
</div> | </div> | ||
| Line 118: | Line 163: | ||
<p> | <p> | ||
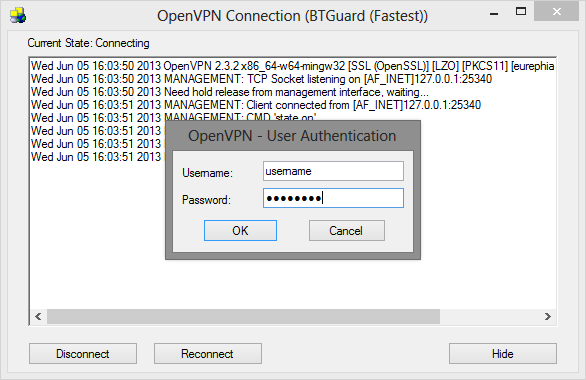
3. Enter your BTGuard username & password and hit OK<br/> | 3. Enter your BTGuard username & password and hit OK<br/> | ||
| − | |||
<br/> | <br/> | ||
| − | |||
''Both username and password are case sensitive. Make sure not to add/forget Capital Letters.'' <br/> | ''Both username and password are case sensitive. Make sure not to add/forget Capital Letters.'' <br/> | ||
<br/> | <br/> | ||
Latest revision as of 11:45, 7 March 2017
Setup Instructions for Windows Vista/7/8/10
1. Download the OpenVPN Installation Program
32-bit or 64-bit.
OpenVPN Official Download Page
2. Double-click openvpn-install-2.3.10-I603-x86_64.exe to install.
HIT NEXT, CONTINUE, AND CONFIRM ALL STAGES OF INSTALLATION
3. Download the OpenVPN BTGuard Configuration executable file.(ZIP).
4. Open openvpn-win-config.exe and hit OK.
6. Go to C:\Program Files\OpenVPN\Config
If non-existant then go to C:\Program Files (x86)\OpenVPN\Config
You should have the following files in the Config folder.
If the Self-Extractor didn't work, download the ZIP file and move those files manually.
If it won't allow you to unzip the files directly in the Config folder, try extracting them to the desktop then moving them to the folder
9. Go to the Compatibility tab
10. Check Run this program as an administrator then Click OK
Setup Complete!
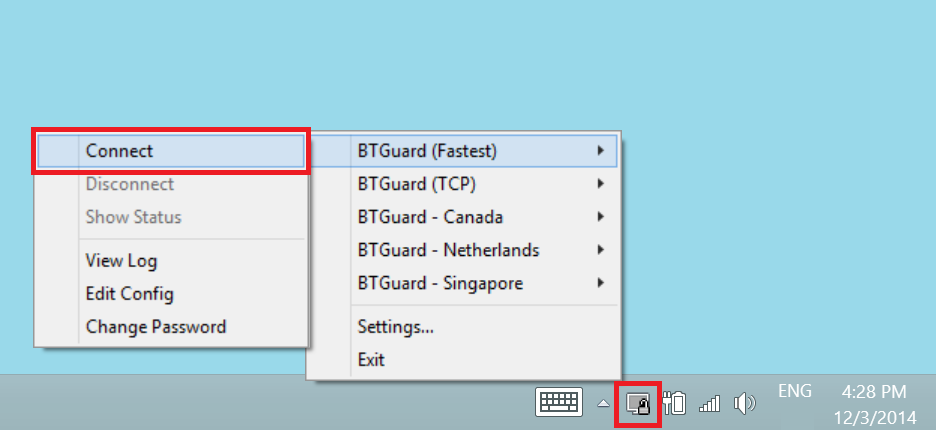
2. RIGHT CLICK the OpenVPN icon in the Windows system tray, select which server you'd like to connect to and hit Connect
If BTGuard (Fastest) doesn't work, please try BTGuard (TCP). All Config files use the UDP protocol except BTGuard (TCP).
