Difference between revisions of "OpenVPN Windows XP"
From BTGuard Wiki
m (Support moved page OpenVPN Windows xp to OpenVPN Windows XP without leaving a redirect) |
|||
| Line 1: | Line 1: | ||
| − | < | + | <div class="wrapper"> |
| − | + | <div class="wrapleft"> | |
| + | <div class="left"> | ||
| + | <img src="" alt=""/> | ||
| + | </div> | ||
| + | </div> | ||
| + | <div class="right"> | ||
| + | <p> | ||
== Setup Instructions == | == Setup Instructions == | ||
| − | + | 1. Download [https://btguard.com/openvpn-install-2.3.0-I005-x86_64.exe OpenVPN Installation Program.]<br /> | |
| + | 2. Double-click '''openvpn-install-2.3.0-I005 to install.'''<br /> | ||
| + | '''HIT NEXT, CONTINUE, AND CONFIRM ALL STAGES OF INSTALLATION'''<br /> | ||
| + | 3. Download [https://btguard.com/openvpn-win-config.exe OpenVPN BTGuard Configuration] ([https://btguard.com/openvpn-win-config.zip ZIP]).<br /> | ||
| + | 4. Extract OpenVPN BTGuard Configuration to '''C:\Program Files\OpenVPN\Config'''<br /> | ||
| + | <br /> | ||
| + | Setup Complete!<br /> | ||
</p> | </p> | ||
| − | |||
| − | |||
| − | |||
| − | |||
| − | |||
| − | |||
| − | |||
| − | |||
| − | |||
| − | |||
| − | |||
| − | |||
| − | |||
| − | |||
</div> | </div> | ||
| + | </div> | ||
| − | |||
| − | |||
| + | <div class="wrapper"> | ||
| + | <div class="wrapleft"> | ||
| + | <div class="left"> | ||
| + | <img src="http://wiki.btguard.com/images/5/5f/Vpn_openvpn_win7_5.jpg " alt=""/> | ||
| + | </div> | ||
| + | </div> | ||
| + | <div class="right"> | ||
| + | <p> | ||
== How To Connect == | == How To Connect == | ||
| − | + | 1. On Desktop, double-click '''OpenVPN GUI''' to start.<br/> | |
| − | + | ||
| − | + | ||
| − | + | ||
</p> | </p> | ||
</div> | </div> | ||
</div> | </div> | ||
| − | + | <div class="wrapper"> | |
| − | <div | + | <div class="wrapleft"> |
| − | <div class=" | + | <div class="left"> |
| − | http://wiki.btguard.com/images/b/b8/Vpn_openvpn_win7_6.jpg | + | <img src="http://wiki.btguard.com/images/b/b8/Vpn_openvpn_win7_6.jpg" alt=""/> |
| − | </div> | + | </div> |
| − | + | </div> | |
| − | <div class="right | + | <div class="right"> |
| − | <p | + | <p> |
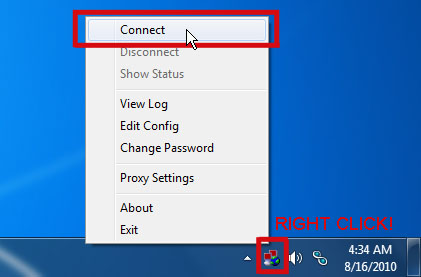
| − | + | 2. '''RIGHT CLICK OpenVPN icon''' in tray and select '''Connect'''<br/> | |
| − | + | 3. Enter your BTGuard username & password and hit OK<br/> | |
| − | + | <br/> | |
| − | + | You are now connected!<br/> | |
</p> | </p> | ||
</div> | </div> | ||
</div> | </div> | ||
Revision as of 23:57, 23 April 2013
Setup Instructions
1. Download OpenVPN Installation Program.
2. Double-click openvpn-install-2.3.0-I005 to install.
HIT NEXT, CONTINUE, AND CONFIRM ALL STAGES OF INSTALLATION
3. Download OpenVPN BTGuard Configuration (ZIP).
4. Extract OpenVPN BTGuard Configuration to C:\Program Files\OpenVPN\Config
Setup Complete!

How To Connect
1. On Desktop, double-click OpenVPN GUI to start.
2. RIGHT CLICK OpenVPN icon in tray and select Connect
3. Enter your BTGuard username & password and hit OK
You are now connected!