Difference between revisions of "OpenVPN Mac OS X latest"
| (4 intermediate revisions by the same user not shown) | |||
| Line 35: | Line 35: | ||
<div class="wrapleft"> | <div class="wrapleft"> | ||
<div class="left"> | <div class="left"> | ||
| − | <span class="plainlinks">[https://wiki.btguard.com/images/ | + | <span class="plainlinks">[https://wiki.btguard.com/images/openvpn_mac_3.5_3.png https://wiki.btguard.com/images/openvpn_mac_3.5_3.png]</span> |
</div> | </div> | ||
</div> | </div> | ||
| Line 115: | Line 115: | ||
<div class="right"> | <div class="right"> | ||
<p><br/><br/> | <p><br/><br/> | ||
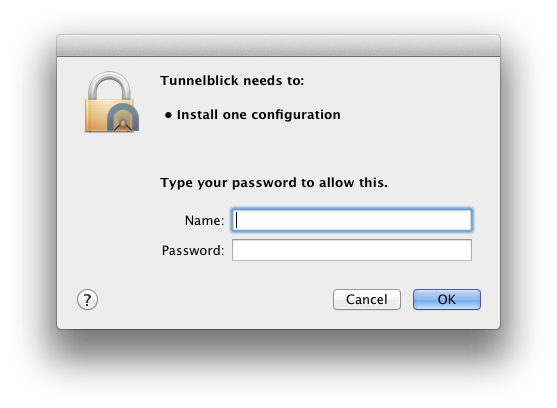
| − | + | 10. Enter your '''Mac password''' and hit '''OK'''. | |
<br/> | <br/> | ||
</p> | </p> | ||
| Line 124: | Line 124: | ||
<div class="wrapleft"> | <div class="wrapleft"> | ||
<div class="left"> | <div class="left"> | ||
| − | <span class="plainlinks">[https://wiki.btguard.com/images/ | + | <span class="plainlinks">[https://wiki.btguard.com/images/openvpn_mac_3.5_8.png https://wiki.btguard.com/images/openvpn_mac_3.5_8.png]</span> |
</div> | </div> | ||
</div> | </div> | ||
<div class="right"> | <div class="right"> | ||
<p><br/><br/> | <p><br/><br/> | ||
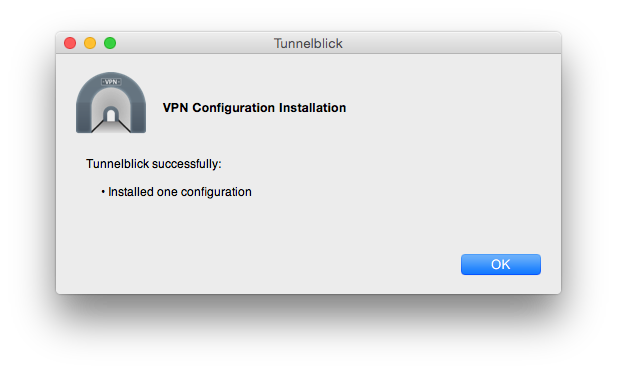
| − | + | 11. Click on '''OK'''.<br/> | |
<br/> | <br/> | ||
| − | + | 12. Repeat '''steps 8''' to '''11''' for '''each''' configuration you might use. <br/> | |
</p> | </p> | ||
</div> | </div> | ||
| Line 141: | Line 141: | ||
<div class="wrapleft"> | <div class="wrapleft"> | ||
<div class="left"> | <div class="left"> | ||
| − | <span class="plainlinks">[https://wiki.btguard.com/images/ | + | <span class="plainlinks">[https://wiki.btguard.com/images/openvpn_mac_3.5_9.png https://wiki.btguard.com/images/openvpn_mac_3.5_9.png]</span> |
</div> | </div> | ||
</div> | </div> | ||
<div class="right"> | <div class="right"> | ||
<p><br/><br/> | <p><br/><br/> | ||
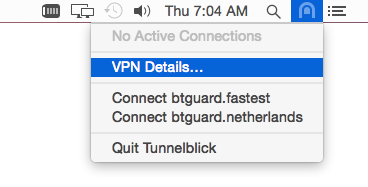
| − | + | 13. Find the Tunnelblick icon in your menu bar (top right), click on it and select '''VPN Details'''. | |
<br/> | <br/> | ||
</p> | </p> | ||
| Line 155: | Line 155: | ||
<div class="wrapleft"> | <div class="wrapleft"> | ||
<div class="left"> | <div class="left"> | ||
| − | <span class="plainlinks">[https://wiki.btguard.com/images/ | + | <span class="plainlinks">[https://wiki.btguard.com/images/openvpn_mac_3.5_10.png https://wiki.btguard.com/images/openvpn_mac_3.5_10.png]</span> |
</div> | </div> | ||
</div> | </div> | ||
<div class="right"> | <div class="right"> | ||
<p><br/><br/> | <p><br/><br/> | ||
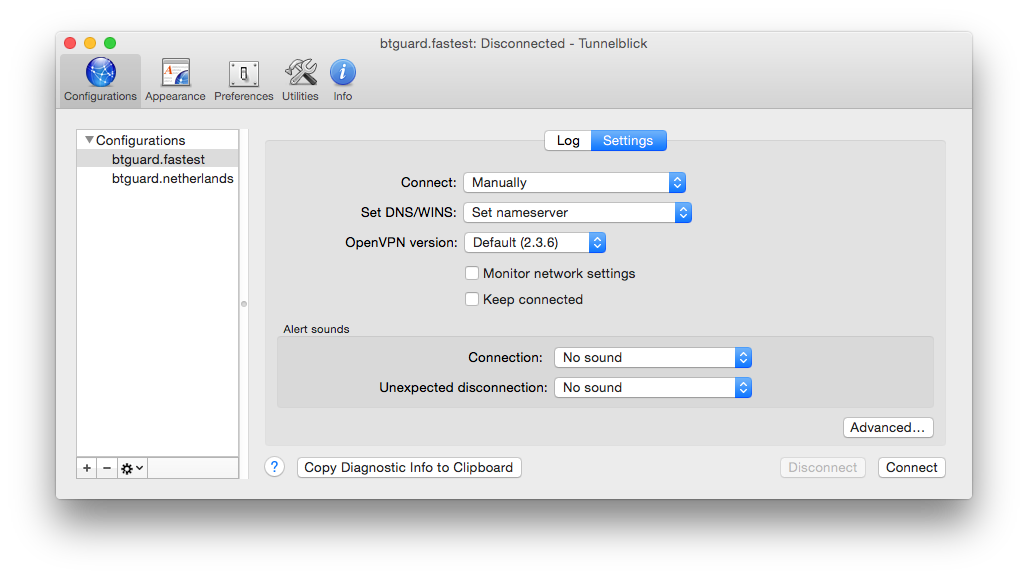
| − | + | 14. Select one of the configurations on the left and click on '''Settings'''. | |
| + | <br/><br/> | ||
| + | 15. Uncheck '''Monitor network settings'''.<br/> | ||
<br/> | <br/> | ||
| − | + | 16. Repeat '''steps 14''' & '''15''' for '''each''' configurations. | |
| − | + | ||
| − | + | ||
| − | + | ||
| − | + | ||
| − | + | ||
| − | + | ||
| − | + | ||
| − | + | ||
| − | + | ||
| − | + | ||
| − | + | ||
| − | + | ||
| − | + | ||
| − | + | ||
<br/><br/><br/> | <br/><br/><br/> | ||
Setup Complete! <br/> | Setup Complete! <br/> | ||
| Line 182: | Line 170: | ||
</div> | </div> | ||
</div> | </div> | ||
| − | |||
| Line 198: | Line 185: | ||
<div class="wrapleft"> | <div class="wrapleft"> | ||
<div class="left"> | <div class="left"> | ||
| − | <span class="plainlinks">[https://wiki.btguard.com/images/ | + | <span class="plainlinks">[https://wiki.btguard.com/images/openvpn_mac_3.5_11.png https://wiki.btguard.com/images/openvpn_mac_3.5_11.png]</span> |
</div> | </div> | ||
</div> | </div> | ||
| Line 217: | Line 204: | ||
<div class="wrapleft"> | <div class="wrapleft"> | ||
<div class="left"> | <div class="left"> | ||
| − | <span class="plainlinks">[https://wiki.btguard.com/images/ | + | <span class="plainlinks">[https://wiki.btguard.com/images/openvpn_mac_3.5_12.png https://wiki.btguard.com/images/openvpn_mac_3.5_12.png]</span>> |
</div> | </div> | ||
</div> | </div> | ||
Latest revision as of 12:34, 15 July 2015
Setup Instructions for Tunnelblick 3.5 (older version 3.4 here or 3.2 here)
1. Download the Tunnelblick Installation File.
Official Download Page
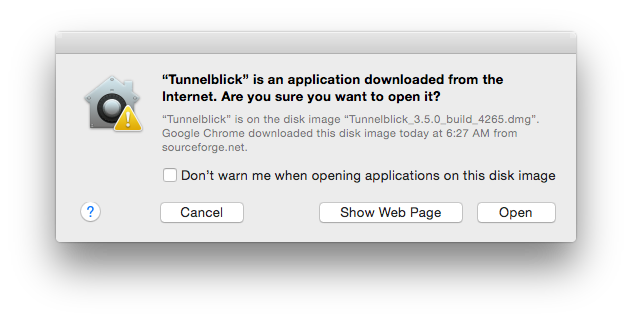
2. Run the downloaded file and click on Open.
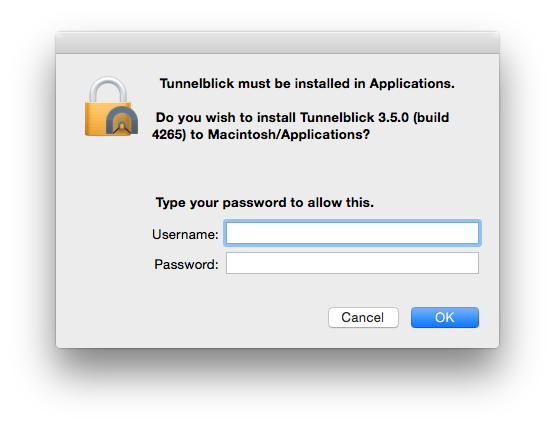
3. Enter your Mac password and hit OK.

4. Click on Launch.

5. Click on I have configuration files.

6. Click on Done.
7. Download the OpenVPN BTGuard Configuration Zip and open it.
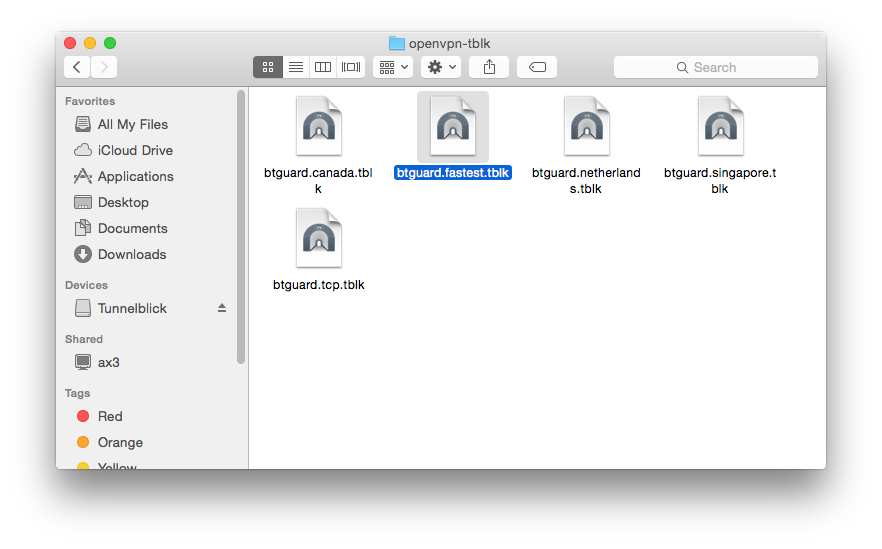
8. Double click on the the server you wish to connect to, for example btguard.fastest.tblk
9. Pick whichever you prefer depending on your needs.
Sometimes this window will not appear and nothing happens when you do step 11. If this occurs, just quit Tunnelblick and repeat step 11. Tunnelblick should automatically open and you should see this window.
10. Enter your Mac password and hit OK.
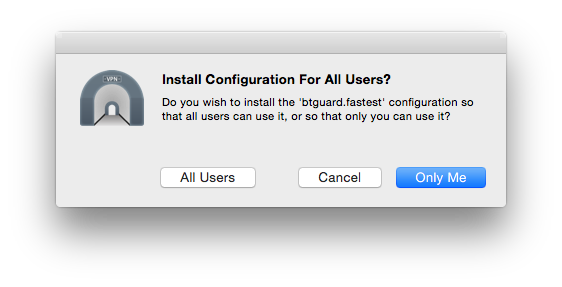
11. Click on OK.
12. Repeat steps 8 to 11 for each configuration you might use.
13. Find the Tunnelblick icon in your menu bar (top right), click on it and select VPN Details.
14. Select one of the configurations on the left and click on Settings.
15. Uncheck Monitor network settings.
16. Repeat steps 14 & 15 for each configurations.
Setup Complete!
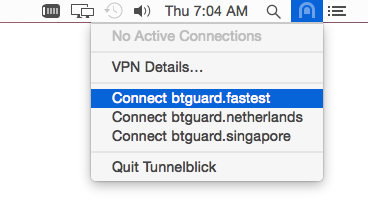
How To Connect
1. Click on the Tunnelblick icon in the menu bar and select Connect btguard.fastest or any of the other servers.
If BTGuard (Fastest) doesn't work, please try BTGuard (TCP). All Config files use the UDP protocol except BTGuard (TCP).
 >
>
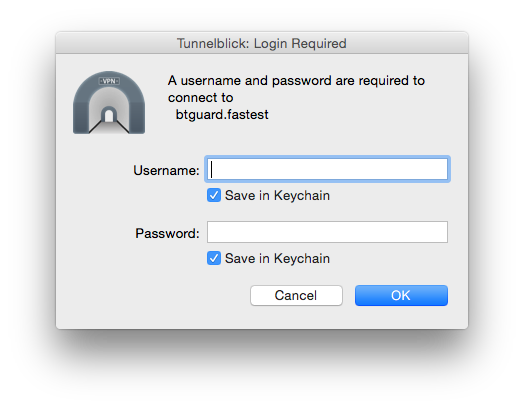
2. Enter your BTGuard username & password and hit OK.
Both username and password are case sensitive. Make sure not to add/forget Capital Letters.
You are now connected!