Difference between revisions of "OpenVPN Tomato"
(Created page with "<div class="wrapper"> <div class="wrapleftnocenter"> <div class="left"> <div class="errorx"> <p> ''' PLEASE READ THROUGH THIS WHOLE ARTICLE!''' <br/> You risk br...") |
|||
| (4 intermediate revisions by the same user not shown) | |||
| Line 1: | Line 1: | ||
<div class="wrapper"> | <div class="wrapper"> | ||
| − | <div class=" | + | <div class="wrapleft"> |
<div class="left"> | <div class="left"> | ||
| − | + | <span class="plainlinks">[https://wiki.btguard.com/images/openvpn_tomato_1.png https://wiki.btguard.com/images/openvpn_tomato_1.png]</span> | |
| − | + | </div> | |
| − | + | </div> | |
| − | + | ||
| − | + | ||
| − | + | ||
| − | + | ||
| − | + | ||
| − | + | ||
| − | + | ||
| − | + | ||
| − | + | ||
| − | + | ||
| − | + | ||
| − | + | ||
| − | + | ||
| − | + | ||
| − | + | ||
| − | + | ||
| − | + | ||
| − | + | ||
| − | </div> | + | |
| − | </div> | + | |
| − | + | ||
<div class="right"> | <div class="right"> | ||
| − | + | <p> | |
| − | + | == Setup Instructions == | |
| − | == | + | 1. Connect to http://192.168.1.1/<br/> |
| − | + | 2. Click on '''VPN Tunneling''' > '''OpenVPN Client''' > '''Client 1''' > '''Basic'''.<br/> | |
| − | + | 3. Fill in the following:<br/> | |
| − | + | ||
| − | + | ||
| − | + | ||
| − | + | ||
<br/> | <br/> | ||
| − | + | Checkmark '''Start with WAN'''<br/> | |
| − | </ | + | Interface Type: '''TUN'''<br/> |
| + | Protocol: '''UDP''' (''switch to TCP if UDP doesn't work'')<br/> | ||
| + | Server Address: '''vpn.btguard.com''', Port: '''1194'''<br/> | ||
| + | Firewall: '''Automatic'''<br/> | ||
| + | Authorization Mode: '''TLS'''<br/> | ||
| + | Checkmark '''Username/Password Authentication'''<br/> | ||
| + | Username:<br/> | ||
| + | Password:<br/> | ||
| + | ''Both username and password are case sensitive. Make sure not to add/forget Capital Letters.'' <br/> | ||
| + | Leave '''Username Authen. Only''' unchecked.<br/> | ||
| + | Extra HMAC authorization (tls-auth): '''Disabled'''<br/> | ||
| + | Checkmark '''Create NAT on tunnel'''<br/> | ||
| + | <br/> | ||
| + | 4. Hit '''Save'''<br/> | ||
| + | </p> | ||
</div> | </div> | ||
</div> | </div> | ||
| − | |||
| − | |||
| − | |||
| + | |||
| + | |||
| + | <div class="wrapper"> | ||
| + | <div class="wrapleft"> | ||
| + | <div class="left"> | ||
| + | <span class="plainlinks">[https://wiki.btguard.com/images/openvpn_tomato_2.png https://wiki.btguard.com/images/openvpn_tomato_2.png]</span> | ||
</div> | </div> | ||
</div> | </div> | ||
<div class="right"> | <div class="right"> | ||
| − | + | <p> | |
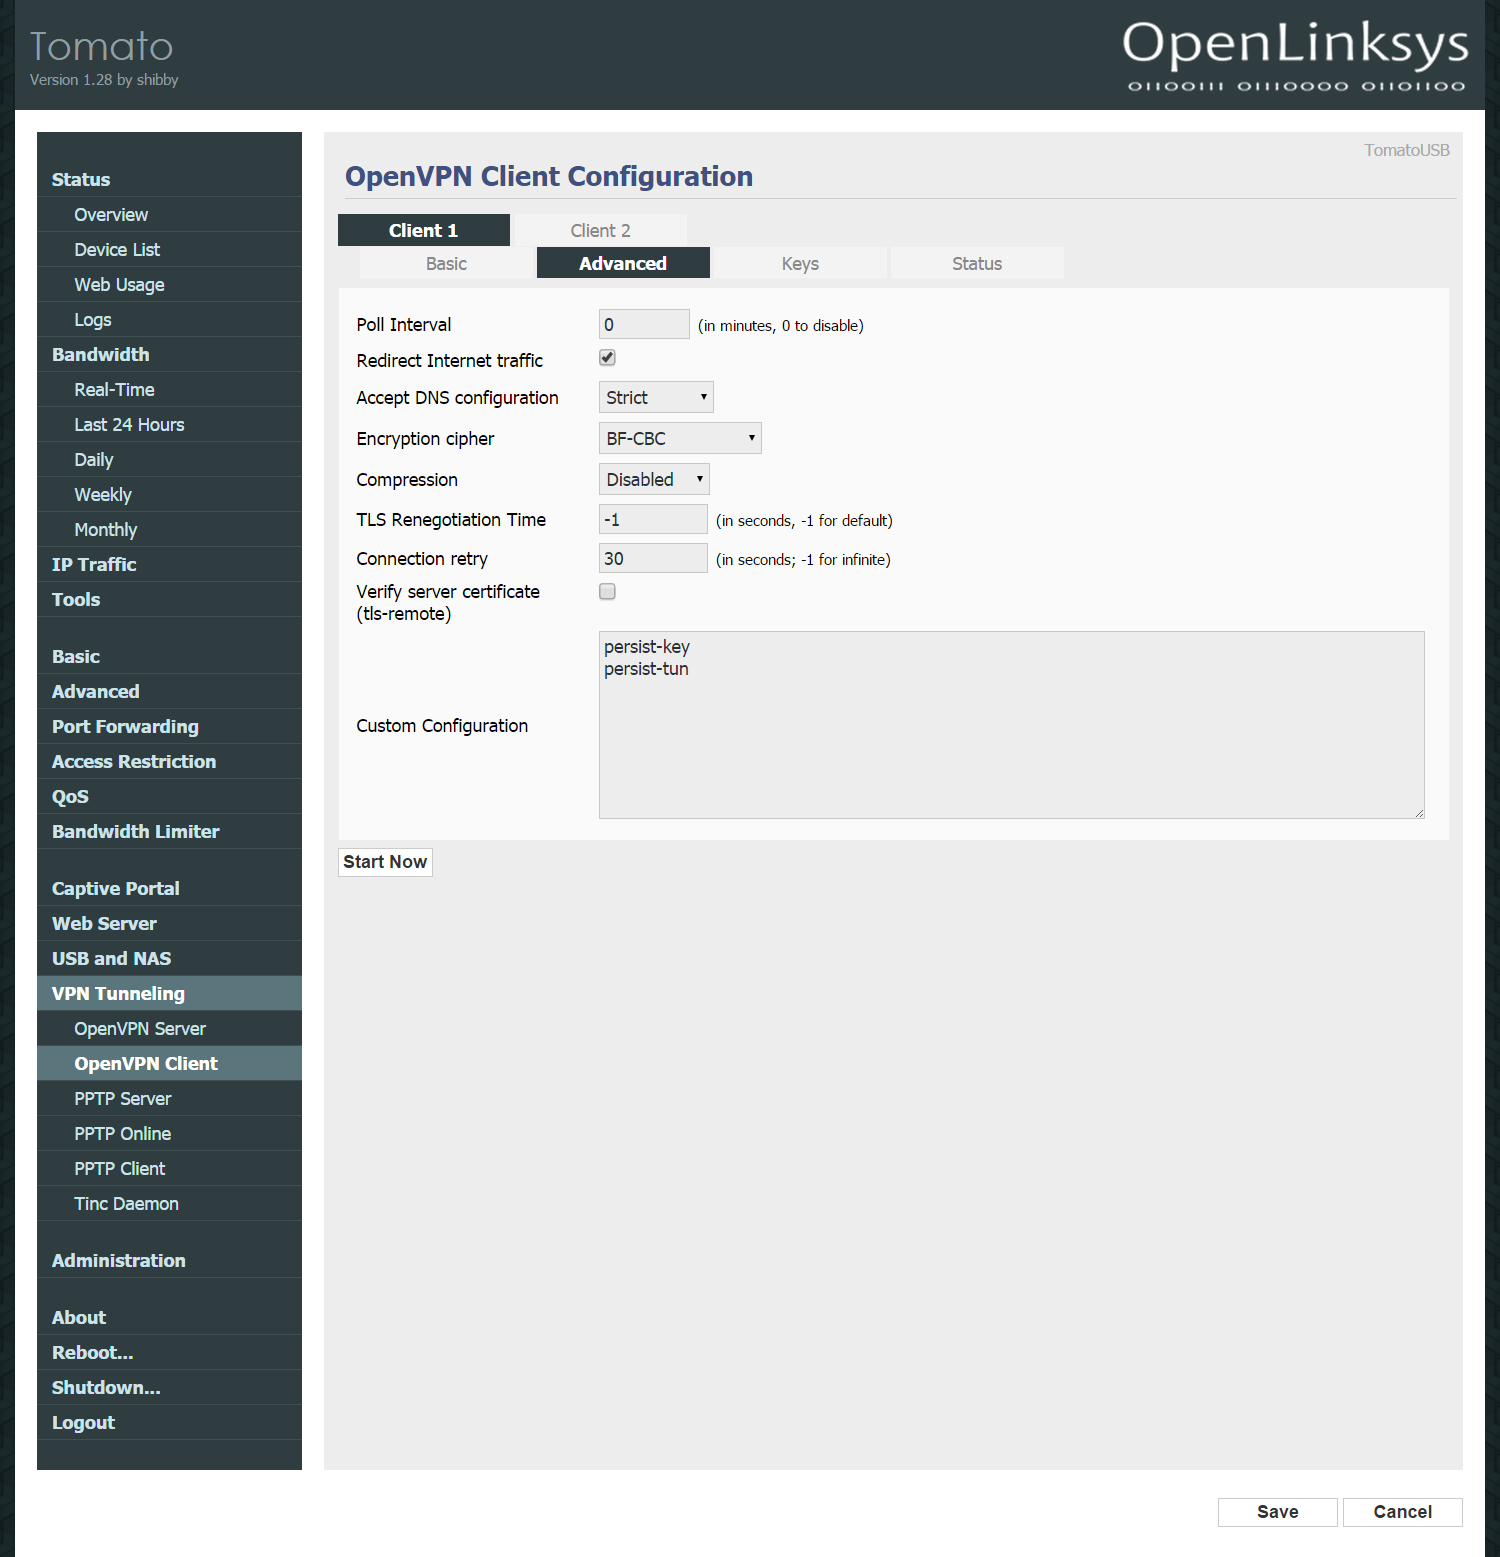
| + | 5. Got to the '''Advanced''' tab.<br/> | ||
| + | <br/> | ||
| + | 6.Fill in the following:<br/> | ||
| + | <br/> | ||
| + | Checkmark '''Redirect Internet traffic'''<br/> | ||
| + | Accept DNS configuration: '''Strict'''<br/> | ||
| + | Encryption cipher: '''AES-256-CBC'''<br/> | ||
| + | Compression: '''Disabled'''<br/> | ||
| + | TLS Renegotiation Time: '''-1'''<br/> | ||
| + | Connection retry: '''30'''<br/> | ||
| + | Leave '''Verify server certificate (tls-remote)''' unchecked.<br/> | ||
| + | Custom Configuration:<br/> | ||
| + | '''persist-key'''<br/> | ||
| + | '''persist-tun'''<br/> | ||
| + | <br/> | ||
| + | 7.Hit '''Save'''<br/> | ||
| + | </p> | ||
</div> | </div> | ||
</div> | </div> | ||
| − | + | ||
| − | + | ||
| − | + | ||
| Line 63: | Line 70: | ||
<div class="wrapleft"> | <div class="wrapleft"> | ||
<div class="left"> | <div class="left"> | ||
| − | <span class="plainlinks">[https://wiki.btguard.com/images/ | + | <span class="plainlinks">[https://wiki.btguard.com/images/openvpn_tomato_3.png https://wiki.btguard.com/images/openvpn_tomato_3.png]</span> |
</div> | </div> | ||
</div> | </div> | ||
<div class="right"> | <div class="right"> | ||
<p> | <p> | ||
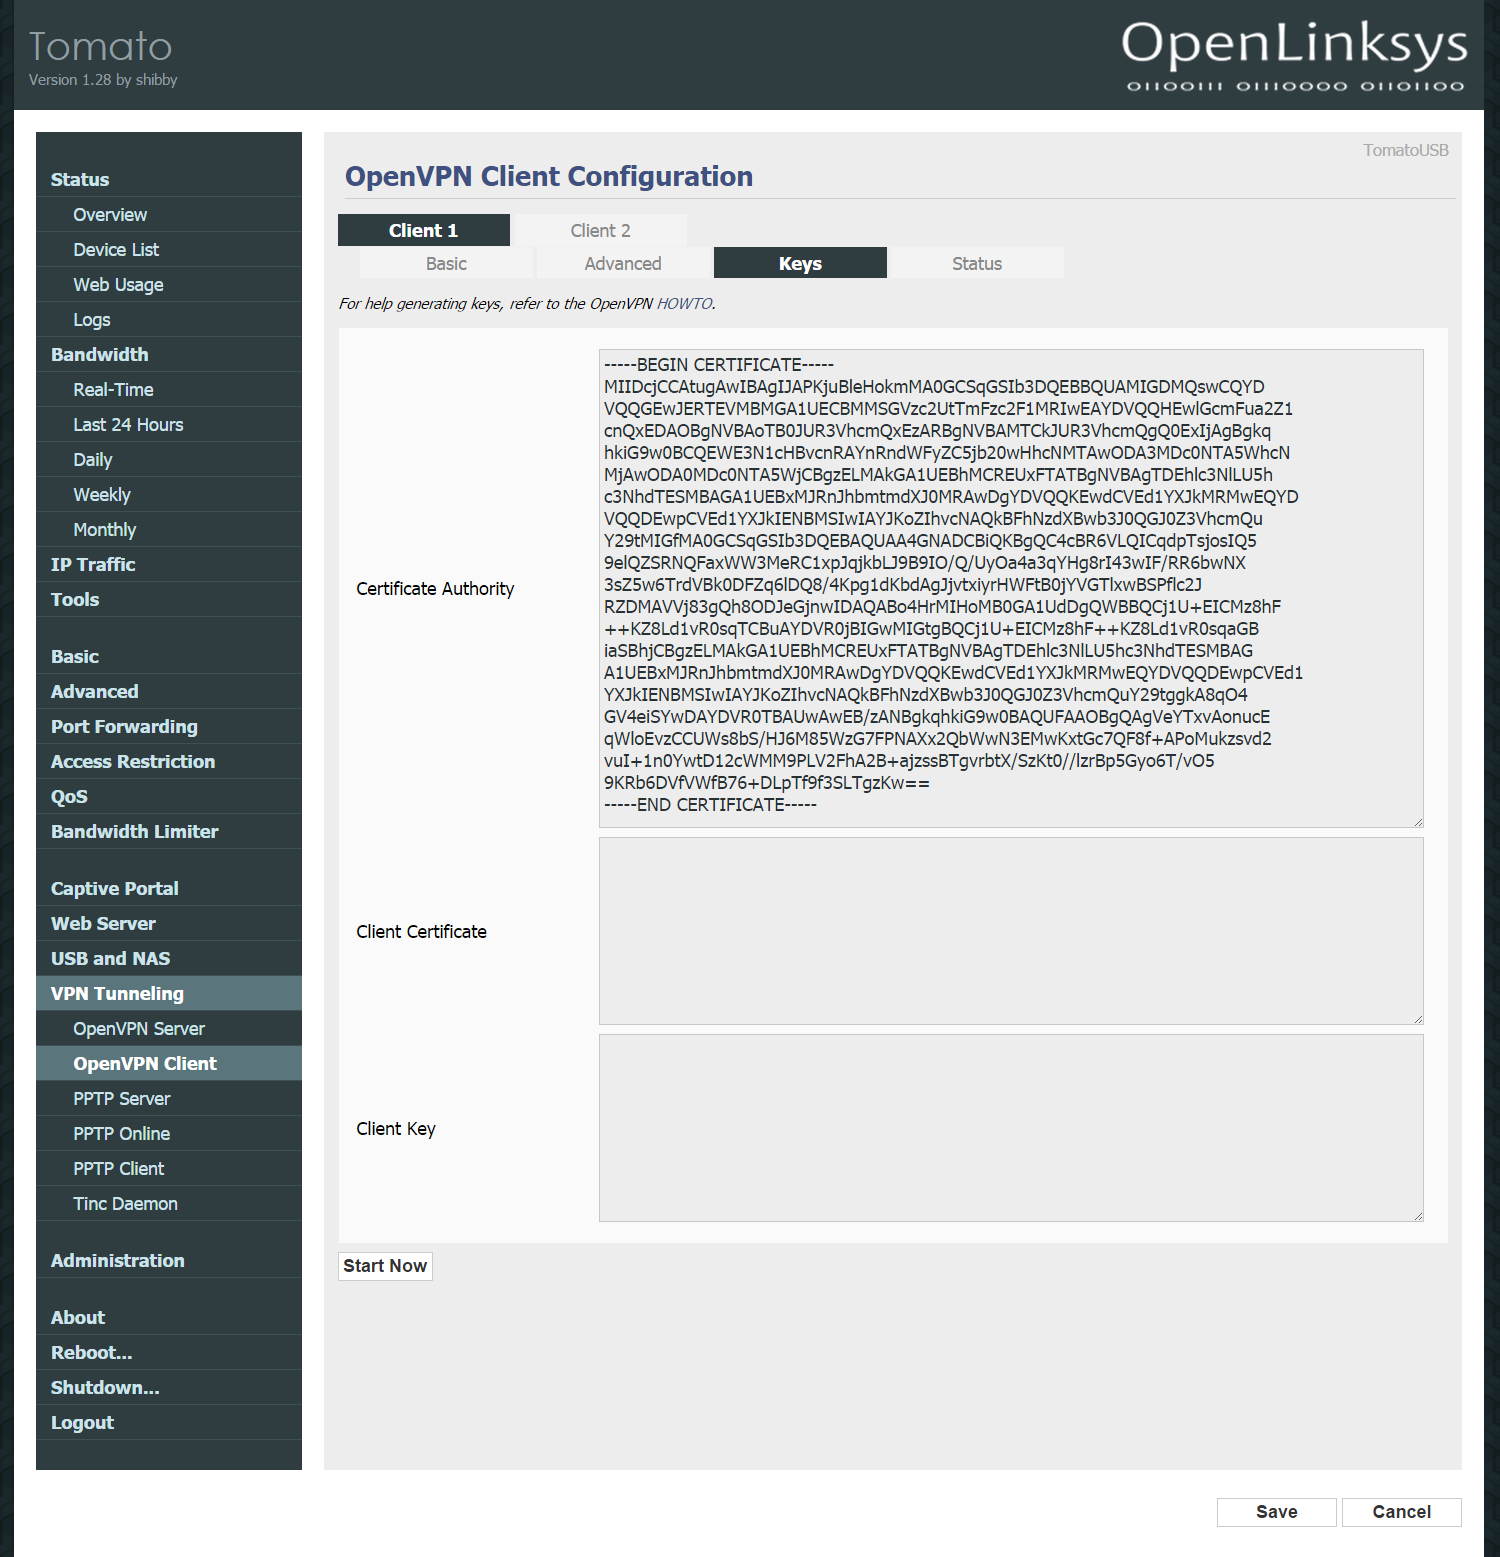
| − | == | + | 8. Go to the '''Keys''' tab.<br/> |
| − | + | <br/> | |
| + | 9. Copy the following into '''Certificate Authority'''<br/> | ||
| + | ''(Click below to select all)''<br/> | ||
| + | <html> | ||
| + | <textarea class="textarea" rows=6 cols=50 onclick="this.select()" readonly> | ||
| + | -----BEGIN CERTIFICATE----- | ||
| + | MIIDcjCCAtugAwIBAgIJAPKjuBleHokmMA0GCSqGSIb3DQEBBQUAMIGDMQswCQYD | ||
| + | VQQGEwJERTEVMBMGA1UECBMMSGVzc2UtTmFzc2F1MRIwEAYDVQQHEwlGcmFua2Z1 | ||
| + | cnQxEDAOBgNVBAoTB0JUR3VhcmQxEzARBgNVBAMTCkJUR3VhcmQgQ0ExIjAgBgkq | ||
| + | hkiG9w0BCQEWE3N1cHBvcnRAYnRndWFyZC5jb20wHhcNMTAwODA3MDc0NTA5WhcN | ||
| + | MjAwODA0MDc0NTA5WjCBgzELMAkGA1UEBhMCREUxFTATBgNVBAgTDEhlc3NlLU5h | ||
| + | c3NhdTESMBAGA1UEBxMJRnJhbmtmdXJ0MRAwDgYDVQQKEwdCVEd1YXJkMRMwEQYD | ||
| + | VQQDEwpCVEd1YXJkIENBMSIwIAYJKoZIhvcNAQkBFhNzdXBwb3J0QGJ0Z3VhcmQu | ||
| + | Y29tMIGfMA0GCSqGSIb3DQEBAQUAA4GNADCBiQKBgQC4cBR6VLQICqdpTsjosIQ5 | ||
| + | 9elQZSRNQFaxWW3MeRC1xpJqjkbLJ9B9IO/Q/UyOa4a3qYHg8rI43wIF/RR6bwNX | ||
| + | 3sZ5w6TrdVBk0DFZq6lDQ8/4Kpg1dKbdAgJjvtxiyrHWFtB0jYVGTlxwBSPflc2J | ||
| + | RZDMAVVj83gQh8ODJeGjnwIDAQABo4HrMIHoMB0GA1UdDgQWBBQCj1U+EICMz8hF | ||
| + | ++KZ8Ld1vR0sqTCBuAYDVR0jBIGwMIGtgBQCj1U+EICMz8hF++KZ8Ld1vR0sqaGB | ||
| + | iaSBhjCBgzELMAkGA1UEBhMCREUxFTATBgNVBAgTDEhlc3NlLU5hc3NhdTESMBAG | ||
| + | A1UEBxMJRnJhbmtmdXJ0MRAwDgYDVQQKEwdCVEd1YXJkMRMwEQYDVQQDEwpCVEd1 | ||
| + | YXJkIENBMSIwIAYJKoZIhvcNAQkBFhNzdXBwb3J0QGJ0Z3VhcmQuY29tggkA8qO4 | ||
| + | GV4eiSYwDAYDVR0TBAUwAwEB/zANBgkqhkiG9w0BAQUFAAOBgQAgVeYTxvAonucE | ||
| + | qWloEvzCCUWs8bS/HJ6M85WzG7FPNAXx2QbWwN3EMwKxtGc7QF8f+APoMukzsvd2 | ||
| + | vuI+1n0YwtD12cWMM9PLV2FhA2B+ajzssBTgvrbtX/SzKt0//lzrBp5Gyo6T/vO5 | ||
| + | 9KRb6DVfVWfB76+DLpTf9f3SLTgzKw== | ||
| + | -----END CERTIFICATE----- | ||
| + | </textarea> | ||
| + | </html> | ||
| + | |||
| + | |||
<br/> | <br/> | ||
| − | |||
<br/> | <br/> | ||
| − | + | 10. Hit '''Save''' then '''Start Now''' to connect. | |
</p> | </p> | ||
</div> | </div> | ||
</div> | </div> | ||
Latest revision as of 21:46, 5 August 2020

Setup Instructions
1. Connect to http://192.168.1.1/
2. Click on VPN Tunneling > OpenVPN Client > Client 1 > Basic.
3. Fill in the following:
Checkmark Start with WAN
Interface Type: TUN
Protocol: UDP (switch to TCP if UDP doesn't work)
Server Address: vpn.btguard.com, Port: 1194
Firewall: Automatic
Authorization Mode: TLS
Checkmark Username/Password Authentication
Username:
Password:
Both username and password are case sensitive. Make sure not to add/forget Capital Letters.
Leave Username Authen. Only unchecked.
Extra HMAC authorization (tls-auth): Disabled
Checkmark Create NAT on tunnel
4. Hit Save
5. Got to the Advanced tab.
6.Fill in the following:
Checkmark Redirect Internet traffic
Accept DNS configuration: Strict
Encryption cipher: AES-256-CBC
Compression: Disabled
TLS Renegotiation Time: -1
Connection retry: 30
Leave Verify server certificate (tls-remote) unchecked.
Custom Configuration:
persist-key
persist-tun
7.Hit Save
8. Go to the Keys tab.
9. Copy the following into Certificate Authority
(Click below to select all)
10. Hit Save then Start Now to connect.