|
|
| (141 intermediate revisions by the same user not shown) |
| Line 1: |
Line 1: |
| − | <div id="page-content"> | + | <div class="wrapper"> |
| | + | <div class="wrapleft"> |
| | + | <div class="left"> |
| | + | <span class="plainlinks">[https://wiki.btguard.com/images/openvpn_win_1.png https://wiki.btguard.com/images/openvpn_win2.4_2.png]</span> |
| | + | </div> |
| | + | </div> |
| | + | <div class="right"> |
| | + | <p> |
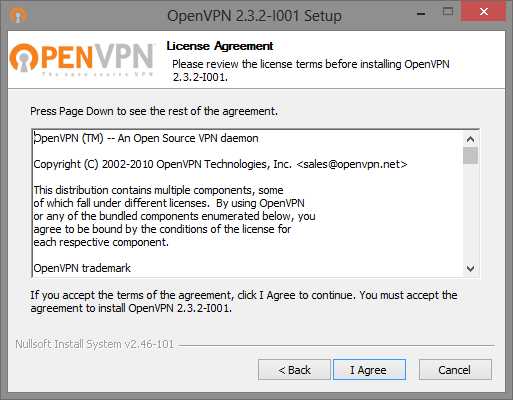
| | + | == Setup Instructions for Windows Vista/7/8/10 for OpenVPN version 2.4 ([[OpenVPN_Windows_Old|older version 2.3 here]]) == |
| | + | 1. Download the OpenVPN Installation Program <br/> [https://swupdate.openvpn.org/community/releases/OpenVPN-2.5.8-I604-amd64.msi Click here to download].<br/> |
| | + | <br /> |
| | + | [https://openvpn.net/index.php/open-source/downloads.html OpenVPN Official Download Page]<br /> |
| | + | <br /> |
| | + | 2. Double-click '''[https://swupdate.openvpn.org/community/releases/OpenVPN-2.5.8-I604-amd64.msi OpenVPN-2.5.8-I604-amd64.msi to install].'''<br /> |
| | + | '''HIT NEXT, CONTINUE, AND CONFIRM ALL STAGES OF INSTALLATION'''<br /> |
| | + | <br/> |
| | + | </p> |
| | + | </div> |
| | + | </div> |
| | | | |
| − | <div style="padding: 2em;"> | + | <div class="wrapper"> |
| − | <table border="0" cellspacing="11" cellpadding="11"> | + | <div class="wrapleft"> |
| − | <tbody> | + | <div class="left"> |
| − | <tr>
| + | <span class="plainlinks">[https://wiki.btguard.com/images/openvpn_win_2.png https://wiki.btguard.com/images/openvpn_win_2.png]</span> |
| − | <td style="width: 700px;" align="left" valign="top">
| + | </div> |
| − | <h1><span>HMA! Pro VPN on Android devices</span></h1>
| + | </div> |
| − | <p><strong>For connecting to the HMA! Pro VPN service on Android devices, you have multiple options; <br />there are several connection methods you can use. </strong></p>
| + | <div class="right"> |
| − | <p>First you should try the PPTP setup - if experiencing any problems with it, you should try L2TP protocol.<br />If that does not fit your needs or you have issues with it, feel free to try the OpenVPN setup.<strong></strong></p>
| + | <p> |
| − | <p><strong><br /></strong></p>
| + | 3. Download the [https://wiki.btguard.com/uploads/openvpn_auto_config.exe OpenVPN BTGuard Configuration] executable file.([https://wiki.btguard.com/uploads/openvpn2.4.zip ZIP]).<br /><br/> |
| − | <p><strong>Attention:</strong> [[Kindle Fire]] users can now use the [[FeatVPN]] app to connect to our VPN service.<br />See our tutorial <a title="Tutorials:FeatVPN OpenVPN on Android" href="http://wiki.hidemyass.com/Tutorials:FeatVPN_OpenVPN_on_Android">OpenVPN FeatVPN tutorial</a> for a step-by-step configuration how-to.<strong><br /></strong></p>
| + | 4. Open '''openvpn_auto_config.exe'''. |
| − | </td>
| + | <br /><br /> |
| − | <td><img src="http://wiki.btguard.com/images/a/a1/Vpn_openvpn_win7_3.jpg" alt="/> </td>
| + | 5. Click on '''Ok'''.<br /> |
| − | </tr>
| + | </p> |
| − | <tr>
| + | </div> |
| − | <td style="width: 700px;" colspan="2" align="left" valign="top">
| + | |
| − | <p><span style="font-size: small;"><strong>----<br /></strong></span></p>
| + | |
| − | <p><span style="font-size: small;"><strong><br /></strong></span></p> | + | |
| − | <table style="width: 100%;" border="0" cellspacing="5" cellpadding="5">
| + | |
| − | <tbody>
| + | |
| − | <tr>
| + | |
| − | <td colspan="3"><span style="font-size: small;"><strong>Your available connection methods depend on which Android version you have:</strong></span></td>
| + | |
| − | </tr> | + | |
| − | <tr>
| + | |
| − | <td style="width: 33%;">
| + | |
| − | <p>Android 2.3.x Gingerbread + Android 3.x Honeycomb:</p> | + | |
| − | <ul>
| + | |
| − | <li><strong><a title="Tutorials:Android Honeycomb PPTP and L2TP setup" href="http://wiki.hidemyass.com/Tutorials:Android_Honeycomb_PPTP_and_L2TP_setup">PPTP instructions</a></strong></li>
| + | |
| − | <li><strong><a title="Tutorials:Android Honeycomb PPTP and L2TP setup" href="http://wiki.hidemyass.com/Tutorials:Android_Honeycomb_PPTP_and_L2TP_setup">L2TP instructions</a></strong></li>
| + | |
| − | <li><strong><a title="Tutorials:FeatVPN OpenVPN on Android" href="http://wiki.hidemyass.com/Tutorials:FeatVPN_OpenVPN_on_Android">OpenVPN FeatVPN tutoria</a></strong></li>
| + | |
| − | <li><strong>[[Tutorials:OpenVPN Connect for Android|OpenVPN Connect for Android]]</strong></li>
| + | |
| − | <li><strong><a title="Tutorials:OpenVPN for Android App" href="http://wiki.hidemyass.com/Tutorials:OpenVPN_for_Android_App">OpenVPN for Android app</a></strong></li>
| + | |
| − | </ul>
| + | |
| − | </td>
| + | |
| − | <td style="width: 33%;">
| + | |
| − | <p>Android 4.0.x Ice Cream Sandwich:</p>
| + | |
| − | <ul>
| + | |
| − | <li><strong><a title="Tutorials:Android ICS PPTP setup" href="http://wiki.hidemyass.com/Tutorials:Android_ICS_and_Jelly_Bean_PPTP_setup">PPTP ICS and Jelly Bean tutorial</a></strong></li>
| + | |
| − | <li><strong><a title="Tutorials:FeatVPN OpenVPN on Android" href="http://wiki.hidemyass.com/Tutorials:FeatVPN_OpenVPN_on_Android">OpenVPN FeatVPN tutorial</a></strong></li>
| + | |
| − | <li><strong>[[Tutorials:OpenVPN Connect for Android|OpenVPN Connect for Android]]</strong></li>
| + | |
| − | <li><strong><a href="http://wiki.hidemyass.com/Tutorials:OpenVPN_for_Android_App">OpenVPN for Android app</a></strong></li>
| + | |
| − | </ul>
| + | |
| − | <p> </p>
| + | |
| − | </td>
| + | |
| − | <td style="width: 33%;">
| + | |
| − | <p> Android 4.1.x Jelly Bean (e.g. Google Nexus 7)</p>
| + | |
| − | <ul>
| + | |
| − | <li><strong><a title="Tutorials:Android ICS PPTP setup" href="http://wiki.hidemyass.com/Tutorials:Android_ICS_and_Jelly_Bean_PPTP_setup">PPTP ICS and Jelly Bean tutorial</a></strong></li>
| + | |
| − | <li><strong><a href="http://wiki.hidemyass.com/Tutorials:Android_Jelly_Bean_L2TP_setup">L2TP Jelly Bean tutorial</a></strong></li>
| + | |
| − | <li><strong><a title="Tutorials:FeatVPN OpenVPN on Android" href="http://wiki.hidemyass.com/Tutorials:FeatVPN_OpenVPN_on_Android">OpenVPN FeatVPN tutorial</a></strong></li>
| + | |
| − | <li><strong>[[Tutorials:OpenVPN Connect for Android|OpenVPN Connect for Android]]</strong></li>
| + | |
| − | <li><strong><a href="http://wiki.hidemyass.com/Tutorials:OpenVPN_for_Android_App">OpenVPN for Android app</a></strong></li>
| + | |
| − | </ul>
| + | |
| − | </td>
| + | |
| − | </tr>
| + | |
| − | <tr>
| + | |
| − | <td style="width: 33%;"> </td>
| + | |
| − | <td style="width: 33%;">
| + | |
| − | <p>Amazon Kindle Fire:</p>
| + | |
| − | <ul>
| + | |
| − | <li><strong><a title="Tutorials:FeatVPN OpenVPN on Android" href="http://wiki.hidemyass.com/Tutorials:FeatVPN_OpenVPN_on_Android">OpenVPN FeatVPN tutorial</a></strong></li>
| + | |
| − | </ul>
| + | |
| − | </td>
| + | |
| − | <td style="width: 33%;"> </td>
| + | |
| − | </tr>
| + | |
| − | </tbody>
| + | |
| − | </table>
| + | |
| − | </td>
| + | |
| − | </tr>
| + | |
| − | <tr>
| + | |
| − | <td style="width: 700px;" colspan="2" align="left" valign="top">
| + | |
| − | <div class="image-container floatleft">
| + | |
| − | <h1><span id="Manual_PPTP_and_L2TP_connection_setup" class="mw-headline">Manual PPTP and L2TP connection setup</span></h1>
| + | |
| − | <ul>
| + | |
| − | <li>on Android v2 Gingerbread / v3 Honeycomb, see the article <strong><a title="Tutorials:Android Honeycomb PPTP and L2TP setup" href="http://wiki.hidemyass.com/Tutorials:Android_Honeycomb_PPTP_and_L2TP_setup">Android Honeycomb PPTP and L2TP setup</a></strong></li>
| + | |
| − | <li>on Android v4.0 ICS and V4.1 Jelly Bean, see the article <strong><a title="Tutorials:Android ICS PPTP setup" href="http://wiki.hidemyass.com/Tutorials:Android_ICS_and_Jelly_Bean_PPTP_setup">Android ICS and Jelly Bean PPTP tutorial</a></strong></li>
| + | |
| − | <li>on Android v4.1 Jelly Bean, see the article<strong> <a href="http://wiki.hidemyass.com/Tutorials:Android_Jelly_Bean_L2TP_setup">Android Jelly Bean L2TP tutorial</a></strong></li>
| + | |
| − | </ul>
| + | |
| − | <p> </p>
| + | |
| − | <p><strong>Attention: On certain subversions of ICS (Ice Cream Sandwich), connecting via L2TP is not possible due to changes in the implementation by Google. <br />We recommend to upgrade to Jelly Bean, or downgrade to Gingerbread/Honeycomb.<br /><br /></strong></p>
| + | |
| − | <p> </p>
| + | |
| − | <p> </p>
| + | |
| − | <h1>OpenVPN on Android devices (no rooted device required)</h1>
| + | |
| − | <p>You can use the VPN client software [[FeatVPN]] to connect via OpenVPN without the need of rooting your device, it's the easiest method to connect.<br />Alternatively use the "OpenVPN for Android" app.<br /><br /><strong>1.</strong> Option No. 1 - using the app [[FeatVPN]]. <br />This is the recommended and currently best method to connect via OpenVPN on Android devices.<br />See our tutorial for configuring FeatVPN here: <strong>[[Tutorials:FeatVPN OpenVPN on Android]]<br /></strong></p>
| + | |
| − | <p><strong><br /></strong></p>
| + | |
| − | <p><strong>2. </strong>Option No. 2 - using the [[Tutorials:OpenVPN Connect for Android|OpenVPN Connect for Android app]]<strong><br /></strong>A very easy and straight-forward app to connect via OpenVPN. Tutorial here: <strong>[[Tutorials:OpenVPN Connect for Android]] <br /></strong></p>
| + | |
| − | <p><strong><br /></strong><strong></strong></p>
| + | |
| − | <p><strong>3.</strong> Option No. 3 - using <a href="https://play.google.com/store/apps/details?id=de.blinkt.openvpn" target="_blank"><strong>OpenVPN for Android</strong></a> (<a href="http://hmastuff.com/openvpnforandroid0.5.7_29.apk">openvpnforandroid0.5.7_29.apk</a>) - working on all Android versions<br />See our tutorial for using it here: <strong>[[Tutorials:OpenVPN for Android App]]</strong></p>
| + | |
| − | <p> </p>
| + | |
| − | <p> </p>
| + | |
| − | <h1>OpenVPN on Android devices (rooted device required)</h1>
| + | |
| − | <p><span style="color: #000000;">(this method is <span style="color: #ff0000;"><strong>obsolete</strong></span> - we recommend to use the nonroot methods mentiond above.)</span><br />Note that you need root privileges to use OpenVPN on Android devices. To get and keep root, you will need to use apps like</p>
| + | |
| − | <ul>
| + | |
| − | <li>z4root: <a href="http://hmastuff.com/android/z4root.7z">Download .APK </a>- <a href="http://forum.xda-developers.com/showthread.php?t=833953">xda thread</a></li>
| + | |
| − | <li>Vipermod: <a href="http://vipermod.tiamat-dev.com/">Website</a></li>
| + | |
| − | <li>Superuser: <a href="https://play.google.com/store/apps/details?id=com.noshufou.android.su">Android Market</a> - <a href="http://hmastuff.com/android/com.noshufou.android.su.apk">Download .APK</a></li>
| + | |
| − | <li>Rootkeeper: <a href="https://play.google.com/store/apps/details?id=org.projectvoodoo.otarootkeeper">Android Market</a> - <a href="http://hmastuff.com/android/org.projectvoodoo.otarootkeeper.apk">Download .APK</a></li>
| + | |
| − | </ul>
| + | |
| − | <p>Once you're sure that you have root privileges, please download and install required apps to get OpenVPN working:</p>
| + | |
| − | <ul>
| + | |
| − | <li>TUN.ko installer: <a href="https://play.google.com/store/apps/details?id=com.aed.tun.installer">Android Market</a> - <a href="http://hmastuff.com/android/com.aed.tun.installer.apk">Download .APK</a> - <a href="http://hmastuff.com/android/tun.ko.for.Android.ICS.zip">tun.ko for ICS</a> - <a href="http://www.schaeuffelhut.de/wordpress/?p=237" target="_blank">tun.ko for Nexus</a></li>
| + | |
| − | <li>OpenVPN installer: <a href="https://play.google.com/store/apps/details?id=de.akvsoft.droid.ovpninstall">Android Market</a> - <a href="http://hmastuff.com/android/de.akvsoft.droid.ovpninstall.apk">Download .APK</a></li>
| + | |
| − | <li>OpenVPN settings: <a href="https://play.google.com/store/apps/details?id=de.schaeuffelhut.android.openvpn&hl=en">Android Market</a> - <a href="http://hmastuff.com/android/de.schaeuffelhut.android.openvpn.apk">Download .APK</a></li>
| + | |
| − | <li>BusyBox: <a href="https://play.google.com/store/apps/details?id=stericson.busybox">Android Market</a> - <a href="http://hmastuff.com/android/stericson.busybox.apk">Download .APK</a></li>
| + | |
| − | </ul>
| + | |
| − | <p>After all this is installed, do:</p>
| + | |
| − | <ul>
| + | |
| − | <li>start the "<strong>OpenVPN installer</strong>" and let it install the OpenVPN binaries</li>
| + | |
| − | <li>create a folder with the name "<strong>openvpn</strong>" on your sdcard</li>
| + | |
| − | </ul>
| + | |
| − | <p>Now you can either do the configuration manually, or use our prepared configuration package.</p>
| + | |
| − | <p><strong><br /></strong></p>
| + | |
| − | <p><strong>a) Prepared configuration package:</strong></p>
| + | |
| − | <ul> | + | |
| − | <li>Download this file: <a href="http://hmastuff.com/android/HMA_OpenVPN_on_Android.zip"><strong>HMA_OpenVPN_on_Android.zip</strong></a> - extract its content into the "openvpn" folder you just created on your sdcard.</li>
| + | |
| − | <li>Open the file "<strong>password.txt</strong>" and replace the lines with your VPN account username and your password.</li>
| + | |
| − | <li>The package contains 1 sample TCP config file (Dusseldorf, Germany) and 1 sample UDP config file (Copenhagen, Denmark)<br />You can just replace the server IP at the bottom of the config files with the IP from a different VPN server.</li>
| + | |
| − | </ul>
| + | |
| | </div> | | </div> |
| − | <div class="image-container floatleft"><strong>b) If you want to do the configuration manually, follow this steps:</strong><br /> | + | |
| − | <ul> | + | |
| − | <li>Download the keys and certificates from <strong>http://hidemyass.com/vpn-config/keys</strong> - put them into the "<strong>openvpn</strong>" folder you just created on your sdcard</li> | + | |
| − | <li>Create a textfile called "<strong>password.txt</strong>" in the "<strong>openvpn</strong>" folder - open this textfile and enter your VPN account username as the first line, and your account password as the second line. Save it.</li>
| + | <div class="wrapper"> |
| − | <li>Select the configuration file from the VPN server you want to connect to @ <strong>http://hidemyass.com/vpn-config</strong> - copy it into the "<strong>openvpn</strong>" folder on the sdcard.</li> | + | <div class="wrapleft"> |
| − | <li>Now, start the app "<strong>OpenVPN settings</strong>". It should show the config file you just downloaded. Tap it and hold, then select "<strong>Edit config file</strong>".</li> | + | <div class="left"> |
| − | <ul>
| + | <span class="plainlinks">[https://wiki.btguard.com/images/openvpn_win2.4_3.png https://wiki.btguard.com/images/openvpn_win2.4_3.png]</span> |
| − | <li>Change the line "<strong>auth-user-pass</strong>" to "<strong>auth-user-pass password.txt</strong>".</li>
| + | </div> |
| − | <li><strong>ATTENTION: Since we are using inline certificate and key files within the *.ovpn config files now, this might be absolete!</strong><br />Check the lines regarding the certificates and keys, e.g. if they are like "<strong>ca ./keys/ca.crt</strong>", you need to put the keys and certificates in a subfolder named "<strong>keys</strong>".<br />Or you can remove the "<strong>./keys/</strong>" part and leave the keys and certificates in the same folder as the <strong>*.ovpn</strong> config files.</li>
| + | </div> |
| − | <li>Remove the line "<strong>show-net-up</strong>", "<strong>dhcp-renew</strong>", "<strong>dhcp-release</strong>"</li> | + | <div class="right"> |
| − | <li>Save it. Now copy the config file into the "<strong>openvpn</strong>" folder.</li>
| + | <p> |
| − | </ul>
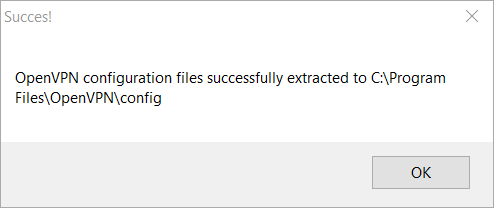
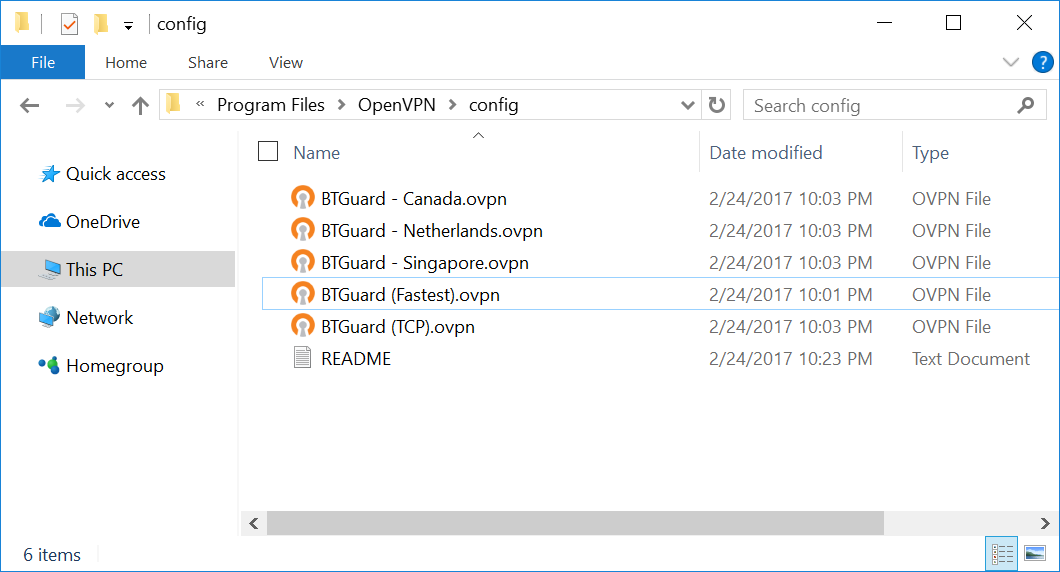
| + | 6. Go to '''C:\Program Files\OpenVPN\Config'''<br /> |
| − | </ul>
| + | If non-existant then go to '''C:\Program Files (x86)\OpenVPN\Config'''<br /> |
| − | <p> </p>
| + | <br /> |
| − | <p>For connecting to the VPN, start the "<strong>OpenVPN settings</strong>" app, then do:</p>
| + | You should have the following files in the Config folder.<br /> |
| − | <ul>
| + | <br /> |
| − | <li>Check the checkboxes next to "<strong>OpenVPN</strong>" and next to the config file you want to use for connecting.</li>
| + | ''If the Self-Extractor didn't work, download the [https://wiki.btguard.com/uploads/openvpn2.4.zip ZIP] file and move those files manually.''<br /> |
| − | <li>You should get notified that you're connected now. You can verify your IP at e.g. <strong>http://ipaddress.com</strong></li>
| + | <br/> |
| − | </ul>
| + | ''If it won't allow you to unzip the files directly in the Config folder, try extracting them to the desktop then moving them to the folder ''<br/> |
| − | <p> </p>
| + | </p> |
| − | <p>If this does not work, you have not installed all necessary apps correctly or mistyped your username+password.<br />When you have enabled logging in the "<strong>OpenVPN settings</strong>" app, you can check the logs of your config file for the reason.</p> | + | </div> |
| | </div> | | </div> |
| − | </td> | + | |
| − | </tr> | + | |
| − | <tr> | + | <div class="wrapper"><br/> |
| − | <td style="width: 700px;" colspan="2" align="left" valign="top"> | + | ---- |
| − | <div class="image-container floatleft"> | + | <br/></div> |
| − | <h1>Troubleshooting</h1>
| + | |
| − | <p><br /><strong>If you are unable to connect to the VPN from your Android device, please note:</strong><br />- Always try both protocols (PPTP+L2TP) and a few servers to compare the results. <br />- For PPTP or L2TP connections, make sure to use your <strong>PPTP password</strong>, not your account password.<br />- All passwords, logins, secrets are <strong>case sensitive</strong>, please watch for capital letters.<br />- If you are trying to connect via <strong>3G:</strong> please check if you provider is blocking the connection. Most mobile data plans don't include VPN support.</p>
| + | |
| − | <p><br />In case that you are connecting via WiFi, please check <strong>PPTP/L2TP passthrough</strong> options of your router.<br />For [[DD-WRT]] routers, go to <strong>Security > VPN</strong><br />- Enable <strong>PPTP Passthrough</strong><br />- Enable <strong>IPSec and L2TP Passthrough</strong><br />- Click <strong>Save</strong><br /><br />Also, deactivate the integrated <strong>firewall</strong> of your router. <br />In some cases it's necessary to forward VPN related ports to your Android devices IP. (alternatively set devices IP as exposed host, = forwarding all ports)</p>
| + | |
| − | <p> </p> | + | <div class="wrapper"> |
| − | <ul>
| + | <div class="wrapleft"> |
| − | <li>Of course you can also connect your Android device to the VPN by using a VPN router. E.g. get a DD-WRT supported router, flash it with DD-WRT firmware. Then configure it for our VPN using the instructions from the article <strong>[[Router configuration]]</strong>. Once done, you can just let the Android device use the routers WLAN connection, then it will be automatically protected by the VPN.</li>
| + | <div class="left"> |
| − | <li>An alternative (not recommended way though) is to use a local hotspot for the VPN, and then let the Android device connect to that hotspot. You can use the instructions from the article <strong>[[Blackberry]]</strong> for this purpose.</li>
| + | <span class="plainlinks">[https://wiki.btguard.com/images/openvpn_win2.4_4.png https://wiki.btguard.com/images/openvpn_win2.4_4.png]</span> |
| − | <li>How to change your DNS settings on Android devices is explained in the article <strong>[[DNS]]</strong>: http://wiki.hidemyass.com/DNS#How_to_configure_your_DNS_settings_on_Android</li>
| + | </div> |
| − | </ul> | + | </div> |
| | + | <div class="right"> |
| | + | <p> |
| | + | |
| | + | == How To Connect == |
| | + | 1. On the Desktop, double-click '''OpenVPN GUI''' to start.<br/> |
| | + | </p> |
| | + | </div> |
| | </div> | | </div> |
| − | </td> | + | |
| − | </tr> | + | <div class="wrapper"> |
| − | </tbody> | + | <div class="wrapleft"> |
| − | </table> | + | <div class="left"> |
| | + | <span class="plainlinks">[https://wiki.btguard.com/images/openvpn_win2.4_5.png https://wiki.btguard.com/images/openvpn_win2.4_5.png]</span> |
| | + | </div> |
| | + | </div> |
| | + | <div class="right"> |
| | + | <p> |
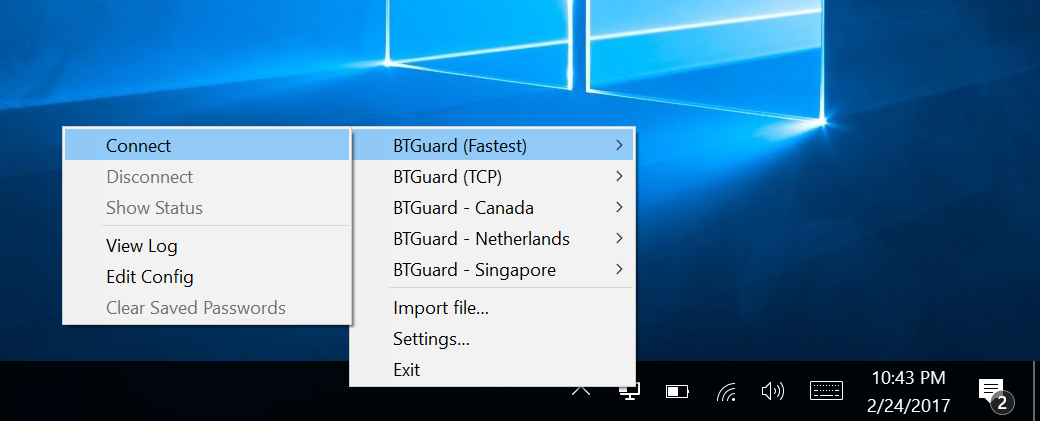
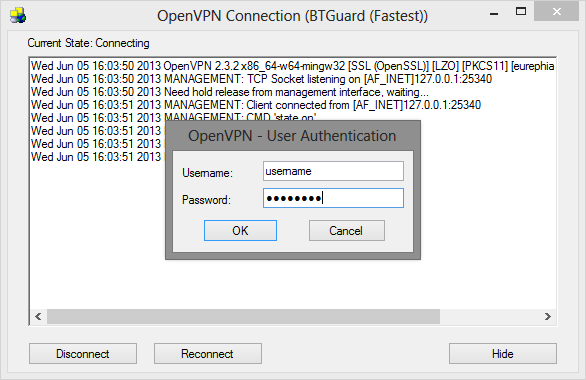
| | + | 2. '''RIGHT CLICK''' the '''OpenVPN icon''' in the Windows system tray, select which server you'd like to connect to and hit '''Connect'''<br/> |
| | + | <br/> |
| | + | ''If '''BTGuard (Fastest)''' doesn't work, please try '''BTGuard (TCP)'''. All Config files use the UDP protocol except BTGuard (TCP).'' |
| | + | <br/> |
| | + | </p> |
| | + | </div> |
| | + | </div> |
| | + | |
| | + | |
| | + | |
| | + | <div class="wrapper"> |
| | + | <div class="wrapleft"> |
| | + | <div class="left"> |
| | + | <span class="plainlinks">[https://wiki.btguard.com/images/openvpn_win_10.png https://wiki.btguard.com/images/openvpn_win2.4_6.png]</span> |
| | + | </div> |
| | + | </div> |
| | + | <div class="right"> |
| | + | <p> |
| | + | 3. Enter your BTGuard username & password and hit OK<br/> |
| | + | Checkmark Save password if you'd like.<br/> |
| | + | <br/> |
| | + | |
| | + | ''Both username and password are case sensitive. Make sure not to add/forget Capital Letters.'' <br/> |
| | + | <br/> |
| | + | You are now connected!<br/> |
| | + | <br/> |
| | + | <br/> |
| | + | Here is a list of all of our IP addresses:<br/> |
| | + | 109.201.133.205<br/> |
| | + | 109.201.133.206<br/> |
| | + | 104.254.90.82<br/> |
| | + | 104.254.90.83<br/> |
| | + | 104.254.90.84<br/> |
| | + | 104.254.90.85<br/> |
| | + | 104.254.90.86<br/> |
| | + | 104.254.90.87<br/> |
| | + | 104.254.92.226<br/> |
| | + | 104.254.92.227<br/> |
| | + | 104.254.92.228<br/> |
| | + | 104.254.92.229<br/> |
| | + | 104.254.92.230<br/> |
| | + | <br/> |
| | + | If you visit [https://ip-lookup.net/ Ip-lookup.net] and see one of our IPs, everything is working correctly!<br/> |
| | + | <br/> |
| | + | </p> |
| | + | </div> |
| | + | </div> |
| | + | |
| | + | |
| | + | |
| | + | |
| | + | |
| | + | |
| | + | |
| | + | <div class="wrapper"><br/> |
| | + | ---- |
| | + | <br/></div> |
| | + | |
| | + | |
| | + | |
| | + | <div class="wrapper"> |
| | + | <div class="wrapleft"> |
| | + | <div class="left"> |
| | + | <span class="plainlinks">[https://wiki.btguard.com/images/qbvpn1.png https://wiki.btguard.com/images/qbvpn1.png]</span> |
| | + | </div> |
| | + | </div> |
| | + | <div class="right"> |
| | + | <p> |
| | + | |
| | + | == For qBittorrent Users! == |
| | + | We have noticed that some IP leaks can happen with qBittorrent while using a VPN. <br/> |
| | + | <br/> |
| | + | To fix this we have 2 solutions.<br/> |
| | + | -The first one is to use an older version of qBittorrent. [https://sourceforge.net/projects/qbittorrent/files/qbittorrent-win32/qbittorrent-3.3.16/qbittorrent_3.3.16_setup.exe/download Click here to download v3.3.16]<br/> |
| | + | <br/> |
| | + | -If you prefer to use the newest version, please apply these changes in the settings.<br/> |
| | + | <br/> |
| | + | <br/> |
| | + | In qBittorrent, go to Tools - Options - Advanced and change the Network Interface from Any interface to the one OpenVPN is using.<br/> |
| | + | <br/> |
| | + | Most likely it should be Local Area Connection but depending on your network setup on your computer it could be named differently. <br/> |
| | + | <br/> |
| | + | To find the name, please follow the instructions below. |
| | + | <br/> |
| | + | </p> |
| | + | </div> |
| | + | </div> |
| | + | |
| | + | |
| | + | <div class="wrapper"> |
| | + | <div class="wrapleft"> |
| | + | <div class="left"> |
| | + | <span class="plainlinks">[https://wiki.btguard.com/images/qbvpn2.png https://wiki.btguard.com/images/qbvpn2.png]</span> |
| | + | </div> |
| | + | </div> |
| | + | <div class="right"> |
| | + | <p> |
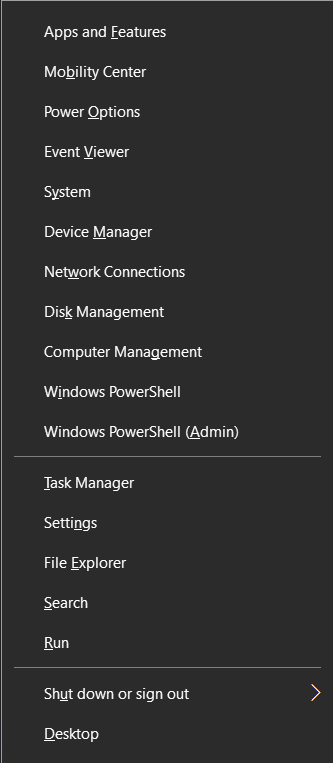
| | + | 1. Hit the '''Windows Key''' + '''X''' then select '''Network Connections'''<br/> |
| | + | <br/> |
| | + | </p> |
| | + | </div> |
| | + | </div> |
| | + | |
| | + | |
| | + | <div class="wrapper"> |
| | + | <div class="wrapleft"> |
| | + | <div class="left"> |
| | + | <span class="plainlinks">[https://wiki.btguard.com/images/qbvpn3.png https://wiki.btguard.com/images/qbvpn3.png]</span> |
| | + | </div> |
| | + | </div> |
| | + | <div class="right"> |
| | + | <p> |
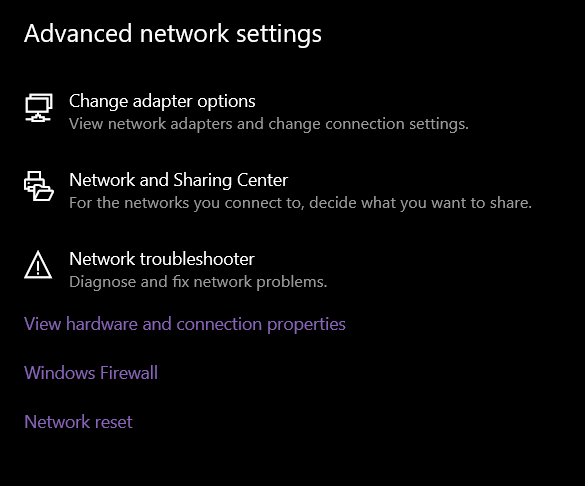
| | + | 2. On the Network Connections page, look under Advanced network settings and click on '''Change adapter options'''<br/> |
| | + | <br/> |
| | + | </p> |
| | + | </div> |
| | + | </div> |
| | + | |
| | + | <div class="wrapper"> |
| | + | <div class="wrapleft"> |
| | + | <div class="left"> |
| | + | <span class="plainlinks">[https://wiki.btguard.com/images/qbvpn4.png https://wiki.btguard.com/images/qbvpn4.png]</span> |
| | + | </div> |
| | + | </div> |
| | + | <div class="right"> |
| | + | <p> |
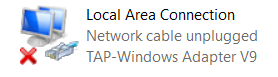
| | + | 3. Find the one that says '''TAP-Windows Adapter V9'''.<br/> |
| | + | In this case it is called '''Local Area Connection''' but it could be named differently on your end.<br/> |
| | + | <br/> |
| | + | This is the one you want to select in the qBittorrent settings.<br/> |
| | + | <br/> |
| | + | </p> |
| | + | </div> |
| | </div> | | </div> |
| − | </div>
| |
| − | <p>[[Category:Android]]</p>
| |
| − | <p>[[Category:Instructions]]</p>
| |
| − | <p>[[Category:VPN]]</p>
| |
| − | <p>[[Category:Mobile devices]]</p>
| |
| − | <p>[[Category:Protocols]]<span style="color: #ffffff; font-size: xx-small;">_FO</span></p>
| |
| − | <p><span style="color: #ffffff; font-size: xx-small;">[[ddddddddddddddddddddddddddddddsssssssssdRCETOC__</span></p>
| |