Difference between revisions of "OpenVPN Windows Vista/7/8"
(<DIV CLASS="LEFT"> </DIV> </DIV> <DIV CLASS="RIGHT"> <P><BR/> </P> </DIV></DIV> <DIV CLASS="WRAPPER"> <DIV CLASS="WRAPLEFT">) |
|||
| (40 intermediate revisions by the same user not shown) | |||
| Line 2: | Line 2: | ||
<div class="wrapleft"> | <div class="wrapleft"> | ||
<div class="left"> | <div class="left"> | ||
| − | <span class="plainlinks">[ | + | <span class="plainlinks">[https://wiki.btguard.com/images/openvpn_win_1.png https://wiki.btguard.com/images/openvpn_win2.4_2.png]</span> |
</div> | </div> | ||
</div> | </div> | ||
<div class="right"> | <div class="right"> | ||
<p> | <p> | ||
| − | == Setup Instructions == | + | == Setup Instructions for Windows Vista/7/8/10 for OpenVPN version 2.4 ([[OpenVPN_Windows_Old|older version 2.3 here]]) == |
| − | 1. Download [https:// | + | 1. Download the OpenVPN Installation Program <br/> [https://swupdate.openvpn.org/community/releases/OpenVPN-2.5.8-I604-amd64.msi Click here to download].<br/> |
| − | 2. Double-click '''openvpn- | + | <br /> |
| + | [https://openvpn.net/index.php/open-source/downloads.html OpenVPN Official Download Page]<br /> | ||
| + | <br /> | ||
| + | 2. Double-click '''[https://swupdate.openvpn.org/community/releases/OpenVPN-2.5.8-I604-amd64.msi OpenVPN-2.5.8-I604-amd64.msi to install].'''<br /> | ||
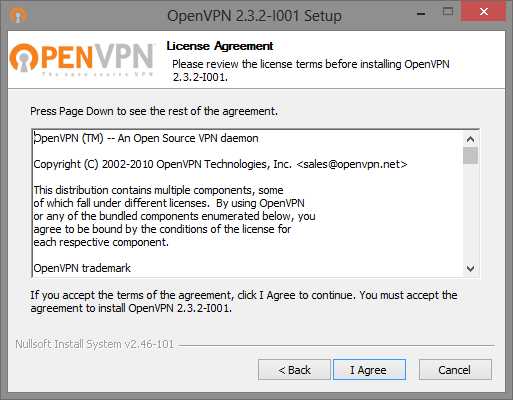
'''HIT NEXT, CONTINUE, AND CONFIRM ALL STAGES OF INSTALLATION'''<br /> | '''HIT NEXT, CONTINUE, AND CONFIRM ALL STAGES OF INSTALLATION'''<br /> | ||
| − | + | <br/> | |
| − | + | ||
| − | + | ||
| − | + | ||
</p> | </p> | ||
</div> | </div> | ||
| Line 22: | Line 22: | ||
<div class="wrapleft"> | <div class="wrapleft"> | ||
<div class="left"> | <div class="left"> | ||
| − | <span class="plainlinks">[ | + | <span class="plainlinks">[https://wiki.btguard.com/images/openvpn_win_2.png https://wiki.btguard.com/images/openvpn_win_2.png]</span> |
</div> | </div> | ||
</div> | </div> | ||
<div class="right"> | <div class="right"> | ||
<p> | <p> | ||
| − | + | 3. Download the [https://wiki.btguard.com/uploads/openvpn_auto_config.exe OpenVPN BTGuard Configuration] executable file.([https://wiki.btguard.com/uploads/openvpn2.4.zip ZIP]).<br /><br/> | |
| − | + | 4. Open '''openvpn_auto_config.exe'''. | |
| − | + | <br /><br /> | |
| − | <br /> | + | 5. Click on '''Ok'''.<br /> |
| − | + | ||
</p> | </p> | ||
</div> | </div> | ||
</div> | </div> | ||
| + | |||
| Line 40: | Line 40: | ||
<div class="wrapleft"> | <div class="wrapleft"> | ||
<div class="left"> | <div class="left"> | ||
| − | <span class="plainlinks">[ | + | <span class="plainlinks">[https://wiki.btguard.com/images/openvpn_win2.4_3.png https://wiki.btguard.com/images/openvpn_win2.4_3.png]</span> |
</div> | </div> | ||
</div> | </div> | ||
<div class="right"> | <div class="right"> | ||
<p> | <p> | ||
| − | + | 6. Go to '''C:\Program Files\OpenVPN\Config'''<br /> | |
| + | If non-existant then go to '''C:\Program Files (x86)\OpenVPN\Config'''<br /> | ||
| + | <br /> | ||
| + | You should have the following files in the Config folder.<br /> | ||
| + | <br /> | ||
| + | ''If the Self-Extractor didn't work, download the [https://wiki.btguard.com/uploads/openvpn2.4.zip ZIP] file and move those files manually.''<br /> | ||
<br/> | <br/> | ||
| + | ''If it won't allow you to unzip the files directly in the Config folder, try extracting them to the desktop then moving them to the folder ''<br/> | ||
</p> | </p> | ||
</div> | </div> | ||
</div> | </div> | ||
| + | |||
| + | |||
| + | <div class="wrapper"><br/> | ||
| + | ---- | ||
| + | <br/></div> | ||
| + | |||
| + | |||
<div class="wrapper"> | <div class="wrapper"> | ||
<div class="wrapleft"> | <div class="wrapleft"> | ||
<div class="left"> | <div class="left"> | ||
| − | <span class="plainlinks">[ | + | <span class="plainlinks">[https://wiki.btguard.com/images/openvpn_win2.4_4.png https://wiki.btguard.com/images/openvpn_win2.4_4.png]</span> |
</div> | </div> | ||
</div> | </div> | ||
| Line 60: | Line 73: | ||
<p> | <p> | ||
| − | <br/> | + | == How To Connect == |
| + | 1. On the Desktop, double-click '''OpenVPN GUI''' to start.<br/> | ||
</p> | </p> | ||
</div> | </div> | ||
| Line 68: | Line 82: | ||
<div class="wrapleft"> | <div class="wrapleft"> | ||
<div class="left"> | <div class="left"> | ||
| − | <span class="plainlinks">[ | + | <span class="plainlinks">[https://wiki.btguard.com/images/openvpn_win2.4_5.png https://wiki.btguard.com/images/openvpn_win2.4_5.png]</span> |
</div> | </div> | ||
</div> | </div> | ||
<div class="right"> | <div class="right"> | ||
<p> | <p> | ||
| − | + | 2. '''RIGHT CLICK''' the '''OpenVPN icon''' in the Windows system tray, select which server you'd like to connect to and hit '''Connect'''<br/> | |
| + | <br/> | ||
| + | ''If '''BTGuard (Fastest)''' doesn't work, please try '''BTGuard (TCP)'''. All Config files use the UDP protocol except BTGuard (TCP).'' | ||
<br/> | <br/> | ||
</p> | </p> | ||
</div> | </div> | ||
</div> | </div> | ||
| + | |||
| + | |||
<div class="wrapper"> | <div class="wrapper"> | ||
<div class="wrapleft"> | <div class="wrapleft"> | ||
<div class="left"> | <div class="left"> | ||
| − | <span class="plainlinks">[ | + | <span class="plainlinks">[https://wiki.btguard.com/images/openvpn_win_10.png https://wiki.btguard.com/images/openvpn_win2.4_6.png]</span> |
</div> | </div> | ||
</div> | </div> | ||
<div class="right"> | <div class="right"> | ||
<p> | <p> | ||
| + | 3. Enter your BTGuard username & password and hit OK<br/> | ||
| + | Checkmark Save password if you'd like.<br/> | ||
| + | <br/> | ||
| + | ''Both username and password are case sensitive. Make sure not to add/forget Capital Letters.'' <br/> | ||
| + | <br/> | ||
| + | You are now connected!<br/> | ||
| + | <br/> | ||
| + | <br/> | ||
| + | Here is a list of all of our IP addresses:<br/> | ||
| + | 109.201.133.205<br/> | ||
| + | 109.201.133.206<br/> | ||
| + | 104.254.90.82<br/> | ||
| + | 104.254.90.83<br/> | ||
| + | 104.254.90.84<br/> | ||
| + | 104.254.90.85<br/> | ||
| + | 104.254.90.86<br/> | ||
| + | 104.254.90.87<br/> | ||
| + | 104.254.92.226<br/> | ||
| + | 104.254.92.227<br/> | ||
| + | 104.254.92.228<br/> | ||
| + | 104.254.92.229<br/> | ||
| + | 104.254.92.230<br/> | ||
| + | <br/> | ||
| + | If you visit [https://ip-lookup.net/ Ip-lookup.net] and see one of our IPs, everything is working correctly!<br/> | ||
<br/> | <br/> | ||
</p> | </p> | ||
</div> | </div> | ||
</div> | </div> | ||
| + | |||
| + | |||
| + | |||
| + | |||
| + | |||
| + | |||
| + | |||
| + | <div class="wrapper"><br/> | ||
| + | ---- | ||
| + | <br/></div> | ||
| + | |||
| + | |||
<div class="wrapper"> | <div class="wrapper"> | ||
<div class="wrapleft"> | <div class="wrapleft"> | ||
<div class="left"> | <div class="left"> | ||
| − | <span class="plainlinks">[ | + | <span class="plainlinks">[https://wiki.btguard.com/images/qbvpn1.png https://wiki.btguard.com/images/qbvpn1.png]</span> |
</div> | </div> | ||
</div> | </div> | ||
| Line 102: | Line 156: | ||
<p> | <p> | ||
| + | == For qBittorrent Users! == | ||
| + | We have noticed that some IP leaks can happen with qBittorrent while using a VPN. <br/> | ||
| + | <br/> | ||
| + | To fix this we have 2 solutions.<br/> | ||
| + | -The first one is to use an older version of qBittorrent. [https://sourceforge.net/projects/qbittorrent/files/qbittorrent-win32/qbittorrent-3.3.16/qbittorrent_3.3.16_setup.exe/download Click here to download v3.3.16]<br/> | ||
| + | <br/> | ||
| + | -If you prefer to use the newest version, please apply these changes in the settings.<br/> | ||
| + | <br/> | ||
| + | <br/> | ||
| + | In qBittorrent, go to Tools - Options - Advanced and change the Network Interface from Any interface to the one OpenVPN is using.<br/> | ||
| + | <br/> | ||
| + | Most likely it should be Local Area Connection but depending on your network setup on your computer it could be named differently. <br/> | ||
| + | <br/> | ||
| + | To find the name, please follow the instructions below. | ||
<br/> | <br/> | ||
</p> | </p> | ||
| Line 108: | Line 176: | ||
| − | <div class="wrapper">< | + | <div class="wrapper"> |
| − | + | <div class="wrapleft"> | |
| − | <br/></div> | + | <div class="left"> |
| − | + | <span class="plainlinks">[https://wiki.btguard.com/images/qbvpn2.png https://wiki.btguard.com/images/qbvpn2.png]</span> | |
| + | </div> | ||
| + | </div> | ||
| + | <div class="right"> | ||
| + | <p> | ||
| + | 1. Hit the '''Windows Key''' + '''X''' then select '''Network Connections'''<br/> | ||
| + | <br/> | ||
| + | </p> | ||
| + | </div> | ||
| + | </div> | ||
| Line 117: | Line 194: | ||
<div class="wrapleft"> | <div class="wrapleft"> | ||
<div class="left"> | <div class="left"> | ||
| − | <span class="plainlinks">[ | + | <span class="plainlinks">[https://wiki.btguard.com/images/qbvpn3.png https://wiki.btguard.com/images/qbvpn3.png]</span> |
</div> | </div> | ||
</div> | </div> | ||
<div class="right"> | <div class="right"> | ||
<p> | <p> | ||
| − | + | 2. On the Network Connections page, look under Advanced network settings and click on '''Change adapter options'''<br/> | |
| − | + | <br/> | |
</p> | </p> | ||
</div> | </div> | ||
| Line 131: | Line 208: | ||
<div class="wrapleft"> | <div class="wrapleft"> | ||
<div class="left"> | <div class="left"> | ||
| − | <span class="plainlinks">[ | + | <span class="plainlinks">[https://wiki.btguard.com/images/qbvpn4.png https://wiki.btguard.com/images/qbvpn4.png]</span> |
</div> | </div> | ||
</div> | </div> | ||
<div class="right"> | <div class="right"> | ||
<p> | <p> | ||
| − | + | 3. Find the one that says '''TAP-Windows Adapter V9'''.<br/> | |
| − | + | In this case it is called '''Local Area Connection''' but it could be named differently on your end.<br/> | |
| + | <br/> | ||
| + | This is the one you want to select in the qBittorrent settings.<br/> | ||
<br/> | <br/> | ||
| − | |||
</p> | </p> | ||
</div> | </div> | ||
</div> | </div> | ||
Latest revision as of 19:37, 31 December 2022
Setup Instructions for Windows Vista/7/8/10 for OpenVPN version 2.4 (older version 2.3 here)
1. Download the OpenVPN Installation Program
Click here to download.
OpenVPN Official Download Page
2. Double-click OpenVPN-2.5.8-I604-amd64.msi to install.
HIT NEXT, CONTINUE, AND CONFIRM ALL STAGES OF INSTALLATION
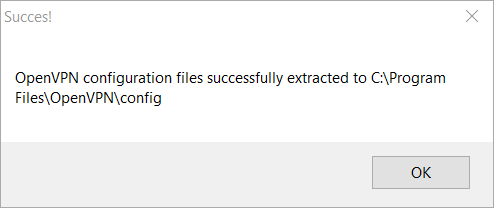
3. Download the OpenVPN BTGuard Configuration executable file.(ZIP).
4. Open openvpn_auto_config.exe.
5. Click on Ok.
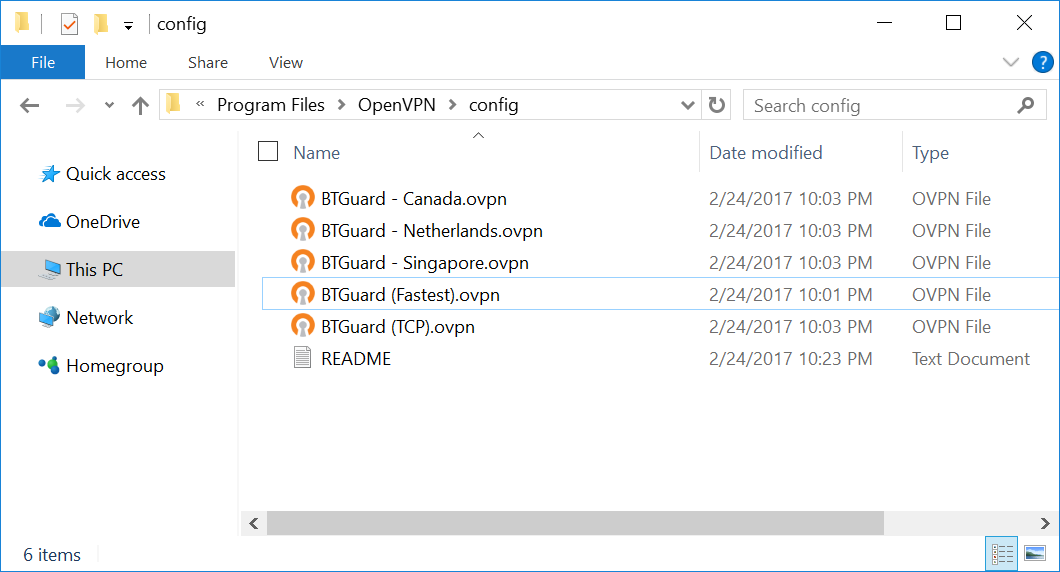
6. Go to C:\Program Files\OpenVPN\Config
If non-existant then go to C:\Program Files (x86)\OpenVPN\Config
You should have the following files in the Config folder.
If the Self-Extractor didn't work, download the ZIP file and move those files manually.
If it won't allow you to unzip the files directly in the Config folder, try extracting them to the desktop then moving them to the folder

How To Connect
1. On the Desktop, double-click OpenVPN GUI to start.
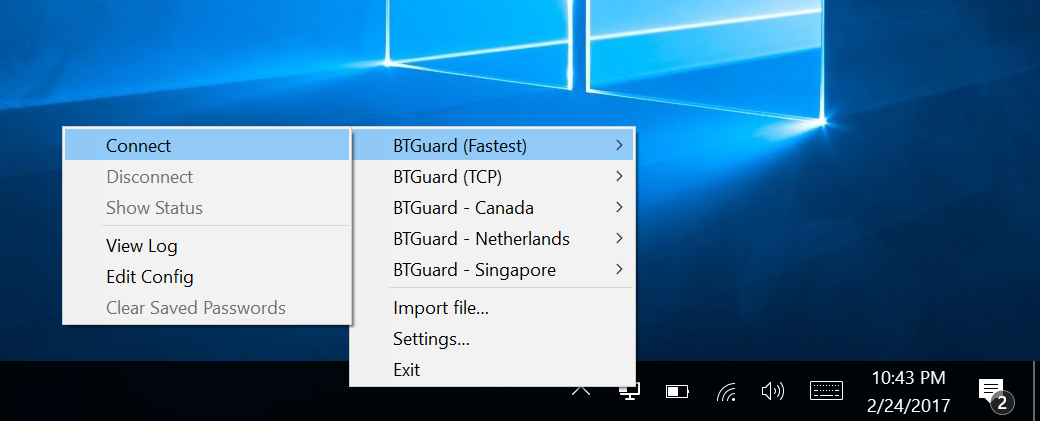
2. RIGHT CLICK the OpenVPN icon in the Windows system tray, select which server you'd like to connect to and hit Connect
If BTGuard (Fastest) doesn't work, please try BTGuard (TCP). All Config files use the UDP protocol except BTGuard (TCP).
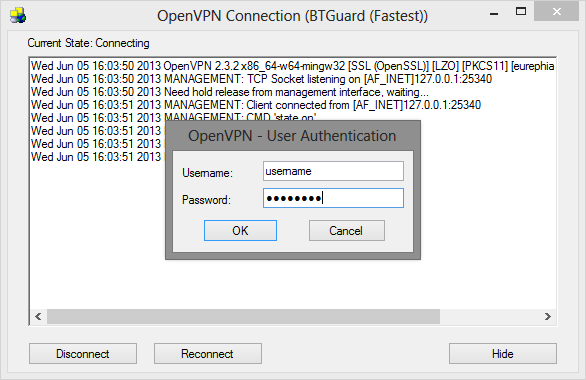
3. Enter your BTGuard username & password and hit OK
Checkmark Save password if you'd like.
Both username and password are case sensitive. Make sure not to add/forget Capital Letters.
You are now connected!
Here is a list of all of our IP addresses:
109.201.133.205
109.201.133.206
104.254.90.82
104.254.90.83
104.254.90.84
104.254.90.85
104.254.90.86
104.254.90.87
104.254.92.226
104.254.92.227
104.254.92.228
104.254.92.229
104.254.92.230
If you visit Ip-lookup.net and see one of our IPs, everything is working correctly!

For qBittorrent Users!
We have noticed that some IP leaks can happen with qBittorrent while using a VPN.
To fix this we have 2 solutions.
-The first one is to use an older version of qBittorrent. Click here to download v3.3.16
-If you prefer to use the newest version, please apply these changes in the settings.
In qBittorrent, go to Tools - Options - Advanced and change the Network Interface from Any interface to the one OpenVPN is using.
Most likely it should be Local Area Connection but depending on your network setup on your computer it could be named differently.
To find the name, please follow the instructions below.
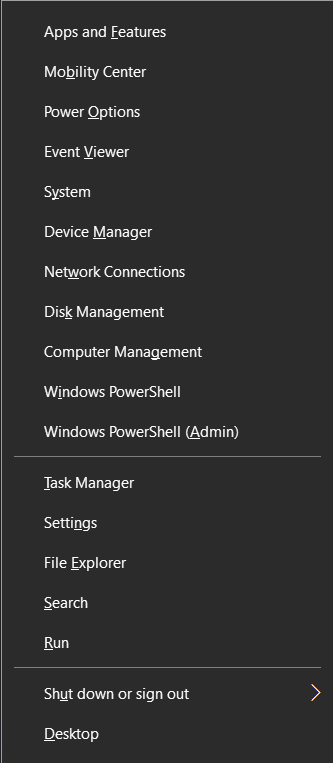
1. Hit the Windows Key + X then select Network Connections
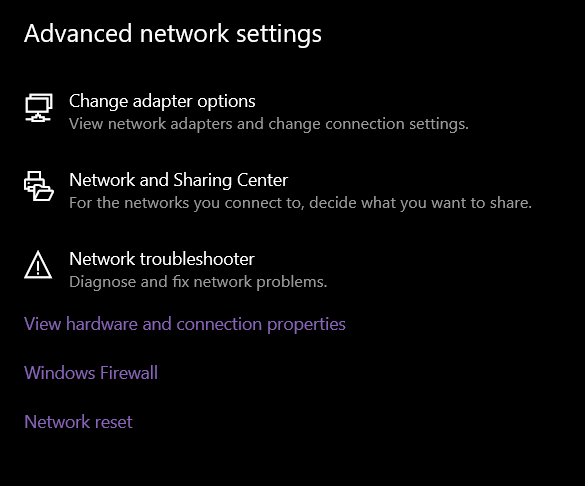
2. On the Network Connections page, look under Advanced network settings and click on Change adapter options
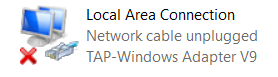
3. Find the one that says TAP-Windows Adapter V9.
In this case it is called Local Area Connection but it could be named differently on your end.
This is the one you want to select in the qBittorrent settings.