Difference between revisions of "OpenVPN Windows Vista/7/8"
| Line 56: | Line 56: | ||
<p> | <p> | ||
6. Go to '''C:\Program Files\OpenVPN\Config'''<br /> | 6. Go to '''C:\Program Files\OpenVPN\Config'''<br /> | ||
| − | If non-existant then go to'''C:\Program Files (x86)\OpenVPN\Config'''<br /> | + | If non-existant then go to '''C:\Program Files (x86)\OpenVPN\Config'''<br /> |
| + | <br /> | ||
You should have the following files in the Config folder.<br /> | You should have the following files in the Config folder.<br /> | ||
<br /> | <br /> | ||
| − | If the Self-Extractor didn't work, download the [https://btguard.com/openvpn-win-config.zip ZIP] file and move those files manually.<br /> | + | ''If the Self-Extractor didn't work, download the [https://btguard.com/openvpn-win-config.zip ZIP] file and move those files manually.''<br /> |
| − | + | ||
<br/> | <br/> | ||
</p> | </p> | ||
| Line 74: | Line 74: | ||
<div class="right"> | <div class="right"> | ||
<p> | <p> | ||
| − | + | 7. On the Desktop, '''RIGHT CLICK OpenVPN GUI''' and select '''Open file location''' | |
| − | + | ||
| − | + | ||
| − | + | ||
| − | + | ||
| − | + | ||
<br/> | <br/> | ||
</p> | </p> | ||
| Line 93: | Line 88: | ||
<div class="right"> | <div class="right"> | ||
<p> | <p> | ||
| − | + | 8. '''RIGHT CLICK OpenVPN GUI''' and select '''Properties'''<br /> | |
| − | <br/> | + | |
</p> | </p> | ||
</div> | </div> | ||
| Line 107: | Line 101: | ||
<div class="right"> | <div class="right"> | ||
<p> | <p> | ||
| − | + | 9. Go to the '''Compatibility''' tab<br /> | |
| + | <br /> | ||
| + | 7. Check '''Run this program as an administrator''' then Click '''OK'''<br /> | ||
| + | <br/> | ||
| + | Setup Complete! | ||
<br/> | <br/> | ||
</p> | </p> | ||
| Line 129: | Line 127: | ||
<p> | <p> | ||
== How To Connect == | == How To Connect == | ||
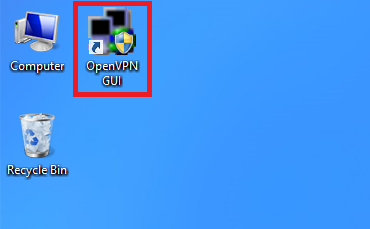
| − | 1. On Desktop, double-click '''OpenVPN GUI''' to start.<br/> | + | 1. On the Desktop, double-click '''OpenVPN GUI''' to start.<br/> |
</p> | </p> | ||
</div> | </div> | ||
| Line 142: | Line 140: | ||
<div class="right"> | <div class="right"> | ||
<p> | <p> | ||
| − | 2. '''RIGHT CLICK OpenVPN icon''' in tray | + | 2. '''RIGHT CLICK''' the ''OpenVPN icon''' in the Windows system tray, select which server you'd like to connect to and hit '''Connect'''<br/> |
| + | <br/> | ||
| + | ''If '''BTGuard (Fastest)''' doesn't work, please try '''BTGuard (TCP)'''.'' | ||
| + | <br/> | ||
</p> | </p> | ||
</div> | </div> | ||
Revision as of 14:25, 5 June 2013
Setup Instructions
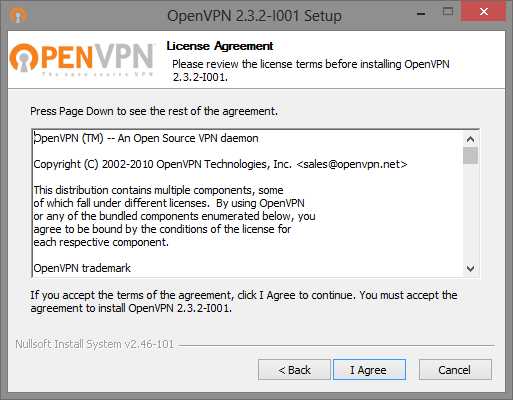
1. Download the OpenVPN Installation Program.
2. Double-click openvpn-install-2.3.0-I005.exe to install.
HIT NEXT, CONTINUE, AND CONFIRM ALL STAGES OF INSTALLATION
3. Download the OpenVPN BTGuard Configuration executable file.(ZIP).
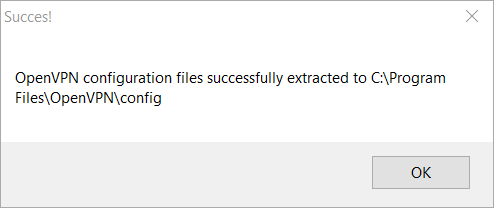
4. Open openvpn-win-config.exe and hit OK.
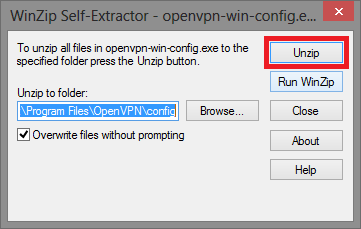
5. Click on Unzip.
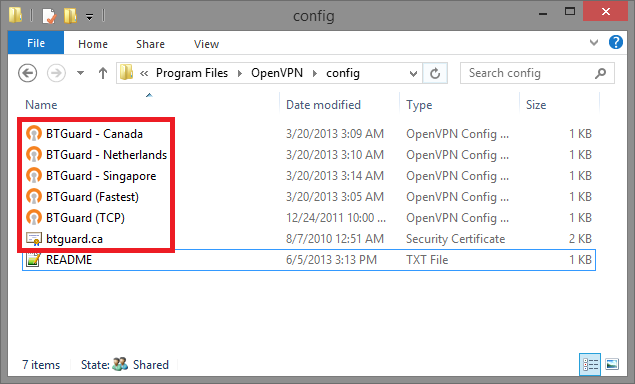
6. Go to C:\Program Files\OpenVPN\Config
If non-existant then go to C:\Program Files (x86)\OpenVPN\Config
You should have the following files in the Config folder.
If the Self-Extractor didn't work, download the ZIP file and move those files manually.
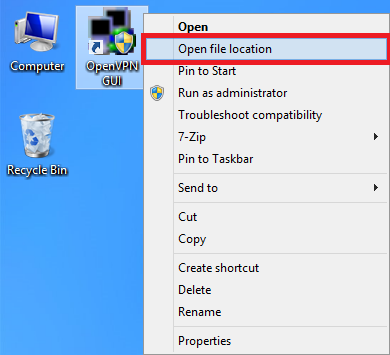
7. On the Desktop, RIGHT CLICK OpenVPN GUI and select Open file location

8. RIGHT CLICK OpenVPN GUI and select Properties
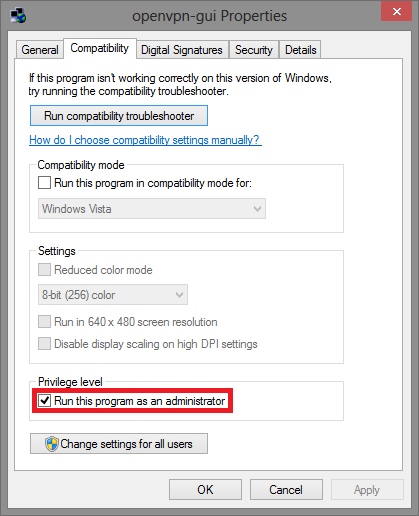
9. Go to the Compatibility tab
7. Check Run this program as an administrator then Click OK
Setup Complete!
How To Connect
1. On the Desktop, double-click OpenVPN GUI to start.
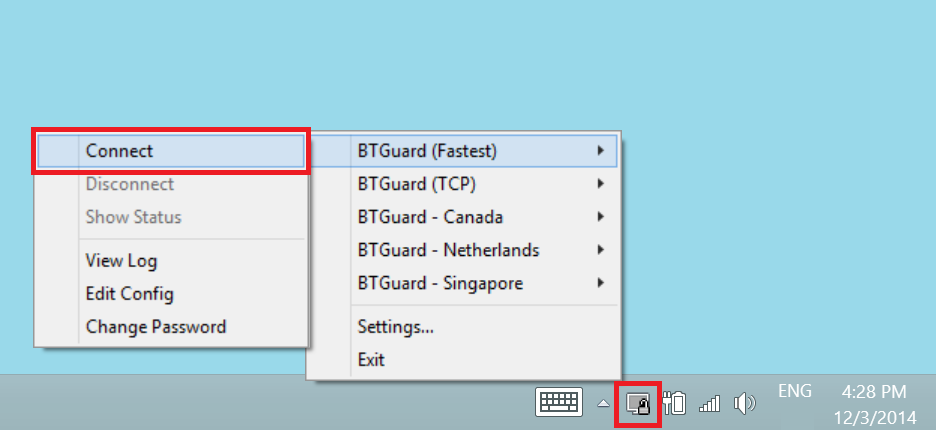
2. RIGHT CLICK' the OpenVPN icon in the Windows system tray, select which server you'd like to connect to and hit Connect
If BTGuard (Fastest) doesn't work, please try BTGuard (TCP).
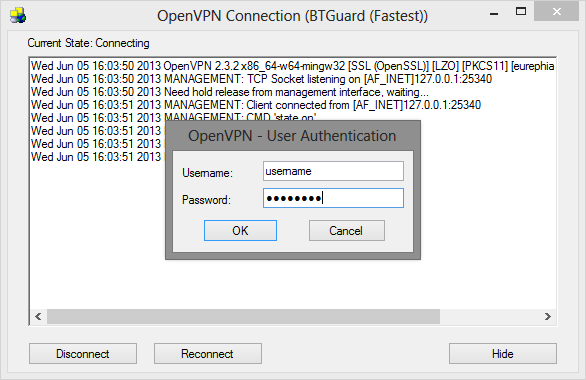
3. Enter your BTGuard username & password and hit OK
You are now connected!