Difference between revisions of "OpenVPN dd-wrt"
(Created page with "<div class="wrapper"> <div class="wrapleft"> <div class="left"> <span class="plainlinks">[http://wiki.btguard.com/index.php/File:Openvpn_ddwrt_1.png http://wiki.btguard...") |
|||
| (181 intermediate revisions by the same user not shown) | |||
| Line 1: | Line 1: | ||
| + | <div class="wrapper"> | ||
| + | <div class="wrapleftnocenter"> | ||
| + | <div class="left"> | ||
| + | <div class="errorx"> | ||
| + | <p> | ||
| + | ''' PLEASE READ THROUGH THIS WHOLE ARTICLE!''' <br/> | ||
| + | You risk breaking your router when using a custom firmware! <br/> | ||
| + | Proceed carefully and make sure your router is compatible! | ||
| + | </p> | ||
| + | </div> | ||
| + | <div style="float:left;border:#cedff2 1px solid;background-color:#f4f7fa;padding:5px 10px;margin:15px 0px 15px"> | ||
| + | <h3 style="color:#6D8DAF; border-bottom:1px solid #6D8DAF"> INFORMATION & REQUIREMENTS </h3> | ||
| + | These instructions are ONLY for users who already have a dd-wrt compatible router flashed with the latest version of the firmware. If you haven't flashed your router, please check the links on the right. Make sure your router is supported and read through the dd-wrt instructions to flash your device.<br/> | ||
| + | <br/> | ||
| + | Router used for this tutorial: D-Link DIR-825 rev. B2 was used,Firmware: DD-WRT v24-sp2 (05/27/13) std build 21676.<br/> | ||
| + | <br/> | ||
| + | If you're having issues with OpenVPN, please try the [[PPTP_dd-wrt|PPTP method]].<br/> | ||
| + | <br/> | ||
| + | <u>'''Check List'''</u> <br/> | ||
| + | *Router must support OpenVPN. (big, mega or some std builds of the firmware) | ||
| + | *Check both '''Model''' and '''Revision''' of your router to get the correct firmware. | ||
| + | *Router must be configured to connect to the internet. (connected to modem through WAN port) | ||
| + | *Firewall on modem must be off. | ||
| + | *Time & Date & Time Zone on the router must be set correctly. (Setup > Basic Setup > Time Settings) | ||
| + | </div> | ||
| + | <div class="errorx" style="margin-bottom:50px"> | ||
| + | <p> | ||
| + | '''WARNING!''' <br/> | ||
| + | Only '''big''', '''mega''' and some '''std''' builds of dd-wrt support OpenVPN.<br/> | ||
| + | '''mini''' and '''micro''' builds will not work with OpenVPN! <br/> | ||
| + | </p> | ||
| + | </div> | ||
| + | </div> | ||
| + | </div> | ||
| + | |||
| + | <div class="right"> | ||
| + | <div style="padding-left:5px;border-left:black 1px solid"> | ||
| + | <p> | ||
| + | __NOTOC__ | ||
| + | == Links for dd-wrt == | ||
| + | *[http://www.dd-wrt.com/ Main Website] | ||
| + | *[http://www.dd-wrt.com/wiki/index.php/Firmware_FAQ FAQ] | ||
| + | *[http://www.dd-wrt.com/phpBB2/ Forum] | ||
| + | *[http://www.dd-wrt.com/wiki/index.php/Supported_Devices Full list of Supported Devices] | ||
| + | *[http://www.dd-wrt.com/site/support/router-database Router Database (Searchable)] | ||
| + | *[http://www.dd-wrt.com/wiki/index.php/Installation Install Instructions: dd-wrt Firmware] | ||
| + | <br/><br/> | ||
| + | |||
| + | </p> | ||
| + | </div> | ||
| + | </div> | ||
| + | </div> | ||
| + | |||
| + | <div class="wrapper"><br/> | ||
| + | ---- | ||
| + | <br/></div> | ||
| + | |||
| + | |||
<div class="wrapper"> | <div class="wrapper"> | ||
<div class="wrapleft"> | <div class="wrapleft"> | ||
<div class="left"> | <div class="left"> | ||
| − | <span class="plainlinks">[ | + | <span class="plainlinks">[https://wiki.btguard.com/images/b/ba/Openvpn_ddwrt_1.png https://wiki.btguard.com/images/b/ba/Openvpn_ddwrt_1.png]</span> |
</div> | </div> | ||
</div> | </div> | ||
<div class="right"> | <div class="right"> | ||
<p> | <p> | ||
| − | == Setup Instructions == | + | == Setup Instructions Method 1== |
| − | 1. Click | + | [[OpenVPN_dd-wrt#Setup Instructions Method 2|Setup Instructions Method 2]]<br/> |
| + | <br/> | ||
| + | 1. Connect to http://192.168.1.1/<br/> | ||
| + | 2. Click on '''Administration > Commands'''. <br/> | ||
| + | 3. Copy the whole content of the [https://wiki.btguard.com/uploads/ddwrt_btguard.txt ddwrt_btguard.txt] file in the '''Command Shell'''. | ||
| + | [https://wiki.btguard.com/uploads/ddwrt_btguard_startup_firewall.zip ZIP with both .txt files]<br/> | ||
| + | *'''ddwrt_btguard.txt''' ''(Click below to select all)''<br/> | ||
| + | <html> | ||
| + | <textarea class="textarea" rows=6 cols=50 onclick="this.select()" readonly> | ||
| + | #!/bin/sh | ||
| + | |||
| + | USERNAME="replace with your username" | ||
| + | PASSWORD="replace with your password" | ||
| + | PROTOCOL="udp" | ||
| + | REMOTE_SERVERS="remote vpn.btguard.com 1194" | ||
| + | |||
| + | #### DO NOT CHANGE below this line #### | ||
| + | |||
| + | CA_CRT='-----BEGIN CERTIFICATE----- | ||
| + | MIIDQTCCAimgAwIBAgIJAJV9QqE+ZzsXMA0GCSqGSIb3DQEBCwUAMBoxGDAWBgNV | ||
| + | BAMMD3Zwbi5idGd1YXJkLmNvbTAeFw0yMDA4MDUxMzUzNDhaFw00MTAyMTYxMzUz | ||
| + | NDhaMBoxGDAWBgNVBAMMD3Zwbi5idGd1YXJkLmNvbTCCASIwDQYJKoZIhvcNAQEB | ||
| + | BQADggEPADCCAQoCggEBAMxVmPrlfsHocRYR1D/kOj47ZRZDv2XG2Z5rkq1ode/a | ||
| + | jMSV082EqKhhIE2o6f03abXhWe8VSoM2ZPoB0818x7WIYeoXzaHJQooZTyKjCpm2 | ||
| + | 8Fz/XDvyShZpyKUZPjuoo9UxNWDEhnMHJegtL9ccJGXWRrbgUjvrOsiyiiAolftu | ||
| + | 8MjSYRTveuARxMyIlMNAXMaG2r3H2tM1QGoDdCn6FaMBYl4JOExXsOtofjGcRxcb | ||
| + | MLQLYkORwTwx7TGTacQizsFxg9pSF7jNQwgHtIjZ5fY6SLgmFHEFOaP0mbuHTF9I | ||
| + | 6e58ACbkJ4wuk4IVTXup80c8Zsr+yBFGM8pB5pqEBj0CAwEAAaOBiTCBhjAdBgNV | ||
| + | HQ4EFgQUhHt2BX7StG7Op1OaZCosAicYJvMwSgYDVR0jBEMwQYAUhHt2BX7StG7O | ||
| + | p1OaZCosAicYJvOhHqQcMBoxGDAWBgNVBAMMD3Zwbi5idGd1YXJkLmNvbYIJAJV9 | ||
| + | QqE+ZzsXMAwGA1UdEwQFMAMBAf8wCwYDVR0PBAQDAgEGMA0GCSqGSIb3DQEBCwUA | ||
| + | A4IBAQDB/OX+2GJB1Zql1DNVoQst1V/5y/AzKUclCpQb5VVpGU3hrXw1GD/HnVaU | ||
| + | Mwq8e+C9+FgJNXh0LtpOuksr7YD0IMie4h0rXh1U8tLk1Zh5gLcq5RPee/CK44Qs | ||
| + | E2X5BUdWfOyL4AkoBAvk2roy25plk4rlOLleUKsHl1qqXMB/o3n+o90pnRKsYZZ4 | ||
| + | PAZGB39DDO9ANTX/CzRXC+GKpTnmEB5KiIJzuDCHI9HeEv9LTGMhZaCvSjJhPuA9 | ||
| + | VuotY2nOSJ9jO/K7aa2Q9dXVbKXYWo29nq0EUGomo/WwzX8ABAP/RLyESDDIukFA | ||
| + | T1Ip5RClcWgkxPlQdzCxhGJ5iEJ0 | ||
| + | -----END CERTIFICATE-----' | ||
| + | |||
| + | |||
| + | OPVPNENABLE=`nvram get openvpncl_enable | awk '$1 == "0" {print $1}'` | ||
| + | |||
| + | if [ "$OPVPNENABLE" != 0 ] | ||
| + | then | ||
| + | nvram set openvpncl_enable=0 | ||
| + | nvram commit | ||
| + | fi | ||
| + | |||
| + | sleep 30 | ||
| + | mkdir /tmp/btguard; cd /tmp/btguard | ||
| + | echo -e "$USERNAME\n$PASSWORD" > userpass.conf | ||
| + | echo "$CA_CRT" > ca.crt | ||
| + | echo "#!/bin/sh" > route-up.sh; echo -e "#!/bin/sh\nsleep 2" > route-down.sh | ||
| + | echo "#!/bin/sh | ||
| + | iptables -I FORWARD -i br0 -o tun0 -j ACCEPT | ||
| + | iptables -I FORWARD -i tun0 -o br0 -j ACCEPT | ||
| + | iptables -I INPUT -i tun0 -j REJECT | ||
| + | iptables -t nat -A POSTROUTING -o tun0 -j MASQUERADE" > /tmp/.rc_firewall | ||
| + | chmod 644 ca.crt; chmod 600 userpass.conf; chmod 700 route-up.sh route-down.sh | ||
| + | chmod 700 /tmp/.rc_firewall | ||
| + | sleep 30 | ||
| + | echo "client | ||
| + | dev tun | ||
| + | proto $PROTOCOL | ||
| + | script-security 2 | ||
| + | hand-window 60 | ||
| + | verb 3 | ||
| + | mute 5 | ||
| + | mtu-disc yes | ||
| + | resolv-retry infinite | ||
| + | nobind | ||
| + | persist-key | ||
| + | persist-tun | ||
| + | keepalive 20 120 | ||
| + | reneg-sec 0 | ||
| + | log btguard.log | ||
| + | ca ca.crt | ||
| + | cipher AES-256-CBC | ||
| + | auth SHA512 | ||
| + | mute-replay-warnings | ||
| + | daemon | ||
| + | auth-user-pass userpass.conf | ||
| + | $REMOTE_SERVERS" > openvpn.conf | ||
| + | ln -s /tmp/btguard/btguard.log /tmp/btguard.log | ||
| + | (killall openvpn; openvpn --config /tmp/btguard/openvpn.conf --route-up /tmp/btguard/route-up.sh --down-pre /tmp/btguard/route-down.sh) & | ||
| + | exit 0 | ||
| + | </textarea> | ||
| + | </html> | ||
| + | |||
| + | 4. Type in your '''username''' and '''password'''. <br/> | ||
| + | ''Both username and password are case sensitive. Make sure not to add/forget Capital Letters. '' <br/> | ||
| + | ''If UDP doesn't work, please type tcp instead of udp.'' <br/> | ||
| + | 5. Click on '''Save Startup'''. <br/> | ||
</p> | </p> | ||
</div> | </div> | ||
| Line 16: | Line 166: | ||
<div class="wrapleft"> | <div class="wrapleft"> | ||
<div class="left"> | <div class="left"> | ||
| − | <span class="plainlinks">[ | + | <span class="plainlinks">[https://wiki.btguard.com/images/e/ed/Openvpn_ddwrt_2.png https://wiki.btguard.com/images/e/ed/Openvpn_ddwrt_2.png]</span> |
</div> | </div> | ||
</div> | </div> | ||
<div class="right"> | <div class="right"> | ||
<p> | <p> | ||
| − | == | + | <br/><br/>6. Copy the whole content of the [https://wiki.btguard.com/uploads/ddwrt_firewall.txt ddwrt_firewall.txt] file in the '''Command Shell'''. <br/> |
| − | + | 7. Click on '''Save Firewall''' <br/> | |
| + | <br/> | ||
| + | *'''ddwrt_firewall.txt''' ''(Click below to select all)''<br/> | ||
| + | <html> | ||
| + | <textarea class="textarea" rows=6 cols=50 onclick="this.select()" readonly> | ||
| + | iptables -I FORWARD -i br0 -o tun0 -j ACCEPT | ||
| + | iptables -I FORWARD -i tun0 -o br0 -j ACCEPT | ||
| + | iptables -I INPUT -i tun0 -j REJECT | ||
| + | iptables -t nat -A POSTROUTING -o tun0 -j MASQUERADE | ||
| + | </textarea> | ||
| + | </html> | ||
| + | <br/> | ||
| + | 8. Now click on the '''Management tab''', go to the bottom of the page and click on '''Reboot Router'''. <br/> | ||
| + | <br/> | ||
| + | Setup Complete! <br/> | ||
| + | <br/> | ||
| + | The router will reboot and it will take a couple minutes to finish setting everything up. <br/> | ||
</p> | </p> | ||
</div> | </div> | ||
</div> | </div> | ||
| + | |||
| + | <div class="wrapper"><br/> | ||
| + | ---- | ||
| + | <br/></div> | ||
| + | |||
| + | |||
<div class="wrapper"> | <div class="wrapper"> | ||
<div class="wrapleft"> | <div class="wrapleft"> | ||
<div class="left"> | <div class="left"> | ||
| − | <span class="plainlinks">[ | + | <span class="plainlinks">[https://wiki.btguard.com/images/openvpn_ddwrt2_1.png https://wiki.btguard.com/images/openvpn_ddwrt2_1.png]</span> |
</div> | </div> | ||
</div> | </div> | ||
<div class="right"> | <div class="right"> | ||
<p> | <p> | ||
| − | == Setup Instructions == | + | == Setup Instructions Method 2== |
| − | 1. Click | + | [[OpenVPN_dd-wrt#Setup Instructions Method 1|Setup Instructions Method 1]]<br/> |
| + | <br/> | ||
| + | |||
| + | 1. Connect to http://192.168.1.1/<br/> | ||
| + | 2. Click on '''Services > VPN'''. <br/> | ||
| + | 3. Enable '''OpenVPN Client'''and fill in the following:<br/> | ||
| + | <br/> | ||
| + | Server IP/Name: '''vpn.btguard.com'''<br/> | ||
| + | Port: '''1194'''<br/> | ||
| + | Tunnel Device: '''TUN'''<br/> | ||
| + | Tunnel Protocol: '''UDP''' ''(switch to TCP if UDP doesn't work)''<br/> | ||
| + | Encryption Cipher: '''AES-256-CBC'''<br/> | ||
| + | Hash Algorithm: '''SHA512''' | ||
| + | Leave '''nsCertType verification''' unchecked. <br/> | ||
| + | Advanced Options: '''Enable'''<br/> | ||
| + | TLS Cipher: '''None'''<br/> | ||
| + | LZO Compression: '''Disabled'''<br/> | ||
| + | NAT: '''Enable'''<br/> | ||
| + | Firewall Protection: '''Disable'''<br/> | ||
| + | Tunnel MTU setting: '''1500'''<br/> | ||
| + | Tunnel UDP MSS-Fix: '''Disable'''<br/> | ||
| + | Additional Config:<br/> | ||
| + | '''auth-user-pass /tmp/openvpncl/user.conf'''<br/> | ||
| + | '''persist-key'''<br/> | ||
| + | '''persist-tun''' | ||
| + | <br/> | ||
| + | CA Cert:<br/> | ||
| + | ''(Click below to select all)''<br/> | ||
| + | <html> | ||
| + | <textarea class="textarea" rows=6 cols=50 onclick="this.select()" readonly> | ||
| + | -----BEGIN CERTIFICATE----- | ||
| + | MIIDQTCCAimgAwIBAgIJAJV9QqE+ZzsXMA0GCSqGSIb3DQEBCwUAMBoxGDAWBgNV | ||
| + | BAMMD3Zwbi5idGd1YXJkLmNvbTAeFw0yMDA4MDUxMzUzNDhaFw00MTAyMTYxMzUz | ||
| + | NDhaMBoxGDAWBgNVBAMMD3Zwbi5idGd1YXJkLmNvbTCCASIwDQYJKoZIhvcNAQEB | ||
| + | BQADggEPADCCAQoCggEBAMxVmPrlfsHocRYR1D/kOj47ZRZDv2XG2Z5rkq1ode/a | ||
| + | jMSV082EqKhhIE2o6f03abXhWe8VSoM2ZPoB0818x7WIYeoXzaHJQooZTyKjCpm2 | ||
| + | 8Fz/XDvyShZpyKUZPjuoo9UxNWDEhnMHJegtL9ccJGXWRrbgUjvrOsiyiiAolftu | ||
| + | 8MjSYRTveuARxMyIlMNAXMaG2r3H2tM1QGoDdCn6FaMBYl4JOExXsOtofjGcRxcb | ||
| + | MLQLYkORwTwx7TGTacQizsFxg9pSF7jNQwgHtIjZ5fY6SLgmFHEFOaP0mbuHTF9I | ||
| + | 6e58ACbkJ4wuk4IVTXup80c8Zsr+yBFGM8pB5pqEBj0CAwEAAaOBiTCBhjAdBgNV | ||
| + | HQ4EFgQUhHt2BX7StG7Op1OaZCosAicYJvMwSgYDVR0jBEMwQYAUhHt2BX7StG7O | ||
| + | p1OaZCosAicYJvOhHqQcMBoxGDAWBgNVBAMMD3Zwbi5idGd1YXJkLmNvbYIJAJV9 | ||
| + | QqE+ZzsXMAwGA1UdEwQFMAMBAf8wCwYDVR0PBAQDAgEGMA0GCSqGSIb3DQEBCwUA | ||
| + | A4IBAQDB/OX+2GJB1Zql1DNVoQst1V/5y/AzKUclCpQb5VVpGU3hrXw1GD/HnVaU | ||
| + | Mwq8e+C9+FgJNXh0LtpOuksr7YD0IMie4h0rXh1U8tLk1Zh5gLcq5RPee/CK44Qs | ||
| + | E2X5BUdWfOyL4AkoBAvk2roy25plk4rlOLleUKsHl1qqXMB/o3n+o90pnRKsYZZ4 | ||
| + | PAZGB39DDO9ANTX/CzRXC+GKpTnmEB5KiIJzuDCHI9HeEv9LTGMhZaCvSjJhPuA9 | ||
| + | VuotY2nOSJ9jO/K7aa2Q9dXVbKXYWo29nq0EUGomo/WwzX8ABAP/RLyESDDIukFA | ||
| + | T1Ip5RClcWgkxPlQdzCxhGJ5iEJ0 | ||
| + | -----END CERTIFICATE-----' | ||
| + | </textarea> | ||
| + | </html> | ||
| + | <br/> | ||
| + | |||
| + | 4. Hit Save. <br/> | ||
| + | |||
| + | |||
| + | <br/> | ||
| + | <br/> | ||
| + | |||
| + | |||
| + | </p> | ||
| + | </div> | ||
| + | </div> | ||
| + | |||
| + | |||
| + | |||
| + | <div class="wrapper"> | ||
| + | <div class="wrapleft"> | ||
| + | <div class="left"> | ||
| + | <span class="plainlinks">[https://wiki.btguard.com/images/openvpn_ddwrt2_2.png https://wiki.btguard.com/images/openvpn_ddwrt2_2.png]</span> | ||
| + | </div> | ||
| + | </div> | ||
| + | <div class="right"> | ||
| + | <p> | ||
| + | 5. Click on '''Administration > Commands'''. <br/> | ||
| + | 6. Copy the following in the '''Commands''' window. <br/> | ||
| + | <html> | ||
| + | <textarea class="textarea" rows=6 cols=50 onclick="this.select()" readonly> | ||
| + | echo "Username | ||
| + | Password" > /tmp/openvpncl/user.conf | ||
| + | </textarea> | ||
| + | </html> | ||
| + | |||
| + | Replace '''Username''' and '''Password''' with yours.<br/> | ||
| + | |||
| + | ''Both username and password are case sensitive. Make sure not to add/forget Capital Letters. '' <br/> | ||
| + | <br/> | ||
| + | 7. Click on '''Save Startup'''. <br/> | ||
| + | |||
| + | <br/> | ||
| + | <br/> | ||
| + | |||
| + | |||
| + | </p> | ||
| + | </div> | ||
| + | </div> | ||
| + | |||
| + | |||
| + | |||
| + | <div class="wrapper"> | ||
| + | <div class="wrapleft"> | ||
| + | <div class="left"> | ||
| + | <span class="plainlinks">[https://wiki.btguard.com/images/openvpn_ddwrt2_3.png https://wiki.btguard.com/images/openvpn_ddwrt2_3.png]</span> | ||
| + | </div> | ||
| + | </div> | ||
| + | <div class="right"> | ||
| + | <p> | ||
| + | 8. Now click on the '''Management tab''', go to the bottom of the page and click on '''Reboot Router'''. <br/> | ||
| + | The router will reboot and it will take a couple minutes to finish setting everything up. <br/> | ||
| + | 9. Click on '''Status > OpenVPN''' to check if you're connected. <br/> | ||
| + | |||
| + | <br/> | ||
| + | <br/> | ||
| + | |||
| + | |||
</p> | </p> | ||
</div> | </div> | ||
</div> | </div> | ||
Latest revision as of 21:44, 5 August 2020
PLEASE READ THROUGH THIS WHOLE ARTICLE!
You risk breaking your router when using a custom firmware!
Proceed carefully and make sure your router is compatible!
INFORMATION & REQUIREMENTS
These instructions are ONLY for users who already have a dd-wrt compatible router flashed with the latest version of the firmware. If you haven't flashed your router, please check the links on the right. Make sure your router is supported and read through the dd-wrt instructions to flash your device.
Router used for this tutorial: D-Link DIR-825 rev. B2 was used,Firmware: DD-WRT v24-sp2 (05/27/13) std build 21676.
If you're having issues with OpenVPN, please try the PPTP method.
Check List
- Router must support OpenVPN. (big, mega or some std builds of the firmware)
- Check both Model and Revision of your router to get the correct firmware.
- Router must be configured to connect to the internet. (connected to modem through WAN port)
- Firewall on modem must be off.
- Time & Date & Time Zone on the router must be set correctly. (Setup > Basic Setup > Time Settings)
WARNING!
Only big, mega and some std builds of dd-wrt support OpenVPN.
mini and micro builds will not work with OpenVPN!
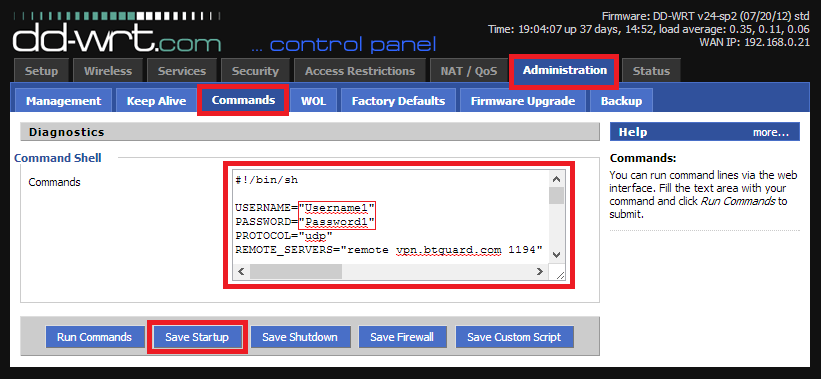
Setup Instructions Method 1
Setup Instructions Method 2
1. Connect to http://192.168.1.1/
2. Click on Administration > Commands.
3. Copy the whole content of the ddwrt_btguard.txt file in the Command Shell.
ZIP with both .txt files
- ddwrt_btguard.txt (Click below to select all)
4. Type in your username and password.
Both username and password are case sensitive. Make sure not to add/forget Capital Letters.
If UDP doesn't work, please type tcp instead of udp.
5. Click on Save Startup.
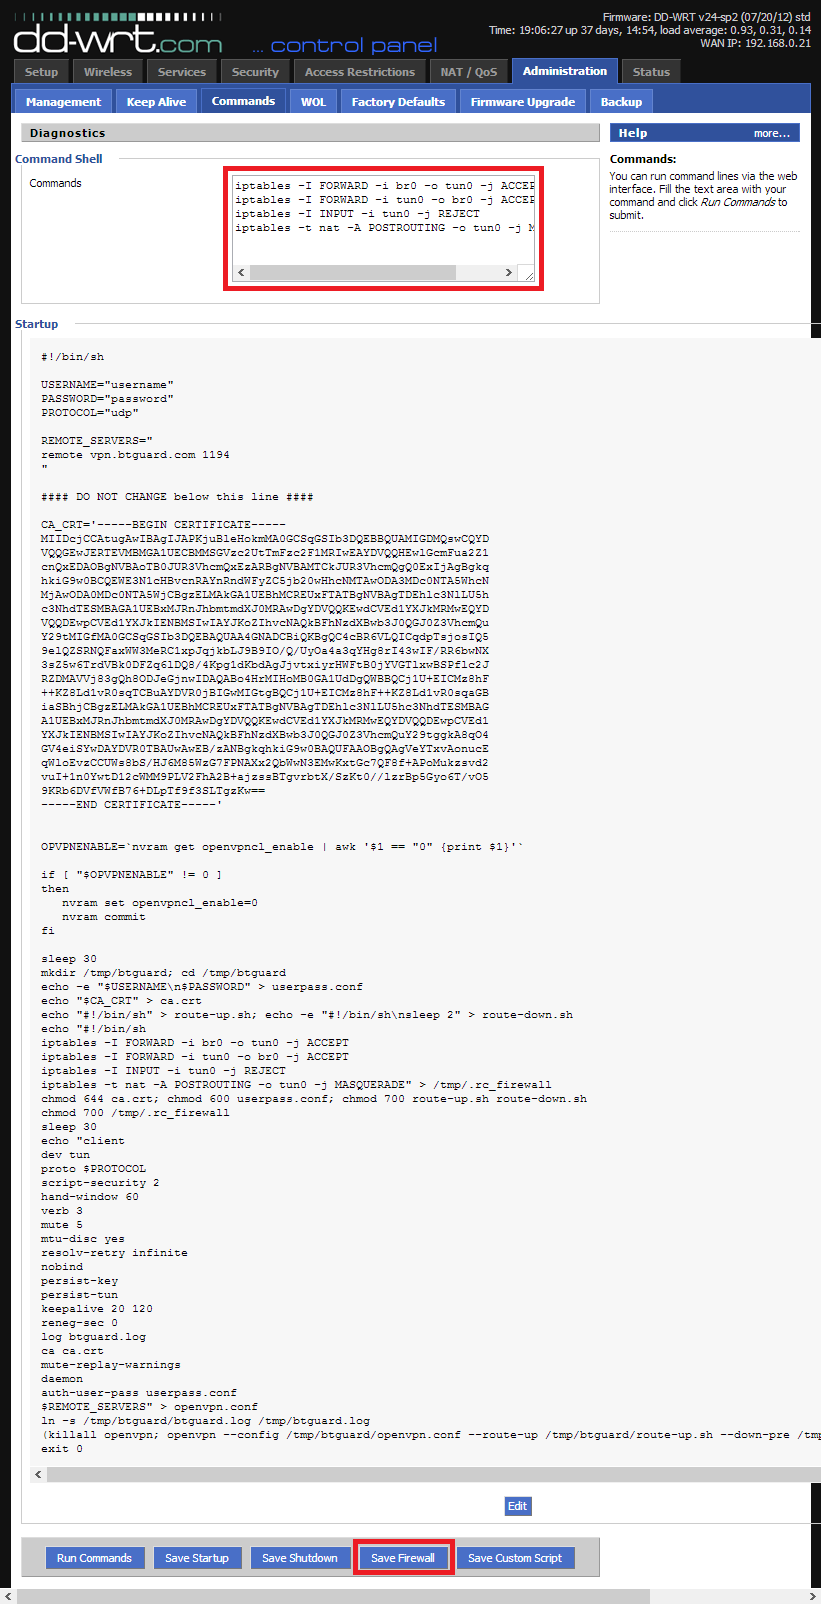
6. Copy the whole content of the ddwrt_firewall.txt file in the Command Shell.
7. Click on Save Firewall
- ddwrt_firewall.txt (Click below to select all)
8. Now click on the Management tab, go to the bottom of the page and click on Reboot Router.
Setup Complete!
The router will reboot and it will take a couple minutes to finish setting everything up.

Setup Instructions Method 2
1. Connect to http://192.168.1.1/
2. Click on Services > VPN.
3. Enable OpenVPN Clientand fill in the following:
Server IP/Name: vpn.btguard.com
Port: 1194
Tunnel Device: TUN
Tunnel Protocol: UDP (switch to TCP if UDP doesn't work)
Encryption Cipher: AES-256-CBC
Hash Algorithm: SHA512
Leave nsCertType verification unchecked.
Advanced Options: Enable
TLS Cipher: None
LZO Compression: Disabled
NAT: Enable
Firewall Protection: Disable
Tunnel MTU setting: 1500
Tunnel UDP MSS-Fix: Disable
Additional Config:
auth-user-pass /tmp/openvpncl/user.conf
persist-key
persist-tun
CA Cert:
(Click below to select all)
4. Hit Save.
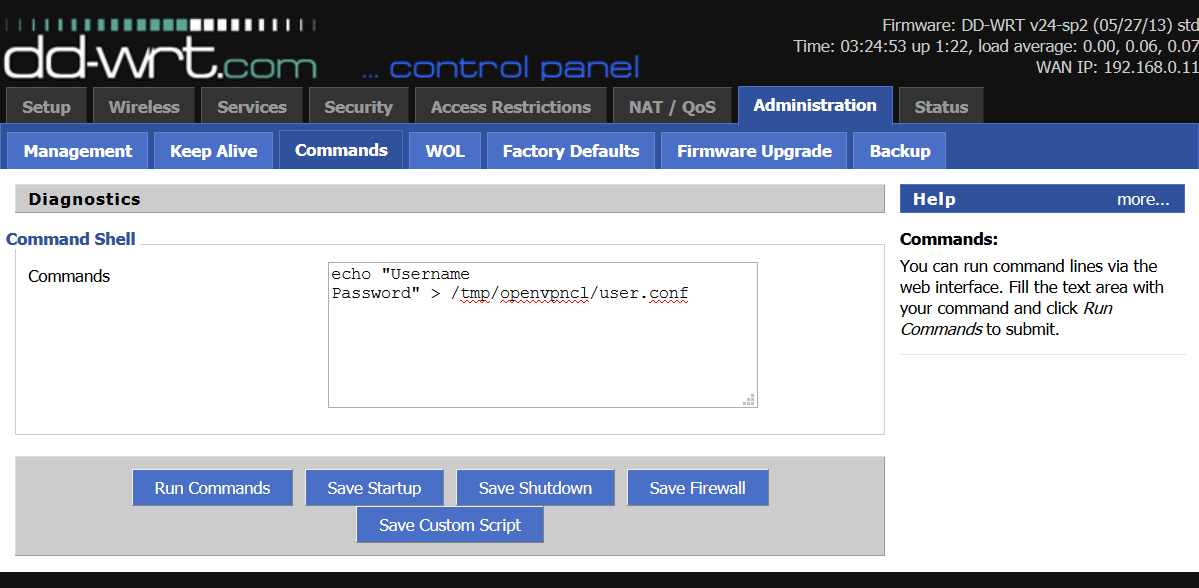
5. Click on Administration > Commands.
6. Copy the following in the Commands window.
Replace Username and Password with yours.
Both username and password are case sensitive. Make sure not to add/forget Capital Letters.
7. Click on Save Startup.
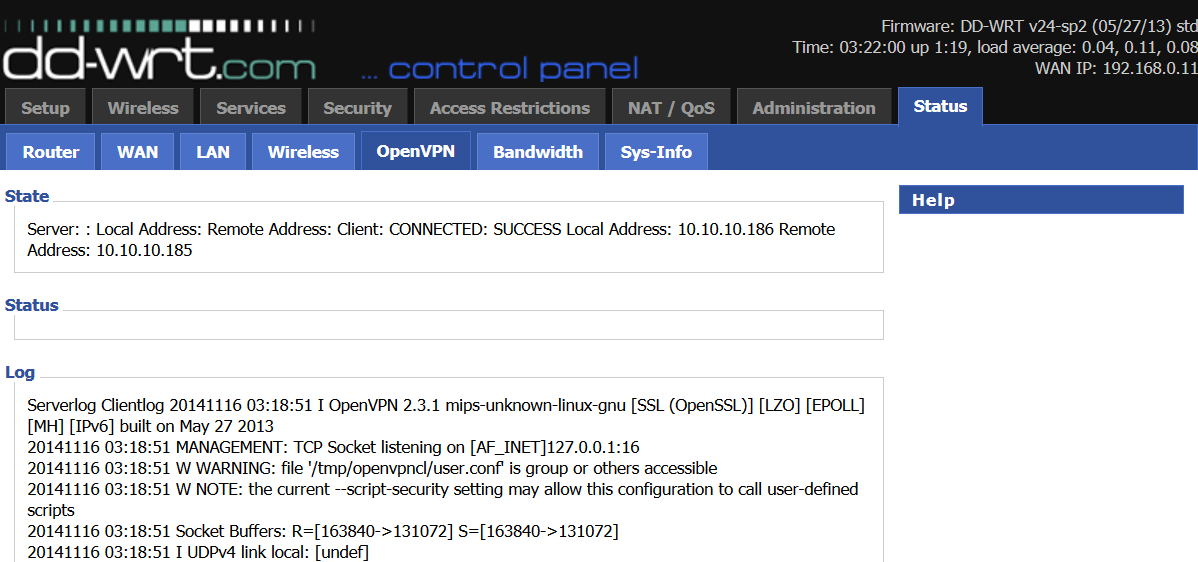
8. Now click on the Management tab, go to the bottom of the page and click on Reboot Router.
The router will reboot and it will take a couple minutes to finish setting everything up.
9. Click on Status > OpenVPN to check if you're connected.