Difference between revisions of "TTorrent"
From BTGuard Wiki
(Created page with "<div class="wrapper"> <div class="wrapleft"> <div class="left"> <span class="plainlinks">[https://wiki.btguard.com/ttorrent_1.png https://wiki.btguard.com/images/ttorre...") |
|||
| (2 intermediate revisions by the same user not shown) | |||
| Line 1: | Line 1: | ||
| − | <div class=" | + | <div class="wrapper4"> |
| − | <div class=" | + | <div class="wrapleft4"> |
| − | <div class=" | + | <div class="left4"> |
<span class="plainlinks">[https://wiki.btguard.com/ttorrent_1.png https://wiki.btguard.com/images/ttorrent_1.png]</span> | <span class="plainlinks">[https://wiki.btguard.com/ttorrent_1.png https://wiki.btguard.com/images/ttorrent_1.png]</span> | ||
</div> | </div> | ||
</div> | </div> | ||
| − | <div class=" | + | <div class="right4"> |
<p> | <p> | ||
== Setup Instructions == | == Setup Instructions == | ||
| − | [https://play.google.com/store/apps/details?id=com. | + | Download [https://play.google.com/store/apps/details?id=hu.tagsoft.ttorrent.lite tTorrent Lite] or [https://play.google.com/store/apps/details?id=hu.tagsoft.ttorrent.pro tTorrent Pro] from Google Play |
<br/><br/> | <br/><br/> | ||
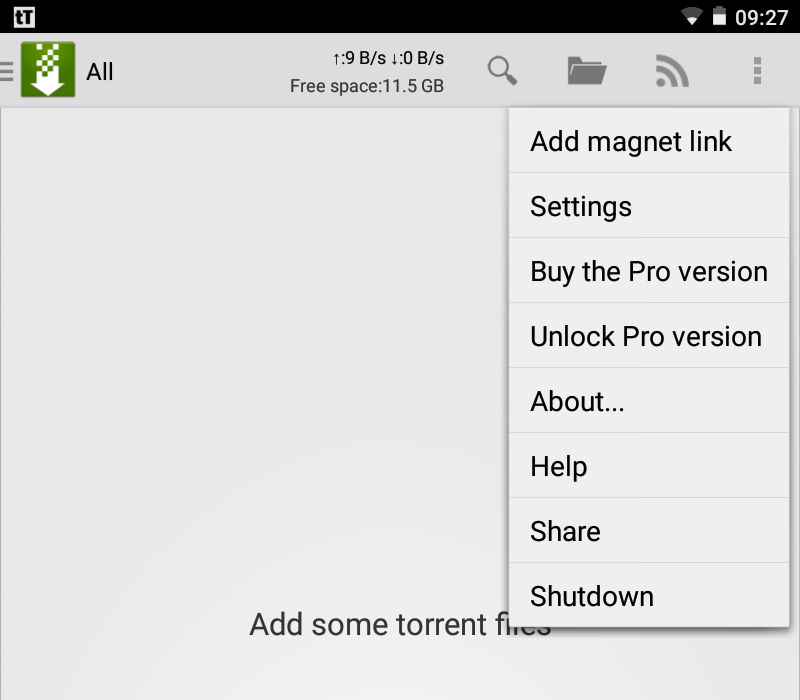
| − | 1. Open | + | 1. Open tTorrent and go to '''Settings''' |
<br/> | <br/> | ||
</p> | </p> | ||
| Line 18: | Line 18: | ||
| − | <div class=" | + | <div class="wrapper4"> |
| − | <div class=" | + | <div class="wrapleft4"> |
| − | <div class=" | + | <div class="left4"> |
<span class="plainlinks">[https://wiki.btguard.com/ttorrent_2.png https://wiki.btguard.com/images/ttorrent_2.png]</span> | <span class="plainlinks">[https://wiki.btguard.com/ttorrent_2.png https://wiki.btguard.com/images/ttorrent_2.png]</span> | ||
</div> | </div> | ||
</div> | </div> | ||
| − | <div class=" | + | <div class="right4"> |
<p> | <p> | ||
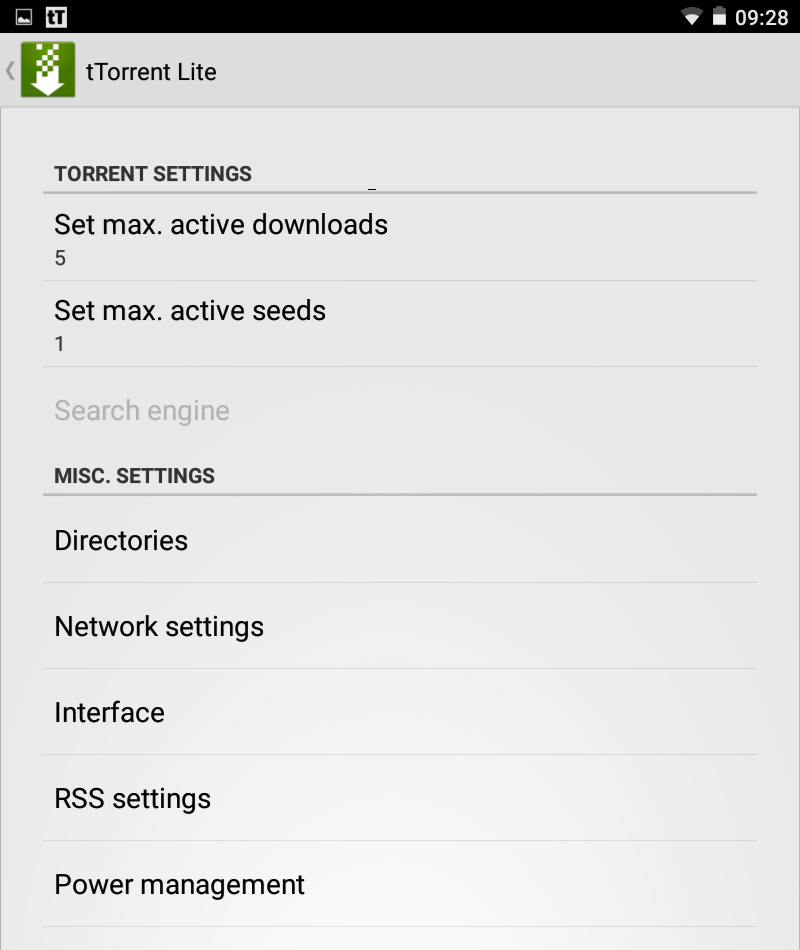
| − | 2. Tap on '''Network''' | + | 2. Tap on '''Network settings''' |
<br/> | <br/> | ||
</p> | </p> | ||
| Line 34: | Line 34: | ||
| − | <div class=" | + | <div class="wrapper4"> |
| − | <div class=" | + | <div class="wrapleft4"> |
| − | <div class=" | + | <div class="left4"> |
<span class="plainlinks">[https://wiki.btguard.com/ttorrent_3.png https://wiki.btguard.com/images/ttorrent_3.png]</span> | <span class="plainlinks">[https://wiki.btguard.com/ttorrent_3.png https://wiki.btguard.com/images/ttorrent_3.png]</span> | ||
</div> | </div> | ||
</div> | </div> | ||
| − | <div class=" | + | <div class="right4"> |
<p> | <p> | ||
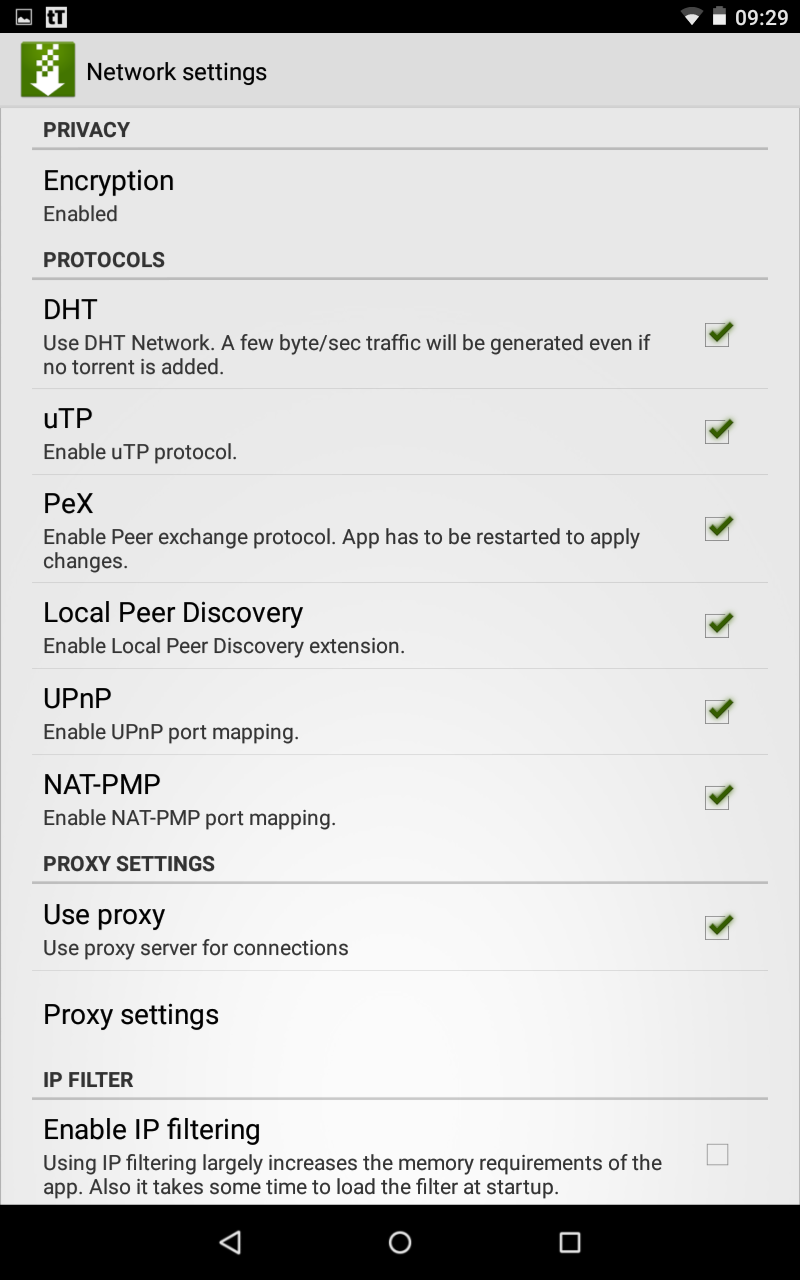
| − | 3. Enable ''' | + | 3. Enable '''Use proxy'''<br/> |
<br/> | <br/> | ||
| − | 4. | + | 4. Then go to '''Proxy settings''' |
<br/> | <br/> | ||
</p> | </p> | ||
| Line 53: | Line 53: | ||
| − | <div class=" | + | <div class="wrapper4"> |
| − | <div class=" | + | <div class="wrapleft4"> |
| − | <div class=" | + | <div class="left4"> |
<span class="plainlinks">[https://wiki.btguard.com/ttorrent_4.png https://wiki.btguard.com/images/ttorrent_4.png]</span> | <span class="plainlinks">[https://wiki.btguard.com/ttorrent_4.png https://wiki.btguard.com/images/ttorrent_4.png]</span> | ||
</div> | </div> | ||
</div> | </div> | ||
| − | <div class=" | + | <div class="right4"> |
<p> | <p> | ||
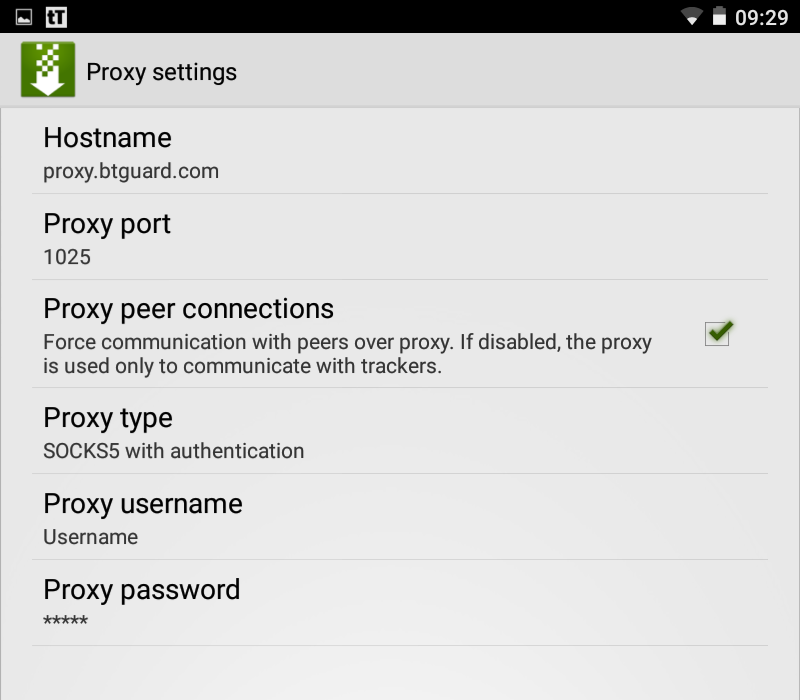
5. Fill in the following information:<br/> | 5. Fill in the following information:<br/> | ||
<br/> | <br/> | ||
| − | + | Hostname: '''proxy.btguard.com'''<br/> | |
| − | + | Proxy port: '''1025'''<br/> | |
| − | + | Checkmark: '''Proxy peer connections'''<br/> | |
| − | Checkmark: ''' | + | Proxy Type: '''SOCKS5 with Authentication'''<br/> |
| − | <br/> | + | Fill in your Username and Password.<br/> |
| − | Fill in your Username and Password | + | ''Both username and password are case sensitive. Make sure not to add/forget Capital Letters.'' <br/> |
<br/> | <br/> | ||
<br/> | <br/> | ||
Latest revision as of 16:00, 25 November 2014
Setup Instructions
Download tTorrent Lite or tTorrent Pro from Google Play
1. Open tTorrent and go to Settings
5. Fill in the following information:
Hostname: proxy.btguard.com
Proxy port: 1025
Checkmark: Proxy peer connections
Proxy Type: SOCKS5 with Authentication
Fill in your Username and Password.
Both username and password are case sensitive. Make sure not to add/forget Capital Letters.
SPEED TEST TORRENT
This is a very fast torrent that will allow you to perform an accurate speed test.
TRACKING TORRENT
This torrent will allow you to confirm your Torrent IP has been changed.
Full instructions here: Check My Torrent IP


