Difference between revisions of "PPTP iOS8"
From BTGuard Wiki
| Line 1: | Line 1: | ||
| + | <div class="wrapper"> | ||
| + | <div class="errorx" style=margin-top:40px> | ||
| + | <p> | ||
| + | ''' For iOS 10 users: PPTP is NOT supported anymore ''' <br/> | ||
| + | If you have just upgraded to iOS 10, your previous VPN connection will not work.<br/><br/> | ||
| + | Please use the OpenVPN protocol:<br/> | ||
| + | [[OpenVPN_iOS|Click here for instructions for iOS users.]] | ||
| + | |||
| + | <br/> | ||
| + | </p> | ||
| + | </div> | ||
| + | </div> | ||
| + | |||
| + | |||
| + | |||
<div class="wrapper3"> | <div class="wrapper3"> | ||
<div class="wrapleft3"> | <div class="wrapleft3"> | ||
Revision as of 11:44, 21 October 2016
For iOS 10 users: PPTP is NOT supported anymore
If you have just upgraded to iOS 10, your previous VPN connection will not work.
Please use the OpenVPN protocol:
Click here for instructions for iOS users.
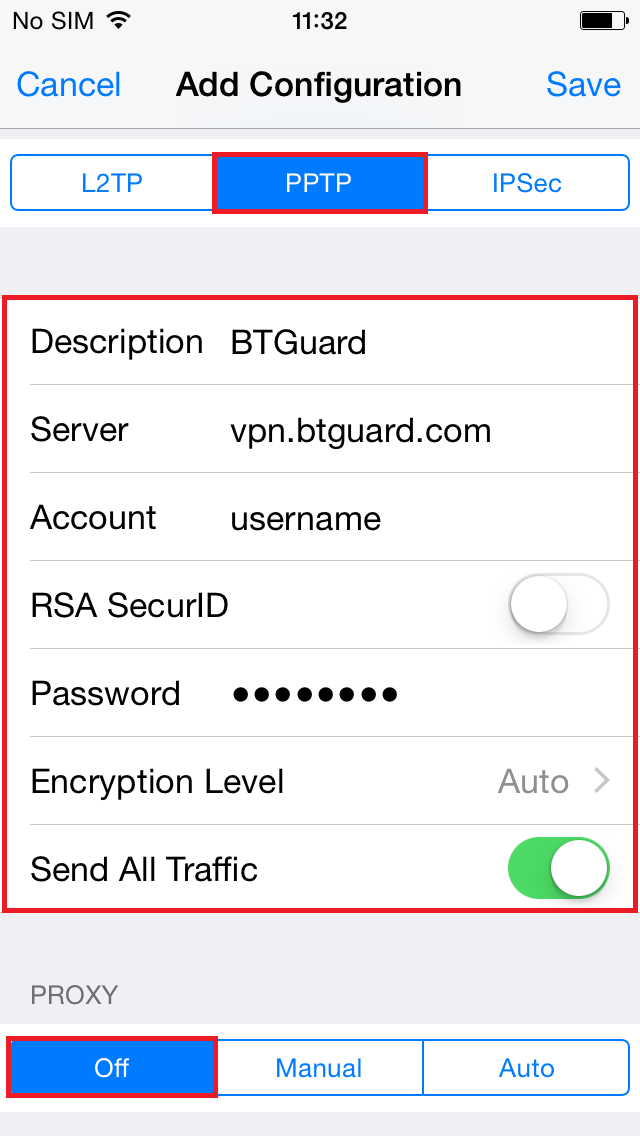
4. Select PPTP
5. In the box below PPTP, enter the following information:
Description: BTGuard
Server: vpn.btguard.com
Optional: To manually select your server location, please use ca.vpn.btguard.com for Canada or eu.vpn.btguard.com for Europe or sg.vpn.btguard.com for Singapore.
Account: Your username
RSA SecurID: OFF
Password: Your Password
Encryption Level: Auto
Send All Traffic: ON
Both username and password are case sensitive. Make sure not to add/forget Capital Letters.
6. Hit Save
Setup Complete!
