Difference between revisions of "OpenVPN Tomato"
From BTGuard Wiki
(Created page with "<div class="wrapper"> <div class="wrapleftnocenter"> <div class="left"> <div class="errorx"> <p> ''' PLEASE READ THROUGH THIS WHOLE ARTICLE!''' <br/> You risk br...") |
|||
| Line 1: | Line 1: | ||
| − | |||
| − | |||
| − | |||
| − | |||
| − | |||
| − | |||
| − | |||
| − | |||
| − | |||
| − | |||
| − | |||
| − | |||
| − | |||
| − | |||
| − | |||
| − | |||
| − | |||
| − | |||
| − | |||
| − | |||
| − | |||
| − | |||
| − | |||
| − | |||
| − | |||
| − | |||
| − | |||
| − | |||
| − | |||
| − | |||
| − | |||
| − | |||
| − | |||
| − | |||
| − | |||
| − | |||
| − | |||
| − | |||
| − | |||
| − | |||
| − | |||
| − | |||
| − | |||
| − | |||
| − | |||
| − | |||
| − | |||
| − | |||
| − | |||
| − | |||
| − | |||
| − | |||
| − | |||
| − | |||
| − | |||
| − | |||
| − | |||
| − | |||
| − | |||
| − | |||
| − | |||
<div class="wrapper"> | <div class="wrapper"> | ||
<div class="wrapleft"> | <div class="wrapleft"> | ||
<div class="left"> | <div class="left"> | ||
| − | <span class="plainlinks">[https://wiki.btguard.com/images/ | + | <span class="plainlinks">[https://wiki.btguard.com/images/openvpn_tomato_1.png https://wiki.btguard.com/images/openvpn_tomato_1.png]</span> |
</div> | </div> | ||
</div> | </div> | ||
| Line 69: | Line 8: | ||
<p> | <p> | ||
== Setup Instructions == | == Setup Instructions == | ||
| − | + | 1. Connect to http://192.168.1.1/<br/> | |
| + | 2. Click on '''VPN Tunneling''' then '''OpenVPN Client'''.<br/> | ||
| + | 3. Fill in the following:<br/> | ||
<br/> | <br/> | ||
| + | Checkmark '''Start with WAN'''<br/> | ||
| + | Interface Type: '''TUN'''<br/> | ||
| + | Protocol: '''UDP''' (''switch to TCP if UDP doesn't work'')<br/> | ||
| + | Server Address: '''vpn.btguard.com''', Port: '''1194'''<br/> | ||
| + | Firewall: '''Automatic'''<br/> | ||
| + | Authorization Mode: '''TLS'''<br/> | ||
| + | Checkmark '''Username/Password Authentication'''<br/> | ||
| + | Username:<br/> | ||
| + | Password:<br/> | ||
''Both username and password are case sensitive. Make sure not to add/forget Capital Letters.'' <br/> | ''Both username and password are case sensitive. Make sure not to add/forget Capital Letters.'' <br/> | ||
| + | Leave '''Username Authen. Only''' unchecked.<br/> | ||
| + | Extra HMAC authorization (tls-auth): '''Disabled'''<br/> | ||
| + | Checkmark '''Create NAT on tunnel'''<br/> | ||
| + | |||
| + | <br/> | ||
<br/> | <br/> | ||
| − | + | 4. Hit '''Save''' then '''Start Now''' to connect. | |
</p> | </p> | ||
</div> | </div> | ||
</div> | </div> | ||
Revision as of 13:41, 17 November 2014
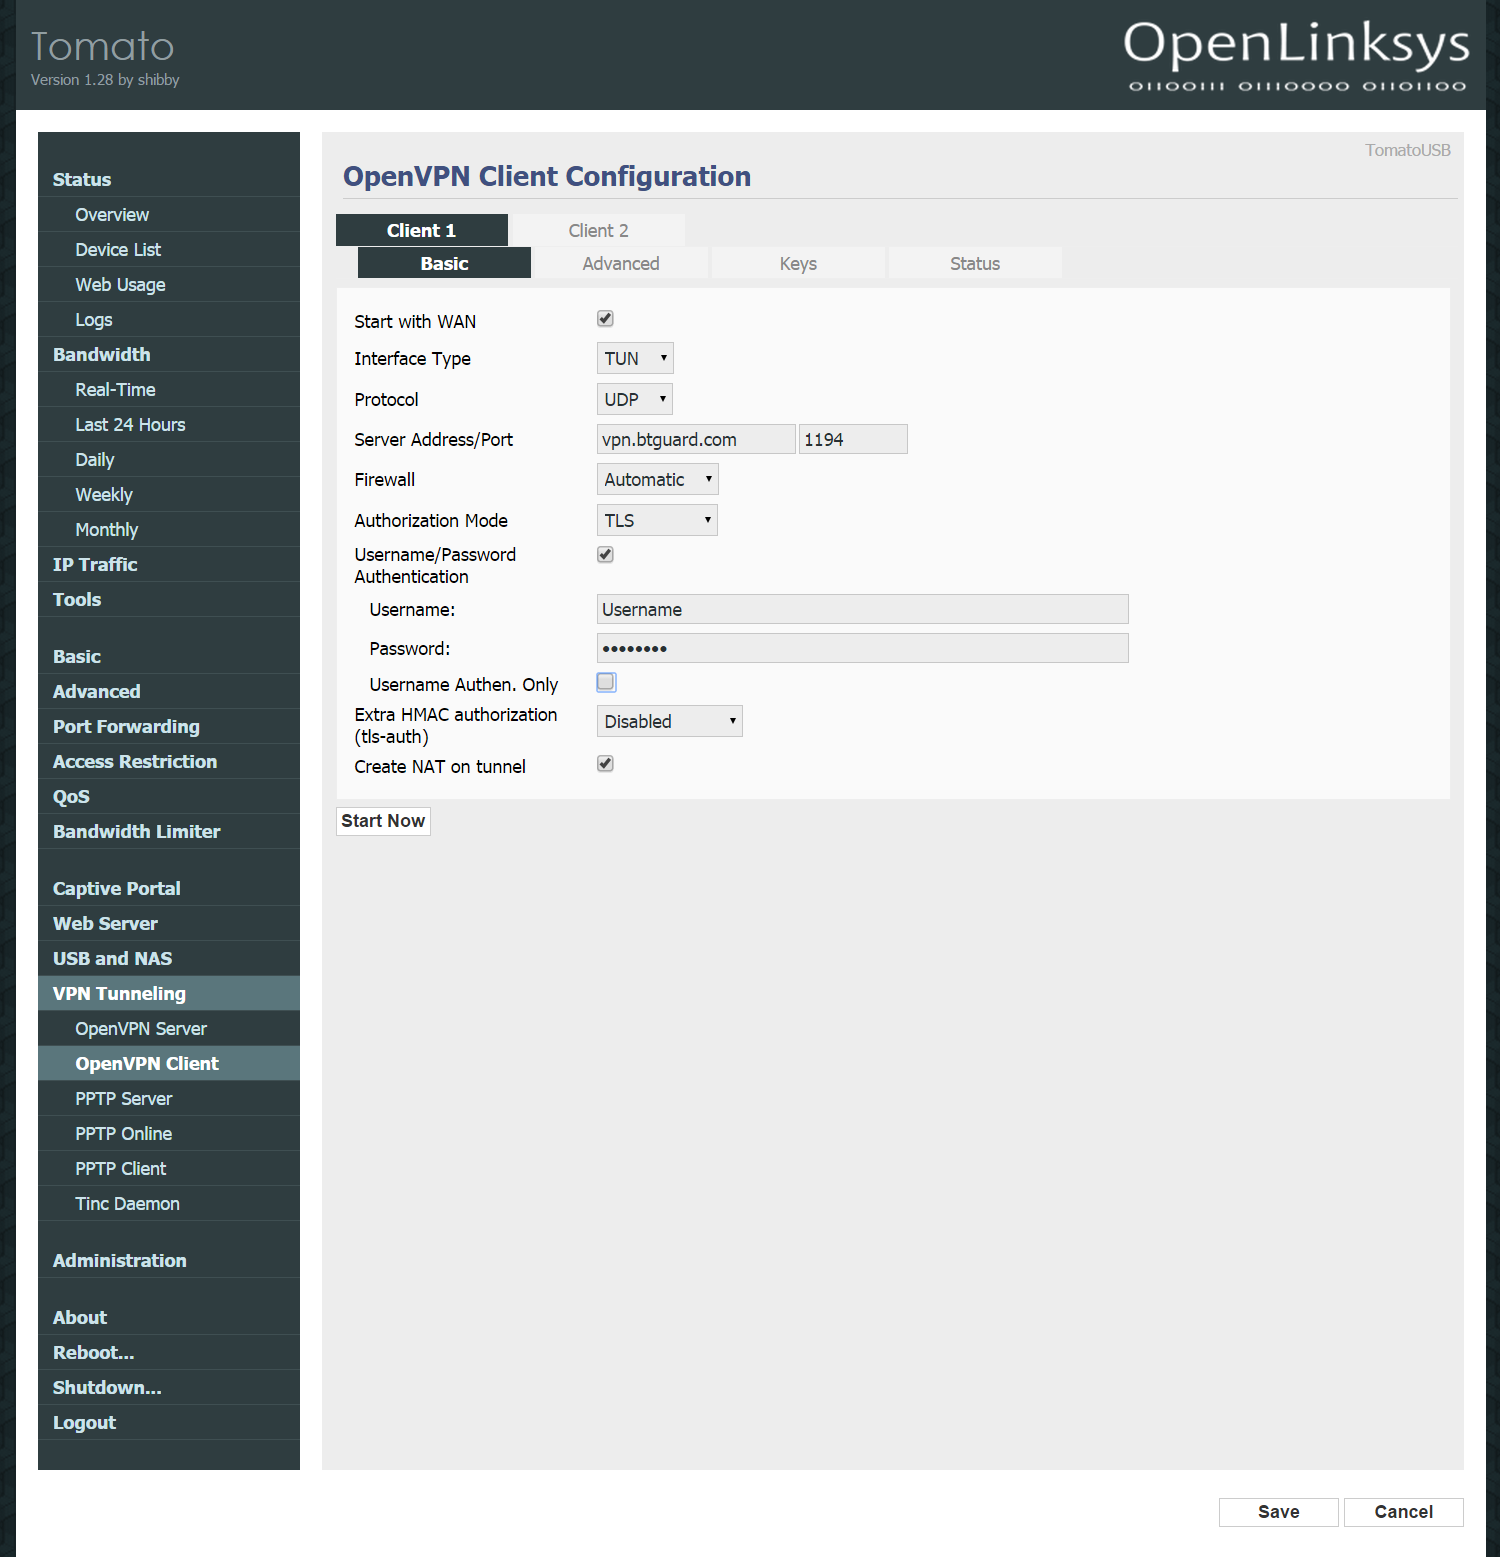
Setup Instructions
1. Connect to http://192.168.1.1/
2. Click on VPN Tunneling then OpenVPN Client.
3. Fill in the following:
Checkmark Start with WAN
Interface Type: TUN
Protocol: UDP (switch to TCP if UDP doesn't work)
Server Address: vpn.btguard.com, Port: 1194
Firewall: Automatic
Authorization Mode: TLS
Checkmark Username/Password Authentication
Username:
Password:
Both username and password are case sensitive. Make sure not to add/forget Capital Letters.
Leave Username Authen. Only unchecked.
Extra HMAC authorization (tls-auth): Disabled
Checkmark Create NAT on tunnel
4. Hit Save then Start Now to connect.
